
CLI Basics
Introduction to Command Line
Section titled “Introduction to Command Line”- Use the command line to perform operations in Linux.
- Search for files.
- Create and manage files.
- Install and update software.
Command-Line Mode Options
Section titled “Command-Line Mode Options”The command line interface provides the following advantages:
- No GUI overhead is incurred.
- Virtually any and every task can be accomplished while sitting at the command line.
- You can implement scripts for often-used (or easy-to-forget) tasks and series of procedures.
- You can sign into remote machines anywhere on the Internet.
- You can initiate graphical applications directly from the command line instead of hunting through menus.
- While graphical tools may vary among Linux distributions, the command line interface does not.
Using a Text Terminal on the Graphical Desktop
Section titled “Using a Text Terminal on the Graphical Desktop”-
A terminal emulator program emulates (simulates) a standalone terminal within a window on the desktop.
-
By default, on GNOME desktop environments, the gnome-terminal application is used to emulate a text-mode terminal in a window. Other available terminal programs include:
The Command Line
Section titled “The Command Line”-
Most input lines entered at the shell prompt have 3 basic elements:
- Command
- Options
- Arguments
-
The command is the name of the program you are executing. It may be followed by one or more options (or switches) that modify what the command may do.
-
Options usually start with one or two dashes, for example,
-por--print, in order to differentiate them from arguments, which represent what the command operates on.
However, plenty of commands have no options, no arguments, or neither. In addition, other elements (such as setting environment variables) can also appear on the command line when launching a task.
sudoallows users to run programs using the security privileges of another user, generally root (superuser).
Steps for Setting Up and Running sudo (If Sudo is not enabled)
- Make modifications as the administrative or superuser, root. While
sudowill become the preferred method of doing this, we do not have it set up yet, so we will usesuinstead. - At the command line prompt, type
suand press Enter. You will then be prompted for the root password, so enter it and press Enter. - Now, you will notice that nothing is printed; this is so others cannot see the password on the screen. You should end up with a different looking prompt, often ending with
#. For example:
suPassword:#- Now, you need to create a configuration file to enable your user account to use
sudo. Typically, this file is created in the/etc/sudoers.d/directory with the name of the file the same as your username.- For example, for this demo, let’s say your username is student. After doing step 1, you would then create the configuration file for student by doing this:
# echo "student ALL=(ALL) ALL" > /etc/sudoers.d/student- Finally, some Linux distributions will complain if you do not also change permissions on the file by doing:
# chmod 440 /etc/sudoers.d/student- When using
sudo, by default you will be prompted to give a password (your own user password) at least the first time you do it within a specified time interval. - It is possible (though very insecure) to configure
sudoto not require a password or change the time window in which the password does not have to be repeated with everysudocommand.
Switching Between the GUI and the Command Line
Section titled “Switching Between the GUI and the Command Line”- The customizable nature of Linux allows you to drop the graphical interface (temporarily or permanently) or to start it up after the system has been running.
- Linux production servers are usually installed without the GUI, and even if it is installed, usually do not launch it during system startup. Removing the graphical interface from a production server can be very helpful in maintaining a lean system, which can be easier to support and keep secure.
Virtual Terminals
Section titled “Virtual Terminals”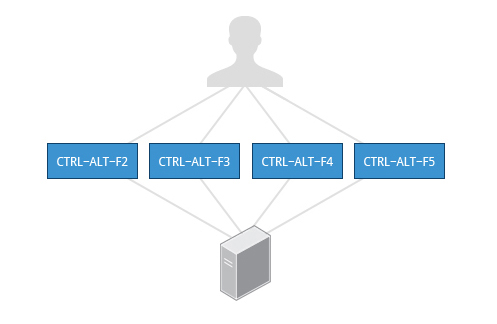
- Virtual Terminals (VT) are console sessions that use the entire display and keyboard outside of a graphical environment. Such terminals are considered “virtual” because, although there can be multiple active terminals, only one terminal remains visible at a time.
- A VT is not quite the same as a command line terminal window; you can have many of those visible at once on a graphical desktop.
- One virtual terminal (usually number one or seven) is reserved for the graphical environment, and text logins are enabled on the unused VT’s.
Ubuntu uses VT 7, but CentOS/RHEL and openSUSE use VT 1 for the graphical display.
- An example of a situation where using VT is helpful is when you run into problems with the graphical desktop. In this situation, you can switch to one of the text VT’s and troubleshoot.
- To switch between VT’s, press
CTRL-ALT-function keyfor the VT.- For example, press
CTRL-ALT-F6for VT 6. Actually, you only have to press theALT-F6key combination if you are in a VT and want to switch to another VT.
- For example, press
Turning Off the Graphical Desktop
Section titled “Turning Off the Graphical Desktop”- Linux distributions can start and stop the graphical desktop in various ways. The exact method differs from distribution and among distribution versions.
- For the newer systemd-based distributions, the display manager is run as a service, you can stop the GUI desktop with the
systemctlutility and most distributions will also work with thetelinitcommand, as in:
sudo systemctl stop gdm#orsudo telinit 3#and restart it (after logging into the console) with:sudo systemctl start gdm#orsudo telinit 5On Ubuntu versions before 18.04 LTS, substitute lightdm for gdm.
Basic Operations
Section titled “Basic Operations”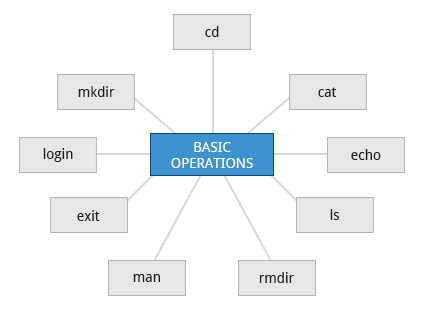
Logging In and Out
Section titled “Logging In and Out”- An available text terminal will prompt for a username (with the string login:) and password. When typing your password, nothing is displayed on the terminal (not even a
*****to indicate that you typed in something), to prevent others from seeing your password. After you have logged into the system, you can perform basic operations.
Rebooting and Shutting Down
Section titled “Rebooting and Shutting Down”- The preferred method to shut down or reboot the system is to use the
shutdowncommand. This sends a warning message, and then prevents further users from logging in. - The init process will then control shutting down or rebooting the system. It is important to always shut down properly; failure to do so can result in damage to the system and/or loss of data.
- The
haltandpoweroffcommands issueshutdown -hto halt the system; rebootissuesshutdown -rand causes the machine to reboot instead of just shutting down.- Both rebooting and shutting down from the command line requires superuser (root) access.
- When administering a multi-user system, you have the option of notifying all users prior to shutdown, as in:
sudo shutdown -h 10:00 "Shutting down for scheduled maintenance."Getting Help
Section titled “Getting Help”man command
Section titled “man command”man manNAME man - an interface to the system reference manuals
SYNOPSIS man [man options] [[section] page ...] ... man -k [apropos options] regexp ... man -K [man options] [section] term ... man -f [whatis options] page ... man -l [man options] file ... man -w|-W [man options] page ...
DESCRIPTION man is the system's manual pager. Each page argument given to man is normally the name of a program, utility or function. The manual page associated with each of these arguments is then found and displayed. A section, if provided, will direct man to look only in that section of the manual. The default action is to search in all of the available sections following a pre-defined order (see DEFAULTS), and to show only the first page found, even if page exists in several sections.
The table below shows the section numbers of the manual followed by the types of pages they contain.
1 Executable programs or shell commands 2 System calls (functions provided by the kernel) 3 Library calls (functions within program libraries) 4 Special files (usually found in /dev) 5 File formats and conventions, e.g. /etc/passwd 6 Games 7 Miscellaneous (including macro packages and conventions), e.g. man(7), groff(7), man-pages(7) 8 System administration commands (usually only for root) 9 Kernel routines [Non standard]How to check, what sections/pages we have available?
man -f lsls (1) - list directory contentswe see, ls has 1 page only.
Let’s use intro. This command in the introduction to Linux commands.
man -f introintro (1) - introduction to user commandsintro (2) - introduction to system callsintro (3) - introduction to library functionsintro (4) - introduction to special filesintro (5) - introduction to file formats and filesystemsintro (6) - introduction to gamesintro (7) - introduction to overview and miscellany sectionintro (8) - introduction to administration and privileged commandsshows us multiple sections available.
Let’s play with them, and please remember, if you wish to quit, press q.
man 1 introman 8 introTo quickly check what a command does
whatis lsls (1) - list directory contentsshows short description of the functionality.
The same is available with man:
man -f lsls (1)               - list directory contents
man -w ls #returns the location of the file from where the page is rendered/usr/share/man/man1/ls.1.gz
man -k ls #searches for the given command through all man pages, and returns all of them as output.
Advanced Shell Features
Section titled “Advanced Shell Features”Modifying the Command Line Prompt
Section titled “Modifying the Command Line Prompt”-
The
PS1variable is the character string that is displayed as the prompt on the command line. -
Most distributions set
PS1to a known default value, which is suitable in most cases. However, users may want custom information to show on the command line.-
For example, some system administrators require the user and the host system name to show up on the command line as in:
Terminal window student@c8 $
-
-
This could prove useful if you are working in multiple roles and want to be always reminded of who you are and what machine you are on. The prompt above could be implemented by setting the
PS1variable to:\u@\h \$- For example:
Terminal window $ echo $PS1$$ PS1="\u@\h \$ "student@c8 $ echo $PS1\u@\h \$student@c8 $ -
By convention, most systems are set up so that the root user has a pound sign (
#) as their prompt.
Standard File Streams
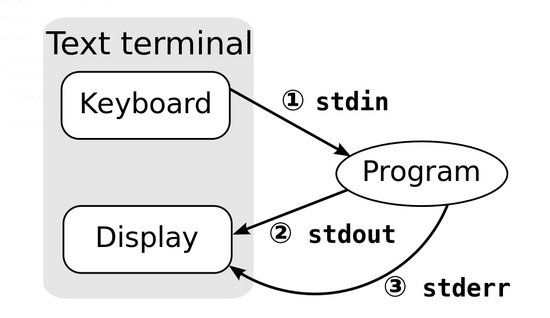
Section titled “Standard File Streams”When commands are executed, by default there are three standard file streams (or descriptors) always open for use:
- standard input (standard in or
stdin), - standard output (standard out or
stdout) and - standard error (or
stderr)
| Name | Symbolic Name | Value | Example |
|---|---|---|---|
| standard input | stdin | 0 | keyboard |
| standard output | stdout | 1 | terminal |
| standard error | stderr | 2 | terminal |
-
Usually,
stdinis your keyboard, andstdoutandstderrare printed on your terminal. -
stderris often redirected to an error logging file, whilestdinis supplied by directing input to come from a file or from the output of a previous command through a pipe. -
stdoutis also often redirected into a file. Sincestderris where error messages are written, usually nothing will go there. -
In Linux, all open files are represented internally by what are called file descriptors. Simply put, these are represented by numbers starting at zero.
stdinis file descriptor 0,stdoutis file descriptor 1, andstderris file descriptor 2.
-
Typically, if other files are opened in addition to these three, which are opened by default, they will start at file descriptor 3 and increase from there.
I/O Redirection
Section titled “I/O Redirection”-
Through the command shell, we can redirect the three standard file streams so that we can get input from either a file or another command, instead of from our keyboard, and we can write output and errors to files or use them to provide input for subsequent commands.
-
For example, if we have a program called
do_somethingthat reads fromstdinand writes tostdoutandstderr, we can change its input source by using the less-than sign (<) followed by the name of the file to be consumed for input data:Terminal window do_something < input-file
-
-
If you want to send the output to a file, use the greater-than sign (
>) as in:Terminal window do_something > output-file -
Because
stderris not the same asstdout, error messages will still be seen on the terminal windows in the above example. -
If you want to redirect
stderrto a separate file, you usestderr’s file descriptor number (2), the greater-than sign (>), followed by the name of the file you want to hold everything the running command writes tostderr:Terminal window do_something 2> error-file
-
A special shorthand notation can send anything written to file descriptor 2 (
stderr) to the same place as file descriptor 1 (stdout):2>&1.Terminal window do_something > all-output-file 2>&1# bash permits an easier syntax for the above:do_something >& all-output-file
-
The UNIX/Linux philosophy is to have many simple and short programs (or commands) cooperate together to produce quite complex results, rather than have one complex program with many possible options and modes of operation.
-
In order to accomplish this, extensive use of pipes is made. You can pipe the output of one command or program into another as its input.
-
In order to do this, we use the vertical-bar, pipe symbol (
|), between commands as in:Terminal window command1 | command2 | command3 -
The above represents what we often call a pipeline, and allows Linux to combine the actions of several commands into one. This is extraordinarily efficient because
command2andcommand3do not have to wait for the previous pipeline commands to complete before they can begin hacking at the data in their input streams; on multiple CPU or core systems, the available computing power is much better utilized and things get done quicker. -
Furthermore, there is no need to save output in (temporary) files between the stages in the pipeline, which saves disk space and reduces reading and writing from disk, which is often the slowest bottleneck in getting something done.