
Files & Directories
Navigating the File System
Section titled “Navigating the File System”Accessing Directories
Section titled “Accessing Directories”- When you first log into a system or open a terminal, the default directory should be your home directory. You can print the exact path of this by typing
echo $HOME. Many Linux distributions actually open new graphical terminals in$HOME/Desktop. The following commands are useful for directory navigation:
| Command | Result |
|---|---|
pwd | Displays the present working directory |
cd ~ or cd | Change to your home directory (shortcut name is ~ (tilde)) |
cd .. | Change to parent directory (..) |
cd - | Change to previous directory (- (minus)) |
Understanding Absolute and Relative Paths
Section titled “Understanding Absolute and Relative Paths”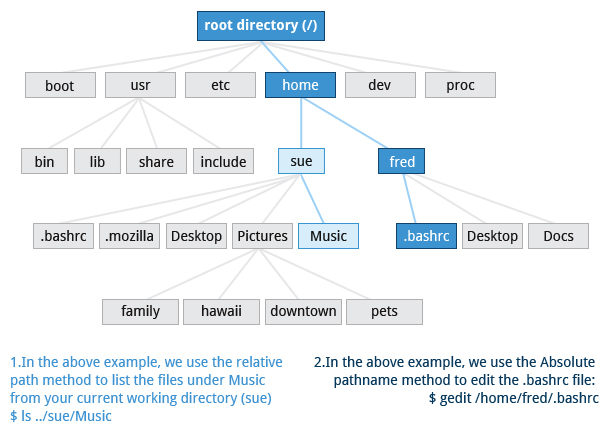
- For example, suppose you are currently working in your home directory and wish to move to the
/usr/bindirectory. The following two ways will bring you to the same directory from your home directory:- Absolute path name method
Terminal window cd /usr/bin - Relative path name method
Terminal window cd ../../usr/bin
- Absolute path name method
There are two ways to identify paths:
- Absolute pathname: An absolute path name begins with the root directory and follows the tree, branch by branch, until it reaches the desired directory or file. Absolute paths always start with
/. - Relative pathname: A relative path name starts from the present working directory. Relative paths never start with
/. - Multiple slashes (
/) between directories and files are allowed, but all but one slash between elements in the path name is ignored by the system.////usr//binis valid, but seen as/usr/binby the system. - Most of the time, it is most convenient to use relative paths, which require less typing. Usually, you take advantage of the shortcuts provided by:
.(present directory),..(parent directory) and~(your home directory).
Exploring the File System
Section titled “Exploring the File System”Traversing up and down the file system tree can get tedious. The tree command is a good way to get a bird’s-eye view of the file system tree. Use tree -d to view just the directories and to suppress listing file names.
| Command | Usage |
|---|---|
cd / | Changes your current directory to the root (/) directory (or path you supply) |
ls | List the contents of the present working directory |
ls –a | List all files, including hidden files and directories (those whose name start with .) |
tree | Displays a tree view of the file system |
List (ls)
Section titled “List (ls)”This is the list command. It allows us to list the content of the directory.
lsFile-01.txt file-01 notmyfile notmyfile2ls -latotal 100drwx------ 7 root root 4096 Jun 11 07:18 .drwxr-xr-x 19 root root 4096 Jun 8 05:40 ..-rw-r--r-- 1 root root 3208 Jun 8 05:40 .bashrcdrwx------ 2 root root 4096 Jun 8 05:36 .sshdrwxr-xr-x 2 root root 4096 Jun 8 05:40 .theia-rw-r--r-- 1 root root 42118 Jun 11 07:18 File-01.txt-rw-r--r-- 1 root root 0 Jun 11 07:18 file-01lrwxrwxrwx 1 root root 1 Jun 8 05:40 filesystem -> /-rw-r--r-- 1 testuser testuser 18 Jun 11 07:18 notmyfile-rw-r--r-- 1 otheruser otheruser 19 Jun 11 07:18 notmyfile2Sorting
Section titled “Sorting”All lists can be sorted. Linux allows us to list files using multiple sorting options.
ls command has some options built-in. By default ls sorts the files alphabetically.
What is timestamp?
- This is the numerical representation of the time. It is the number of seconds passed from
Unix epochwhich is midnight of 1st of January, 1970.
Example how it looks is visible below
$ date +%s1635797690$ dateMon 01 Nov 2021 08:14:52 PM UTC-
The first sort option will be
-t. This argument sorts files with the last modification time, newest files come first.Terminal window ls -lttotal 68-rw-r--r-- 1 root root 42118 Jun 11 07:18 File-01.txt-rw-r--r-- 1 root root 18 Jun 11 07:18 file-01.txt-rw-r--r-- 1 root root 0 Jun 11 07:18 file-02-rw-r--r-- 1 testuser testuser 18 Jun 11 07:18 notmyfile-rw-r--r-- 1 otheruser otheruser 19 Jun 11 07:18 notmyfile2drwxr-xr-x 2 root root 4096 Jun 11 07:18 testDirdrwxr-xr-x 3 root root 4096 Jun 11 07:18 testdir-rw-r--r-- 1 root root 0 Jun 11 07:18 file-01drwx------ 3 root root 4096 Jun 11 07:15 snaplrwxrwxrwx 1 root root 1 Jun 8 05:40 filesystem -> /
We use two arguments, to observe things better. We can specify exactly the modification time by adding u to the argument list.
-
But please remember, in order to print this information properly you have to use
twith another argument (uin this case).Terminal window ls -ltutotal 68-rw-r--r-- 1 root root 0 Jun 11 07:18 file-02-rw-r--r-- 1 testuser testuser 18 Jun 11 07:18 notmyfile-rw-r--r-- 1 otheruser otheruser 19 Jun 11 07:18 notmyfile2-rw-r--r-- 1 root root 42118 Jun 11 07:18 File-01.txt-rw-r--r-- 1 root root 0 Jun 11 07:18 file-01-rw-r--r-- 1 root root 18 Jun 11 07:18 file-01.txtdrwxr-xr-x 2 root root 4096 Jun 11 07:18 testDirdrwxr-xr-x 3 root root 4096 Jun 11 07:18 testdirlrwxrwxrwx 1 root root 1 Jun 11 07:15 filesystem -> /drwx------ 3 root root 4096 Jun 11 07:15 snap -
List and order it by
ctime- metadata change.Terminal window ls -ltctotal 68-rw-r--r-- 1 root root 42118 Jun 11 07:18 File-01.txt-rw-r--r-- 1 root root 18 Jun 11 07:18 file-01.txt-rw-r--r-- 1 root root 0 Jun 11 07:18 file-02-rw-r--r-- 1 testuser testuser 18 Jun 11 07:18 notmyfile-rw-r--r-- 1 otheruser otheruser 19 Jun 11 07:18 notmyfile2drwxr-xr-x 2 root root 4096 Jun 11 07:18 testDirdrwxr-xr-x 3 root root 4096 Jun 11 07:18 testdir-rw-r--r-- 1 root root 0 Jun 11 07:18 file-01drwx------ 3 root root 4096 Jun 11 07:15 snaplrwxrwxrwx 1 root root 1 Jun 8 05:40 filesystem -> /
Execute these commands and carefully observe the output
touch theNewestFile #(this creates a new file)
ls -ltutotal 68-rw-r--r-- 1 root      root          0 Jun 11 07:43 theNewestFile-rw-r--r-- 1 root      root          0 Jun 11 07:18 file-02-rw-r--r-- 1 testuser  testuser     18 Jun 11 07:18 notmyfile-rw-r--r-- 1 otheruser otheruser    19 Jun 11 07:18 notmyfile2-rw-r--r-- 1 root      root      42118 Jun 11 07:18 File-01.txt-rw-r--r-- 1 root      root          0 Jun 11 07:18 file-01-rw-r--r-- 1 root      root         18 Jun 11 07:18 file-01.txtdrwxr-xr-x 2 root      root       4096 Jun 11 07:18 testDirdrwxr-xr-x 3 root      root       4096 Jun 11 07:18 testdirlrwxrwxrwx 1 root      root          1 Jun 11 07:15 filesystem -> /drwx------ 3 root      root       4096 Jun 11 07:15 snap
ls -ltctotal 68-rw-r--r-- 1 root      root          0 Jun 11 07:43 theNewestFile-rw-r--r-- 1 root      root      42118 Jun 11 07:18 File-01.txt-rw-r--r-- 1 root      root         18 Jun 11 07:18 file-01.txt-rw-r--r-- 1 root      root          0 Jun 11 07:18 file-02-rw-r--r-- 1 testuser  testuser     18 Jun 11 07:18 notmyfile-rw-r--r-- 1 otheruser otheruser    19 Jun 11 07:18 notmyfile2drwxr-xr-x 2 root      root       4096 Jun 11 07:18 testDirdrwxr-xr-x 3 root      root       4096 Jun 11 07:18 testdir-rw-r--r-- 1 root      root          0 Jun 11 07:18 file-01drwx------ 3 root      root       4096 Jun 11 07:15 snaplrwxrwxrwx 1 root      root          1 Jun  8 05:40 filesystem -> /
echo "hello world!" > file-02 #(this will add something to the file)
ls -ltutotal 72-rw-r--r-- 1 root      root          0 Jun 11 07:43 theNewestFile-rw-r--r-- 1 root      root         13 Jun 11 07:18 file-02-rw-r--r-- 1 testuser  testuser     18 Jun 11 07:18 notmyfile-rw-r--r-- 1 otheruser otheruser    19 Jun 11 07:18 notmyfile2-rw-r--r-- 1 root      root      42118 Jun 11 07:18 File-01.txt-rw-r--r-- 1 root      root          0 Jun 11 07:18 file-01-rw-r--r-- 1 root      root         18 Jun 11 07:18 file-01.txtdrwxr-xr-x 2 root      root       4096 Jun 11 07:18 testDirdrwxr-xr-x 3 root      root       4096 Jun 11 07:18 testdirlrwxrwxrwx 1 root      root          1 Jun 11 07:15 filesystem -> /drwx------ 3 root      root       4096 Jun 11 07:15 snap
ls -ltctotal 72-rw-r--r-- 1 root      root         13 Jun 11 07:45 file-02-rw-r--r-- 1 root      root          0 Jun 11 07:43 theNewestFile-rw-r--r-- 1 root      root      42118 Jun 11 07:18 File-01.txt-rw-r--r-- 1 root      root         18 Jun 11 07:18 file-01.txt-rw-r--r-- 1 testuser  testuser     18 Jun 11 07:18 notmyfile-rw-r--r-- 1 otheruser otheruser    19 Jun 11 07:18 notmyfile2drwxr-xr-x 2 root      root       4096 Jun 11 07:18 testDirdrwxr-xr-x 3 root      root       4096 Jun 11 07:18 testdir-rw-r--r-- 1 root      root          0 Jun 11 07:18 file-01drwx------ 3 root      root       4096 Jun 11 07:15 snaplrwxrwxrwx 1 root      root          1 Jun  8 05:40 filesystem -> /
chmod 444 file-01 #(this will change the permissions of the file)
ls -ltutotal 72-rw-r--r-- 1 root      root          0 Jun 11 07:43 theNewestFile-rw-r--r-- 1 root      root         13 Jun 11 07:18 file-02-rw-r--r-- 1 testuser  testuser     18 Jun 11 07:18 notmyfile-rw-r--r-- 1 otheruser otheruser    19 Jun 11 07:18 notmyfile2-rw-r--r-- 1 root      root      42118 Jun 11 07:18 File-01.txt-r--r--r-- 1 root      root          0 Jun 11 07:18 file-01-rw-r--r-- 1 root      root         18 Jun 11 07:18 file-01.txtdrwxr-xr-x 2 root      root       4096 Jun 11 07:18 testDirdrwxr-xr-x 3 root      root       4096 Jun 11 07:18 testdirlrwxrwxrwx 1 root      root          1 Jun 11 07:15 filesystem -> /drwx------ 3 root      root       4096 Jun 11 07:15 snap
ls -ltctotal 72-r--r--r-- 1 root      root          0 Jun 11 07:48 file-01-rw-r--r-- 1 root      root         13 Jun 11 07:45 file-02-rw-r--r-- 1 root      root          0 Jun 11 07:43 theNewestFile-rw-r--r-- 1 root      root      42118 Jun 11 07:18 File-01.txt-rw-r--r-- 1 root      root         18 Jun 11 07:18 file-01.txt-rw-r--r-- 1 testuser  testuser     18 Jun 11 07:18 notmyfile-rw-r--r-- 1 otheruser otheruser    19 Jun 11 07:18 notmyfile2drwxr-xr-x 2 root      root       4096 Jun 11 07:18 testDirdrwxr-xr-x 3 root      root       4096 Jun 11 07:18 testdirdrwx------ 3 root      root       4096 Jun 11 07:15 snaplrwxrwxrwx 1 root      root          1 Jun  8 05:40 filesystem -> /
The format contains a few columns. Let’s try to understand them:
- permissions: Kind of permission the object has.
- number of hard links: By default every object has 1 hard link.
- Owner: The owner of the object. It doesn’t mean who created it, but who owns it at this moment.
- Group: Owner belongs to the group (of users). This information is here too. This means that our ‘groupmates’ have specific access to the file.
- Size: File size in bytes.
- date and time of last modification of the object.
- file name.
Owner and group: Names of the users and groups → System keeps and translates them from numerical representation. These are UID for user identifier and GID for group identifier. We can list this information in numeric way, by entering the ls -n command. This works like ls -l, but it changes the user-friendly names to UIDs and GIDs.
ls -ntotal 68-rw-r--r-- 1 0 0 42118 Jun 11 07:18 File-01.txt-rw-r--r-- 1 0 0 0 Jun 11 07:18 file-01-rw-r--r-- 1 0 0 18 Jun 11 07:18 file-01.txt-rw-r--r-- 1 0 0 0 Jun 11 07:18 file-02lrwxrwxrwx 1 0 0 1 Jun 8 05:40 filesystem -> /-rw-r--r-- 1 1001 1001 18 Jun 11 07:18 notmyfile-rw-r--r-- 1 1002 1002 19 Jun 11 07:18 notmyfile2drwx------ 3 0 0 4096 Jun 11 07:15 snapdrwxr-xr-x 2 0 0 4096 Jun 11 07:18 testDirdrwxr-xr-x 3 0 0 4096 Jun 11 07:18 testdirA few more useful commands:
# print the username of the creator of the filels -al --author
# prints directories onlyls -ald
# prints inodes (there will be a lesson about inodes)ls -ali
# recursively prints all subdirectoriesls -alR
# prints list in the reversed orderls -alr
# prints the version of the binaryls --version-indicates that we will pass arguments. We have two ways here-one dash informs the system that we will pass one letter argument, likel--two dashes means that argument will contain more than one letter. Most commonly it will be an english word.
lmeans long listing format.
Sort Content by Size
Section titled “Sort Content by Size”ls -stotal 7244 File-01.txt 0 file-01 4 file-01.txt 4 file-02 0 filesystem 4 notmyfile 4 notmyfile2 4 snap 4 testDir 4 testdir 0 theNewestFileThis shows the short list of files and allocated space. As we already know, we can combine this argument - s - with others. Let’s do it.
ls -lstotal 7244 -rw-r--r-- 1 root root 42118 Jun 11 07:18 File-01.txt 0 -r--r--r-- 1 root root 0 Jun 11 07:18 file-01 4 -rw-r--r-- 1 root root 18 Jun 11 07:18 file-01.txt 4 -rw-r--r-- 1 root root 13 Jun 11 07:45 file-02 0 lrwxrwxrwx 1 root root 1 Jun 8 05:40 filesystem -> / 4 -rw-r--r-- 1 testuser testuser 18 Jun 11 07:18 notmyfile 4 -rw-r--r-- 1 otheruser otheruser 19 Jun 11 07:18 notmyfile2 4 drwx------ 3 root root 4096 Jun 11 07:15 snap 4 drwxr-xr-x 2 root root 4096 Jun 11 07:18 testDir 4 drwxr-xr-x 3 root root 4096 Jun 11 07:18 testdir 0 -rw-r--r-- 1 root root 0 Jun 11 07:43 theNewestFileBut this is what you have by default, using ls -l, right? No? You are correct, the answer is no. Take a look on the beginning of each line, this is where you can find, what was added by -s.
Why we used s? When capital S is used, this means sort.
ls -lS sorts files by size, largest going first.
So, arguments are case-sensitive, like… everything in Linux :)
-
--human-readable, or better --h-
ls -lhprints the size of the files not in bytes, but in more readable form, withK,M, orG, that sort of things.Terminal window ls -lhtotal 72K-rw-r--r-- 1 root root 42K Jun 11 07:18 File-01.txt-r--r--r-- 1 root root 0 Jun 11 07:18 file-01-rw-r--r-- 1 root root 18 Jun 11 07:18 file-01.txt-rw-r--r-- 1 root root 13 Jun 11 07:45 file-02lrwxrwxrwx 1 root root 1 Jun 8 05:40 filesystem -> /-rw-r--r-- 1 testuser testuser 18 Jun 11 07:18 notmyfile-rw-r--r-- 1 otheruser otheruser 19 Jun 11 07:18 notmyfile2drwx------ 3 root root 4.0K Jun 11 07:15 snapdrwxr-xr-x 2 root root 4.0K Jun 11 07:18 testDirdrwxr-xr-x 3 root root 4.0K Jun 11 07:18 testdir-rw-r--r-- 1 root root 0 Jun 11 07:43 theNewestFile
-
-
huses the powers of 1024. So, 1K is 1 powered by 1024. We have another option which uses powers of 1000.Terminal window ls -l --sitotal 74k-rw-r--r-- 1 root root 43k Jun 11 07:18 File-01.txt-r--r--r-- 1 root root 0 Jun 11 07:18 file-01-rw-r--r-- 1 root root 18 Jun 11 07:18 file-01.txt-rw-r--r-- 1 root root 13 Jun 11 07:45 file-02lrwxrwxrwx 1 root root 1 Jun 8 05:40 filesystem -> /-rw-r--r-- 1 testuser testuser 18 Jun 11 07:18 notmyfile-rw-r--r-- 1 otheruser otheruser 19 Jun 11 07:18 notmyfile2drwx------ 3 root root 4.1k Jun 11 07:15 snapdrwxr-xr-x 2 root root 4.1k Jun 11 07:18 testDirdrwxr-xr-x 3 root root 4.1k Jun 11 07:18 testdir-rw-r--r-- 1 root root 0 Jun 11 07:43 theNewestFileTerminal window ls -lShtotal 72K-rw-r--r-- 1 root root 42K Jun 11 07:18 File-01.txtdrwx------ 3 root root 4.0K Jun 11 07:15 snapdrwxr-xr-x 2 root root 4.0K Jun 11 07:18 testDirdrwxr-xr-x 3 root root 4.0K Jun 11 07:18 testdir-rw-r--r-- 1 otheruser otheruser 19 Jun 11 07:18 notmyfile2-rw-r--r-- 1 root root 18 Jun 11 07:18 file-01.txt-rw-r--r-- 1 testuser testuser 18 Jun 11 07:18 notmyfile-rw-r--r-- 1 root root 13 Jun 11 07:45 file-02lrwxrwxrwx 1 root root 1 Jun 8 05:40 filesystem -> /-r--r--r-- 1 root root 0 Jun 11 07:18 file-01-rw-r--r-- 1 root root 0 Jun 11 07:43 theNewestFile
Navigating the Directory History
Section titled “Navigating the Directory History”- The
cdcommand remembers where you were last, and lets you get back there withcd -. - For remembering more than just the last directory visited, use
pushdto change the directory instead ofcd; this pushes your starting directory onto a list. - Using
popdwill then send you back to those directories, walking in reverse order (the most recent directory will be the first one retrieved withpopd). - The list of directories is displayed with the
dirscommand.
Working with Files and Directories
Section titled “Working with Files and Directories”Locating Applications
Section titled “Locating Applications”- Depending on the specifics of particular distribution’s policy, programs and software packages can be installed in various directories.
- In general, executable programs and scripts should live in the
/bin,/usr/bin,/sbin,/usr/sbindirectories, or- somewhere under
/opt. - They can also appear in
/usr/local/binand/usr/local/sbin, or - in a directory in a user’s account space, such as
/home/student/bin.
- One way to locate programs is to employ the
whichutility. For example, to find out exactly where the diff program resides on the file system:
which diff/usr/bin/diff- If
whichdoes not find the program,whereisis a good alternative because it looks for packages in a broader range of system directories:
whereis diffdiff: /usr/bin/diff /usr/share/man/man1/diff.1.gz /usr/share/man/man1p/diff.1p.gzas well as locating source and man files packaged with the program.
Working with Files
Section titled “Working with Files”Viewing Files
Section titled “Viewing Files”| Command | Usage |
|---|---|
cat | Used for viewing files that are not very long; it does not provide any scroll-back. |
tac | Used to look at a file backwards, starting with the last line. |
less | Used to view larger files because it is a paging program. It pauses at each screen full of text, provides scroll-back capabilities, and lets you search and navigate within the file. Use / to search forward and ? to search backward. An older program named more is still used, but has fewer capabilities: “less is more”. |
tail | Used to print the last 10 lines of a file by default. You can change the number of lines by doing -n 15 or just -15 if you wanted to look at the last 15 lines instead of the default. |
head | The opposite of tail; by default, it prints the first 10 lines of a file. |
Creating, Updating and Modifying Files
Section titled “Creating, Updating and Modifying Files”-
touchis often used to set or update the access, change, and modify times of files. -
By default, it resets a file’s timestamp to match the current time. However, you can also create an empty file using
touch:touch <filename>— This is normally done to create an empty file as a placeholder for a later purpose. -
touchprovides several useful options.-
For example, the
-toption allows you to set the date and timestamp of the file to a specific value, as in:Terminal window touch -t 12091600 myfileThis sets the
myfilefile’s timestamp to 4 p.m., December 9th (12 09 1600).
-
mkdir and rmdir
Section titled “mkdir and rmdir”-
mkdiris used to create a directory: -
mkdir sampdir— creates a sample directory namedsampdirunder the current directory. -
mkdir /usr/sampdir— creates a sample directory calledsampdirunder/usr. -
Create multiple directories with similar names:
Terminal window mkdir testdir{1..10}mkdir mydirectory anotherdirectory thirddirectory -
In order to create deeper structure, we have to use
-pargument. This allows us to create the whole structure, without creating parent directory as first step.Terminal window mkdir -p parentdir/childdir{01..100}with
-pwe allowed the system to create parent directory and the second part we already know. Under theparentdirwe created 100 files, fromchilddir001tochilddir100. Please notice, how nice it is formatted by the system! We said01, but system created directories to keep three digits as it is inchilddir100. -
Removing a directory is done with
rmdir. -
The directory must be empty or the command will fail.
-
To remove a directory and all of its contents you have to do
rm -rf.
Moving, Renaming or Removing a File
Section titled “Moving, Renaming or Removing a File”mvdoes double duty, in that it can:- Simply rename a file
- Move a file to another location, while possibly changing its name at the same time.
- If you are not certain about removing files that match a pattern you supply, it is always good to run
rminteractively (rm –i) to prompt before every removal.
| Command | Usage |
|---|---|
mv | Rename a file |
rm | Remove a file |
rm –f | Forcefully remove a file |
rm –i | Interactively remove a file |
Renaming or Removing a Directory
Section titled “Renaming or Removing a Directory”rmdirworks only on empty directories; otherwise you get an error.- While typing
rm –rfis a fast and easy way to remove a whole file system tree recursively, it is extremely dangerous and should be used with the utmost care, especially when used by root (recall that recursive means drilling down through all sub-directories, all the way down a tree).
| Command | Usage |
|---|---|
mv | Rename a directory |
rmdir | Remove an empty directory |
rm -rf | Forcefully remove a directory recursively |
Searching for Files
Section titled “Searching for Files”- The main tools for doing this are the
locateandfindutilities.
locate
-
The
locateutility program performs a search taking advantage of a previously constructed database of files and directories on your system, matching all entries that contain a specified character string. This can sometimes result in a very long list. -
To get a shorter (and possibly more relevant) list, we can use the
grepprogram as a filter.grepwill print only the lines that contain one or more specified strings, as in:Terminal window locate zip | grep binwhich will list all the files and directories with both
zipandbinin their name. -
locateutilizes a database created by a related utility,updatedb. -
Most Linux systems run this automatically once a day. However, you can update it at any time by just running
updatedbfrom the command line as the root user.
The find Program
findrecurses down the filesystem tree from any particular directory (or set of directories) and locates files that match specified conditions. The default pathname is always the present working directory.- For example, administrators sometimes scan for potentially large core files (which contain diagnostic information after a program fails) that are more than several weeks old in order to remove them.
- It is also common to remove files in inessential or outdated files in
/tmp(and other volatile directories, such as those containing cached files) that have not been accessed recently.
Using find
-
When no arguments are given,
findlists all files in the current directory and all of its sub directories. Commonly used options to shorten the list include:-name(only list files with a certain pattern in their name),-iname(also ignore the case of file names), and-type(which will restrict the results to files of a certain specified type, such asdfor directory,lfor symbolic link, orffor a regular file, etc.). -
Searching for files and directories named
gcc:Terminal window find /usr -name gcc -
Searching only for directories named
gcc:Terminal window find /usr -type d -name gcc -
Searching only for regular files named
gcc:Terminal window find /usr -type f -name gcc
Using Advanced find Options
-
Another good use of
findis being able to run commands on the files that match your search criteria. The-execoption is used for this purpose. -
To find and remove all files that end with
.swp:Terminal window find -name "*.swp" -exec rm {} ';' -
The
{}(squiggly brackets) is a placeholder that will be filled with all the file names that result from the find expression, and the preceding command will be run on each one individually. -
Please note that you have to end the command with either
';'(including the single-quotes) or\;. Both forms are fine. -
One can also use the
-okoption, which behaves the same as-exec, except thatfindwill prompt you for permission before executing the command. This makes it a good way to test your results before blindly executing any potentially dangerous commands.
Finding Files Based on Time and Size
-
To find files based on time:
Terminal window find / -ctime 3 -
Here,
-ctimeis when the inode metadata (i.e. file ownership, permissions, etc.) last changed; it is often, but not necessarily, when the file was first created. -
You can also search for accessed/last read (
-atime) or modified/last written (-mtime) times. -
The number is the number of days and can be expressed as either a number (
n) that means exactly that value,+n, which means greater than that number, or-n, which means less than that number. There are similar options for times in minutes (as in-cmin,-amin, and-mmin). -
To find files based on sizes:
Terminal window find / -size 0Note the size here is in 512-byte blocks, by default; you can also specify bytes (c), kilobytes (k), megabytes (M), gigabytes (G), etc.
-
As with the time numbers above, file sizes can also be exact numbers (
n),+nor-n. -
For example, to find files greater than 10 MB in size and running a command on those files:
Terminal window find / -size +10M -exec command {} ';' -
To search for files using the
?wildcard, replace each unknown character with?.- For example, if you know only the first two letters are ‘ba’ of a three-letter filename with an extension of
.out, typels ba?.out.
- For example, if you know only the first two letters are ‘ba’ of a three-letter filename with an extension of
Wildcards and Matching File Names
You can search for a filename containing specific characters using wildcards.
| Wildcard | Result |
|---|---|
? | Matches any single character |
* | Matches any string of characters |
[set] | Matches any character in the set of characters, for example [adf] will match any occurrence of a, d, or f |
[!set] | Matches any character not in the set of characters |
- To search for files using the
*wildcard, replace the unknown string with*.- For example, if you remember only that the extension was
.out, typels *.out
- For example, if you remember only that the extension was
Hard and Soft Links
Section titled “Hard and Soft Links”Hard Links
Section titled “Hard Links”-
The
lnutility is used to create hard links and (with the-soption) soft links, also known as symbolic links or symlinks. These two kinds of links are very useful in UNIX-based operating systems. -
Suppose that
file1already exists. A hard link, calledfile2, is created with the command:
ln file1 file2ls -li file1 file249302296 -rw-r--r-- 2 student student 0 Oct 24 2024 file149302296 -rw-r--r-- 2 student student 0 Oct 24 2024 file2-
The
-ioption tolsprints out in the first column the inode number, which is a unique quantity for each file object. This field is the same for both of these files; what is really going on here is that it is only one file, but it has more than one name associated with it, as is indicated by the 2 that appears in thelsoutput. Thus, there was already another object linked tofile1before the command was executed. -
Hard links are very useful and they save space. For one thing, if you remove either
file1orfile2in the example, the inode object (and the remaining file name) will remain, which might be undesirable, as it may lead to subtle errors later if you recreate a file of that name. -
If you edit one of the files, exactly what happens depends on your editor; most editors, including
viandgedit, will retain the link by default, but it is possible that modifying one of the names may break the link and result in the creation of two objects.
Soft (Symbolic) Links
Section titled “Soft (Symbolic) Links”- Soft (or Symbolic) links are created with the
-soption, as in:
ln -s file1 file3
ls -li file1 file349302296 -rw-r--r-- 2 student student 0 Oct 24 2024 file149302397 lrwxrwxrwx 1 student student 5 Oct 24 2024 file3 -> file1- Symbolic links take no extra space on the file system (unless their names are very long). They are extremely convenient, as they can easily be modified to point to different places. An easy way to create a shortcut from your home directory to long path names is to create a symbolic link.
- Unlike hard links, soft links can point to objects even on different file systems, partitions, and/or disks and other media, which may or may not be currently available or even exist. In the case where the link does not point to a currently available or existing object, you obtain a dangling link.