
Filesystems & Mounting
File Systems
Section titled “File Systems”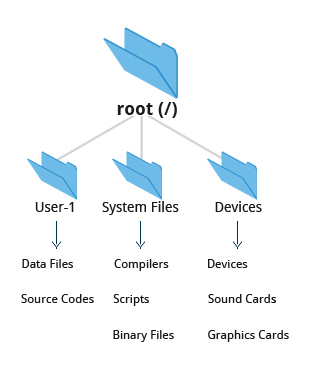
Introduction to File systems
Section titled “Introduction to File systems”- In Linux (and all UNIX-like operating systems) it is often said “Everything is a file”, or at least it is treated as such.
- This means whether you are dealing with normal data files and documents, or with devices such as sound cards and printers, you interact with them through the same kind of Input/Output (I/O) operations.
- This simplifies things: you open a “file” and perform normal operations like reading the file and writing on it
- On many systems (including Linux), the file system is structured like a tree.
- The tree is usually portrayed as inverted, and starts at what is most often called the root directory, which marks the beginning of the hierarchical file system and is also sometimes referred to as the trunk, or simply denoted by
/. - The root directory is not the same as the root user.
- The hierarchical file system also contains other elements in the path (directory names), which are separated by forward slashes (
/), as in/usr/bin/emacs, where the last element is the actual file name.
File system Varieties
Section titled “File system Varieties”- A file-system is a method of storing/finding files on a hard disk (usually in a partition).
- One can think of a partition as a container in which a file-system resides, although in some circumstances, a file-system can span more than one partition if one uses symbolic links.
- Linux supports a number of native file system types, expressly created by Linux developers, such as:
- ext3
- ext4
- squashfs
- btrfs
It also offers implementations of file systems used on other alien operating systems, such as those from:
-
Windows (ntfs, vfat)
-
SGI (xfs)
-
IBM (jfs)
-
MacOS (hfs, hfs+)
-
Many older, legacy file systems, such as FAT, are also supported.
-
It is often the case that more than one file system type is used on a machine, based on considerations such as the size of files, how often they are modified, what kind of hardware they sit on and what kind of access speed is needed, etc.
-
The most advanced file system types in common use are the journaling varieties: ext4, xfs, btrfs, and jfs. These have many state-of-the-art features and high performance, and are very hard to corrupt accidentally.
Different types of file-systems supported by Linux:
- Conventional disk file-systems: ext3, ext4, XFS, Btrfs, JFS, NTFS, vfat, exfat, etc.
- Flash storage file-systems: ubifs, jffs2, yaffs, etc.
- Database file-systems
- Special purpose file-systems: procfs, sysfs, tmpfs, squashfs, debugfs, fuse, etc.
A comparison between file-systems in Windows and Linux:
| Windows | Linux | |
|---|---|---|
| Partition | Disk1 | /dev/sda1 |
| File-system Type | NTFS/VFAT | EXT3/EXT4/XFS/BTRFS… |
| Mounting Parameters | DriveLetter | MountPoint |
| Base Folder (where OS is stored) | C:\/ | / |
Virtual Filesystem (VFS)
Section titled “Virtual Filesystem (VFS)”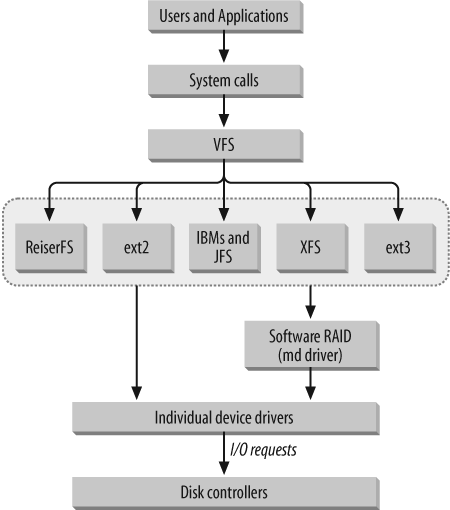
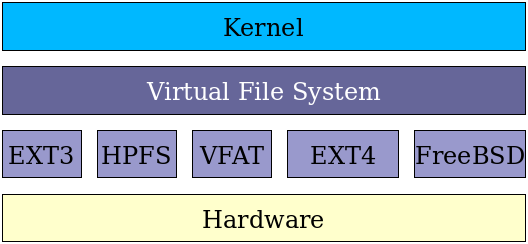
- Linux implements a Virtual File System (VFS), as do all modern operating systems.
- When an application needs to access a file, it interacts with the VFS abstraction layer, which then translates all the I/O system calls (reading, writing, etc.) into specific code relevant to the particular actual filesystem. Thus, neither the specific actual filesystem or physical media and hardware on which it resides need be considered by applications. Furthermore, network filesystems (such as NFS) can be handled transparently.
- This permits Linux to work with more filesystem varieties than any other operating system. This democratic attribute has been a large factor in its success.
- Most filesystems have full read and write access, while a few have only read access and perhaps experimental write access. Some filesystem types, especially non-UNIX based ones, may require more manipulation in order to be represented in the VFS.
- Variants such as
vfatdo not have distinct read/write/execute permissions for the owner/group/world fields; the VFS has to make an assumption about how to specify distinct permissions for the three types of user, and such behavior can be influenced by mounting operations. - There are non-kernel filesystem implementations, such as the read/write ntfs-3g, which are reliable but have weaker performance than in-kernel filesystems.
Extended FileSystem (ext3, ext4)
Section titled “Extended FileSystem (ext3, ext4)”| Ext2 | Ext3 | Ext4 | |
|---|---|---|---|
| Max File Size | 2 TB | 2 TB | 16 TB |
| Max Volume Size | 4 TB | 4 TB | 1 Exabyte |
| Supports Compression | Uses Journal | Uses Journal | |
| Supports Linux Permissions | Backward Compatible | Backward Compatible | |
| Long Crash Recovery | Uses Checksum for Journal |
- Journaling filesystems recover from system crashes or ungraceful shutdowns with little or no corruption, and do so very rapidly. While this comes at the price of having some more operations to do, additional enhancements can more than offset the price.
- In a journaling filesystem, operations are grouped into transactions. A transaction must be completed without error, atomically; otherwise, the filesystem is not changed. A log file is maintained of transactions. When an error occurs, usually only the last transaction needs to be examined. (ext3 | ext4 | reiserfs | JFS | XFS | btrfs)
Ext4 Filesystem features
Section titled “Ext4 Filesystem features”-
The ext4 filesystem can support volumes up to 1 EB and file sizes up to 16 TB. Extents replace the older block mapping mechanism.
-
ext4is backwards compatible with ext3 and ext2. It can pre allocate disk space for a file. The allocated space is usually guaranteed and contiguous. It also uses a performance technique called allocate-on-flush (delays block allocation until it writes data to disk). ext4 breaks the 32,000 subdirectory limit of ext3. -
ext4uses checksums for the journal which improves reliability. This can also safely avoid a disk I/O wait during journalling, which results in a slight performance boost. -
Another feature is the use of improved timestamps. ext4 provides timestamps measured in nanoseconds.
ext4 Superblock and Block Groups
Section titled “ext4 Superblock and Block Groups”The superblock at the beginning contains information about the entire filesystem. It is followed by Block Groups composed of sets of contiguous blocks:
- Include administrative information
- High redundancy of information in block groups
- Other blocks store file data
The block size is specified when the filesystem is created. It may be 512, 1K, 2K, 4K, 8K, etc. bytes, but not larger than a page of memory (4kB on x86).
An ext4 filesystem is split into a set of block groups. The block allocator tries to keep each file’s blocks within the same block group to reduce seek times. The default block size is 4 KB, which would create a block group of 128 MB.
All fields in ext4 are written to disk in little-endian order, except the journal.

ext3 and ext4 Filesystem Layout
Section titled “ext3 and ext4 Filesystem Layout”The layout of a standard block group is simple. For block group 0, the first 1024 bytes are unused (to allow for boot sectors, etc).
The superblock will start at the first block, except for block group 0. This is followed by the group descriptors and a number of GDT (Group Descriptor Table) blocks. These are followed by the data block bitmap, the inode bitmap, the inode table, and the data blocks.
Block Groups
Section titled “Block Groups”The first and second blocks are the same in every block group, and comprise the Superblock and the Group Descriptors.
Under normal circumstances, only those in the first block group are used by the kernel; the duplicate copies are only referenced when the filesystem is being checked. If everything is OK, the kernel merely copies them over from the first block group.
If there is a problem with the master copies, it goes to the next and so on until a healthy one is found and the filesystem structure is rebuilt. This redundancy makes it very difficult to thoroughly fry an ext2/3/4 filesystem, as long as the filesystem checks are run periodically.
In the early incarnations of the ext filesystem family, each block group contained the group descriptors for every block group, as well as a copy of the superblock. As an optimization, however, today not all block groups have a copy of the superblock and group descriptors.
A Closer Look at the Superblock
Section titled “A Closer Look at the Superblock”Note that every time the disk is successfully mounted, the mount count is incremented. The filesystem is checked every maximum-mount-counts or every 180 days, whichever comes first.
Block size can be set through the mkfs command.
The superblock for the filesystem is stored in block 0 of the disk. This superblock contains information about the filesystem itself.
The Superblock contains global information about the filesystem
- Mount count and maximum mount count
- Block size for this filesystem
- Blocks per group
- Free block count
- Free Inode count
- OS ID
The Superblock is redundantly stored in several block groups.
Managing Ext4
Section titled “Managing Ext4”Block and Inode Information for ext4: dumpe2fs
Section titled “Block and Inode Information for ext4: dumpe2fs”The block size is used to set the maximum number of:
- Blocks
- Inodes
- Superblocks
You can use the dumpe2fs program to get information about a particular partition. See dumpe2fs to scan the filesystem information such as limits, capabilities and flags, as well as other attributes.
  sudo dumpe2fs /dev/sdb1
  Output:
  dumpe2fs 1.45.6 (20-Mar-2020)  Filesystem volume name:   VMS  Last mounted on:          /VMS  Filesystem UUID:          fce521c7-e2ce-414a-8a7e-e2311640802f  Filesystem magic number:  0xEF53  Filesystem revision #:    1 (dynamic)  Filesystem features:      has_journal ext_attr resize_inode dir_index filetype  needs_recovery extent 64bit flex_bg \  sparse_super large_file huge_file uninit_bg dir_nlink extra_isize  Filesystem flags:         signed_directory_hash  Default mount options:    user_xattr acl  Filesystem state:         clean  Errors behavior:          Continue  Filesystem OS type:       Linuxxf .  Inode count:              14352384  Block count:              57388288  Reserved block count:     2869413  Free blocks:              22270800  Free inodes:              14352217  First block:              0  Block size:               4096
  Block bitmap at 1056 (bg \#0 + 1056)  Inode bitmap at 1072 (bg \#0 + 1072)  Inode table at 1599-2110 (bg \#0 + 1599)  415 free blocks, 8192 free inodes, 0 directories, 8192 unused inodes  Free blocks: 33822-33985, 34550-34691, 38803-38911  Free inodes: 8193-16384Group 2: (Blocks 65536-98303) csum 0xdde9 [INODE_UNINIT, ITABLE_ZEROED]  Block bitmap at 1057 (bg \#0 + 1057)  Inode bitmap at 1073 (bg \#0 + 1073)  Inode table at 2111-2622 (bg \#0 + 2111)  0 free blocks, 8192 free inodes, 0 directories, 8192 unused inodes  Free blocks:  Free inodes: 16385-24576....
Change Filesystem Parameters: tune2fs
Section titled “Change Filesystem Parameters: tune2fs”tune2fs can be used to change filesystem parameters.
-
To change the maximum number of mounts between filesystem checks (max-mount-count) run this command:
sudo tune2fs -c 25 /dev/sda1 -
To change the time interval between checks (interval-between-checks) type the following command:
Terminal window sudo tune2fs -i 10 /dev/sda1 -
To list the contents of the superblock, including the current values of parameters which can be changed use this command:
Terminal window sudo tune2fs -l /dev/sda1 -
It basically shows the global information from dumpe2fs.
Terminal window sudo tune2fs -l /dev/sdb1tune2fs 1.45.6 (20-Mar-2020)Filesystem volume name: VMSLast mounted on: /VMSFilesystem UUID: fce521c7-e2ce-414a-8a7e-e2311640802fFilesystem magic number: 0xEF53Filesystem revision #: 1 (dynamic)Filesystem features: has_journal ext_attr resize_inode dir_index filetype needs_recovery extent 64bit flex_bg sparse_super large_file huge_file uninit_bg dir_nlink extra_isizeFilesystem flags: signed_directory_hashDefault mount options: user_xattr aclFilesystem state: cleanErrors behavior: ContinueFilesystem OS type: LinuxInode count: 14352384Block count: 57388288Reserved block count: 2869413Free blocks: 22270800Free inodes: 14352217First block: 0Block size: 4096Fragment size: 4096.....Filesystem created: Mon Mar 25 14:14:57 2025Last mount time: Mon Sep 8 06:05:03 2025Last write time: Mon Oct 8 06:05:03 2025Mount count: 2003Maximum mount count: -1Last checked: Wed Oct 28 14:24:15 2025Check interval: 0 (<none>)Lifetime writes: 14 TB....
Working with EXT4
Section titled “Working with EXT4”- Making a ext4 disk sdb2 at /dev/sdb2
mkfs.ext4 /dev/sdb2- Mounting file system
mkdir /mnt/ext4 mount /dev/sdb2 /mnt/ext4- Checking if file system is mounted
mount | grep /dev/sdb2 or df -hP | grep /dev/sdb2- To make this mount available after reboot add entry to /etc/fstab
echo "/dev/sdb2 /mnt/ext4 ext4 rw 0 0" >> /etc/fstabLinux Partitions
Section titled “Linux Partitions”- Each file system on a Linux system occupies a disk partition.
- Partitions help to organize the contents of disks according to the kind and use of the data contained.
- For example, important programs required to run the system are often kept on a separate partition (known as
rootor/) than the one that contains files owned by regular users of that system (/home).
- For example, important programs required to run the system are often kept on a separate partition (known as
- In addition, temporary files created and destroyed during the normal operation of Linux may be located on dedicated partitions.
- One advantage of this kind of isolation by type and variability is that when all available space on a particular partition is exhausted, the system may still operate normally.
Mount Points
Section titled “Mount Points”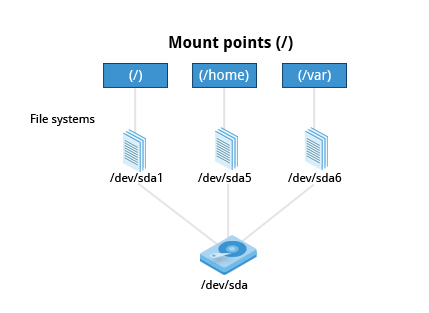
- Before you can start using a file system, you need to mount it on the file system tree at a mount point. This is simply a directory (which may or may not be empty) where the file system is to be grafted on. Sometimes, you may need to create the directory if it does not already exist.
[!WARNING] If you mount a file system on a non-empty directory, the former contents of that directory are covered-up and not accessible until the file system is unmounted. Thus, mount points are usually empty directories.
Mounting and Un-mounting
Section titled “Mounting and Un-mounting”- The
mountcommand is used to attach a file system (which can be local to the computer or on a network) somewhere within the file system tree. The basic arguments are thedevice nodeand mount point.- For example -
sudo mount /dev/sda5 /homewill attach the file system contained in the disk partition associated with the/dev/sda5device node, into the file system tree at the/homemount point. There are other ways to specify the partition other than the device node, such as using the disk label or UUID.
- For example -
- To unmount the partition, the command would be:
sudo umount /home - Note the command is
umount, not unmount! - Only a root user (logged in as root, or using
sudo) has the privilege to run these commands, unless the system has been otherwise configured. - If you want it to be automatically available every time the system starts up, you need to edit
/etc/fstabaccordingly (the name is short for file system table). - Executing
mountwithout any arguments will show all presently mounted file systems. - The command
df -Th(disk-free) will display information about mounted file systems, including the file system type, and usage statistics about currently used and available space.
/etc/fstab
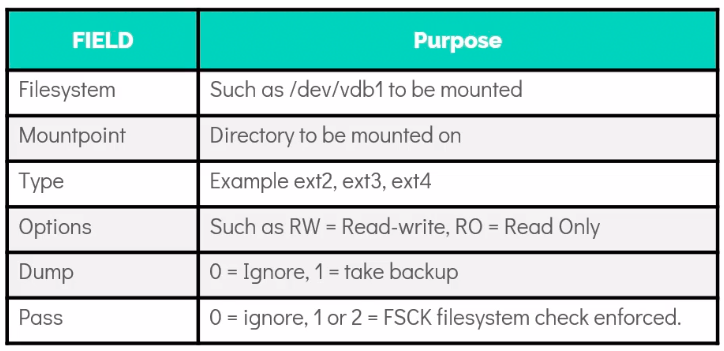
Section titled “/etc/fstab”Each record in the /etc/fstab file contains information about a filesystem to be mounted at boot, their standard mount points and what options should be used when mounting them. Each record in the file contains white space separated fields of information about a filesystem to be mounted:
- Device file name (such as
/dev/sda1), label, or UUID - Mount point for the filesystem (where in the tree structure is it to be inserted)
- Filesystem type
- A comma-separated list of options
- dump frequency used by the
dump -wcommand, or a zero which is ignored by dump fsckpass number or a zero - meaning do notfsckthis partition
The mount and umount utilities can use information in /etc/fstab.
Special & Network Filesystems
Section titled “Special & Network Filesystems”Special File Systems
Section titled “Special File Systems”- Linux widely employs the use of special filesystems for certain tasks. These are particularly useful for accessing various kernel data structures and tuning kernel behavior, or for implementing particular functions.
[!important] IMP Some of these special filesystems have mount points, such as proc at
/procor sys at/sysand others do not. Examples of special filesystems that have no mount point includesockfsorpipefs; this means user applications don’t interact with them, but the kernel uses them, taking advantage of VFS layers and code. These special filesystems are really not true filesystems; they are kernel facilities or subsystems that find the filesystem structural abstraction to be a useful way to recognize data and functionality.
| FILESYSTEM | MOUNT POINT | PURPOSE |
| rootfs | None | During kernel load, provides an empty root directory |
| hugetlbfs | Anywhere | Provides extended page access (2 or 4 MB on X86) |
| bdev | None | Used for block devices |
| proc | /proc | Pseudofilesystem access to many kernel structures and subsystems |
| sockfs | None | Used by BSD Sockets |
| tmpfs | Anywhere | RAM disk with swapping, re-sizing |
| shm | None | Used by System V IPC Shared Memory |
| pipefs | None | Used for pipes |
| binfmt_misc | Anywhere | Used by various executable formats |
| devpts | /dev/pts | Used by Unix98 pseudo-terminals |
| usbfs | /proc/bus/usb | Used by USB sub-system for dynamical devices |
| sysfs | /sys | Used as a device tree |
| debugfs | /sys/kernel/debug | Used for simple debugging file access |
NFS (Network File System)
Section titled “NFS (Network File System)”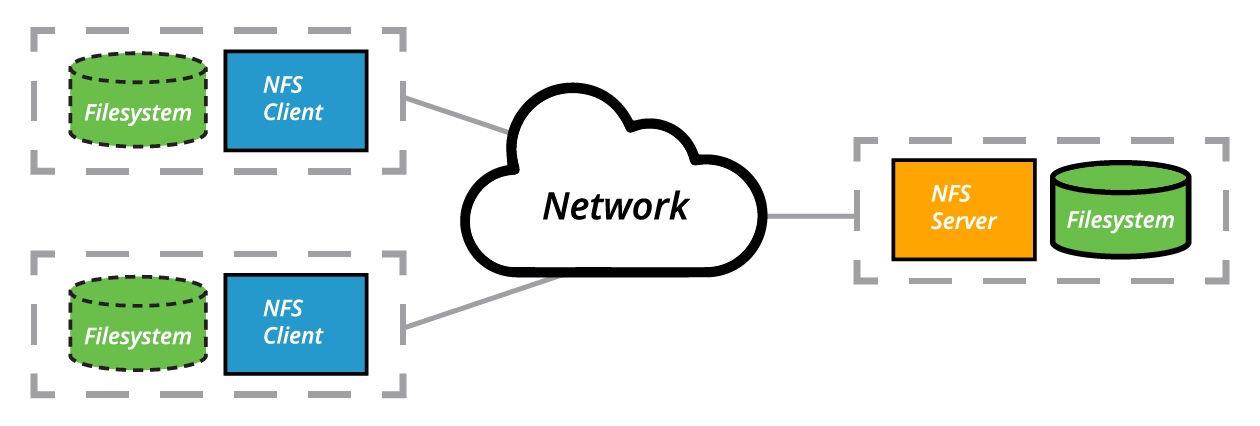
The Client-Server Architecture of NFS
Section titled “The Client-Server Architecture of NFS”[!IMPORTANT] Other network filesystems include AFS (Andrew File System), and SMB (Server Message Block), also termed CIFS (Common Internet File System).
-
It is often necessary to share data across physical systems which may be either in the same location or anywhere that can be reached by the Internet.
-
A network (also sometimes called distributed) file system may have all its data on one machine or have it spread out on more than one network node.
-
A variety of different file systems can be used locally on the individual machines; a network file system can be thought of as a grouping of lower level file systems of varying types.
-
Many system administrators mount remote users’ home directories on a server in order to give them access to the same files and configuration files across multiple client systems. This allows the users to log in to different computers, yet still have access to the same files and resources.
-
The most common such filesystem is named simply NFS (the Network File System). It has a very long history and was first developed by Sun Microsystems.
-
Another common implementation is CIFS (also termed SAMBA), which has Microsoft roots.
-
NFS details:
- Does not store data in blocks; instead it saves it in form of files.
- Works on Server-client model.
- Directory sharing in NFS is known as Exporting.
- NFS server maintains an export configuration file at
/etc/exportsthat define the clients which should be able to access the directories on the server. - Once export conf is updated the directory is shared to the clients by using the
export-fscommand. It is used to apply the changes without restarting the NFS service.
NFS on the Server
Section titled “NFS on the Server”-
On the server machine, NFS uses daemons (built-in networking and service processes in Linux) and other system servers are started at the command line by typing:
$ sudo systemctl start nfs
[!NOTE] On RHEL/CentOS 8, the service is called
nfs-server, notnfs.
-
The text file
/etc/exportscontains the directories and permissions that a host is willing to share with other systems over NFS.-
A very simple entry in this file may look like the following:
/projects *.example.com(rw) -
This entry allows the directory
/projectsto be mounted using NFS with read and write (rw) permissions and shared with other hosts in the example.com domain.
-
-
Every file in Linux has three possible permissions: read (r), write (w) and execute (x).
-
After modifying the
/etc/exportsfile, you can typeexportfs -avto notify Linux about the directories you are allowing to be remotely mounted using NFS.
-
You can also restart NFS with
sudo systemctl restart nfsbut this is heavier, as it halts NFS for a short while before starting it up again.
-
To make sure the NFS service starts whenever the system is booted, issue
sudo systemctl enable nfs
NFS on the Client
Section titled “NFS on the Client”-
On the client machine, if it is desired to have the remote filesystem mounted automatically upon system boot,
/etc/fstabis modified to accomplish this.-
For example, an entry in the client’s
/etc/fstabmight look like the following:servername:/projects /mnt/nfs/projects nfs defaults 0 0
-
-
You can also mount the remote filesystem without a reboot or as a one-time mount by directly using the mount command:
$ sudo mount servername:/projects /mnt/nfs/projects -
Remember, if
/etc/fstabis not modified, this remote mount will not be present the next time the system is restarted. -
Furthermore, you may want to use the
nofailoption infstabin case the NFS server is not live at boot.
Network Block Device (NBD)
Section titled “Network Block Device (NBD)”A Network Block Device is a Linux protocol designed to export a block device from a source computer (server) to a target (client). The NBD can use either Unix sockets or TCP/IP for communication.
The unit that is exported by the server can be one or more files, image, or a block device. On the client side, the data blob presented by the server is mapped through an nbd kernel module and accessed as a block device. The client side block devices can be recognized by names like /dev/nbd0, /dev/nbd1, etc.
In its simplest configuration the datastream is not encrypted. However, encryption is available and part of the NBD specification.
Some additional information and reference documents can be found at the following locations:
To configure an nbd client/server pair, the general steps are:
- Define something to export on the server
- Define the item to be shared to the server
- Connect the client
- The device can be partitioned and formatted like any other block device by using the
/dev/nbd0,/dev/nbd1devices - Almost any filesystem type can be used with the nbd devices once partitioned
The steps I have used are:
- Use
ddto create an empty file - Define the item to be shared by the server in a configuration file
- Activate the nbd kernel module
- Query the server with the client using the export name, IP address and port
- Associate the local
/dev/nbdblock driver with the server with thenbd-clientcommand - Use
fdiskto partition the nbd - Add a filesystem to the nbd and mount it
NBD User Utilities
Section titled “NBD User Utilities”There are several nbd clients and server packages available, including:
nbdkit: CentOS, Fedora, Debian, Ubuntunbd-clientandnbd-server: Ubuntu, Debiannbd(from GitHub): CentOS, Fedora, Debian, UbuntuxNBD-clientandxNBD-server: Debianqemu-img: CentOS
In general the clients and servers can be mixed and matched, so careful testing in your use case is recommended.
An example of the user and administrator utilities for Ubuntu 22.04:
- nbd-server-conf is an example of a configuration file for the server containing:
- IP address and port to listen for connections
- storage device to export as a disk
- some optional control elements
- nbd-server is the server side component to answer connection requests and communication
- nbd-server man page contains the specifics for server configuration. This information may vary between distributions.
- nbd-client is used to query the server and make the connection to the server
- nbd-client man page contains client-related information to make the connection to the server.
These utilities may have different names and include different functions depending on how they are packaged by the distributions.
Network Block Device Example
Section titled “Network Block Device Example”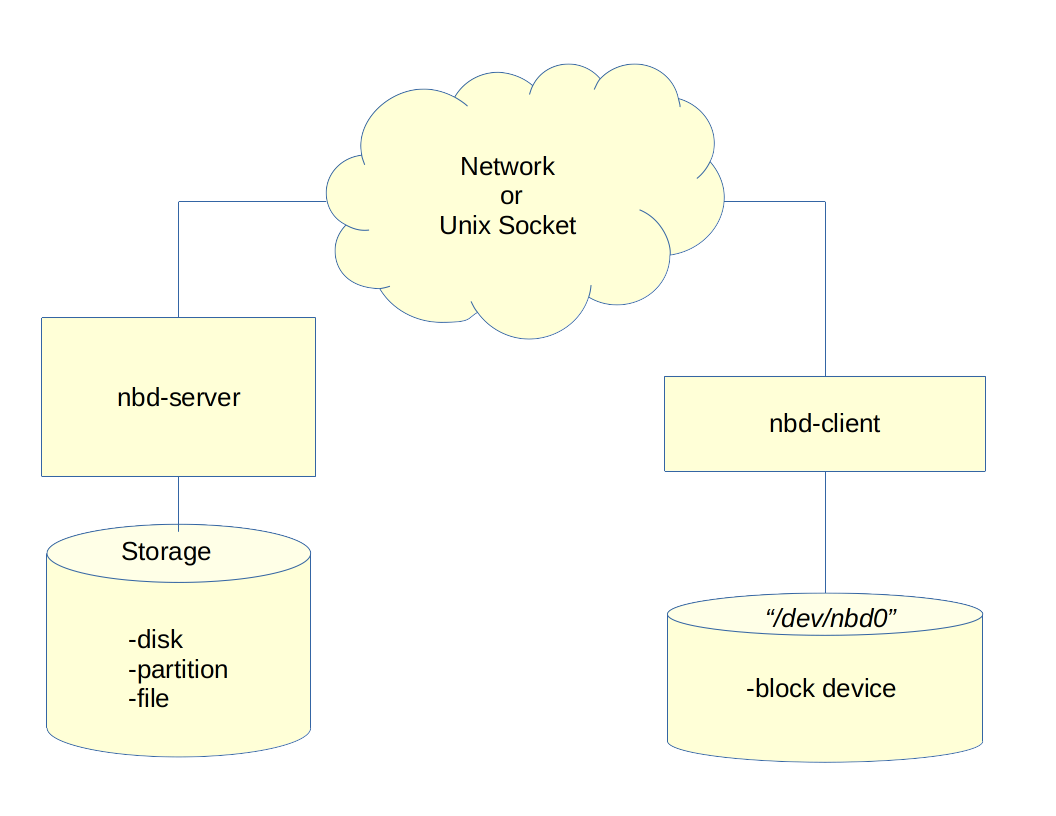
Some example commands for the clients and server are:
-
The server was CentOS-8-Stream using the nbd package from GitHub.
-
The client was CentOS-8-Stream using the nbd package from GitHub.
-
Ensure the nbd kernel modules are loaded using the following command:
sudo modprobe -i nbd- Connect the exported foo on 192.168.242.160 to the local device /dev/nbd10:
sudo nbd-client -N foo 192.168.242.160 /dev/nbd10Examples of some commands from an Ubuntu installation:
- Start the nbd server process with the following command:
sudo nbd-server -C nbd-server.conf- List the exports on the server from the client with the following command:
sudo nbd-client -l 127.0.0.1 10042- Connect the export foo to the local device /dev/nbd0:
sudo nbd-client -N foo 127.0.0.1 10042 /dev/nbd0Inodes
Section titled “Inodes”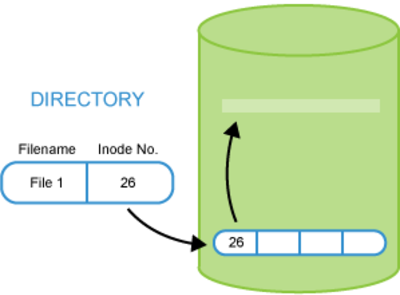
- The name of a file is just a property of its inode, which is the more fundamental object.
- An inode is a data structure on disk that describes and stores file attributes, including its location.
- Every file which is contained in a Linux filesystem is associated with its own inode. All data about a file is contained within its inode.
- The inode is used by the operating system to keep track of properties such as location, file attributes (permissions, ownership, etc.), access times and other items. Because of this, all I/O activity concerning a file usually also involves the file’s inode.
Inodes describe and store information about a file, including:
- Permissions
- User and group ownership
- Size
- Timestamps (nanosecond)
- Access time - The last time the file was accessed for any purpose
- Modification time - The last time the file’s contents were modified
- Change time - The last time the file’s inode was changed, by a change in permissions, ownership, filename, hard links, etc.
Hard and Soft Links
Section titled “Hard and Soft Links”A directory file is a particular type of file that is used to associate file names and inodes. There are two ways to associate (or link) a file name with an inode:
-
Hard links point to an inode.
- They are made by using
lnwithout an option. - Two or more files can point to the same inode (hard link).
- All hard linked files have to be on the same filesystem.
- Changing the content of a hard linked file in one place may not change it in other places.
- They are made by using
-
Soft (or symbolic) links point to a file name which has an associated inode.
- They are made by using
lnwith the-soption. - Soft linked files may be on different filesystems.
- If the target does not yet exist or is not yet mounted, it can be dangling.
- They are made by using
-
Each association of a directory file contents and an inode is known as a link.
-
Because it is possible (and quite common) for two or more directory entries to point to the same inode (hard links), a file can be known by multiple names, each of which has its own place in the directory structure. However, it can have only one inode no matter which name is being used.
-
When a process refers to a path name, the kernel searches directories to find the corresponding inode number. After the name has been converted to an inode number, the inode is loaded into memory and is used by subsequent requests.
-
Normally, when you modify a file it does not break the hard links that reference the same inode. However, there are (badly written) applications that can copy a file and change it and then replace it, or delete a file and replace it, and in the process create a new file that is not linked any more. So keep your eye out for this behavior if it is not intended.
Hard Links vs Soft Links
Section titled “Hard Links vs Soft Links”| Basis for Comparison | Hard Link | Soft Link |
|---|---|---|
| Basic | A file can be accessed through many different names known as hard links. | A file can be accessed through different references pointing to that file is known as a soft link. |
| Link validation, when the original file is deleted | Still valid and file can be accessed. | Invalid |
| Command used for creation | ln | ln -s |
| inode number | Same | Different |
| Can be linked | To its own partition. | To any other file system even networked. |
| Memory consumption | Less | More |
| Relative Path | Not applicable | Allowed |
ln /path/to/file /path/to/hardlinkln -s /path/to/file /path/to/softlink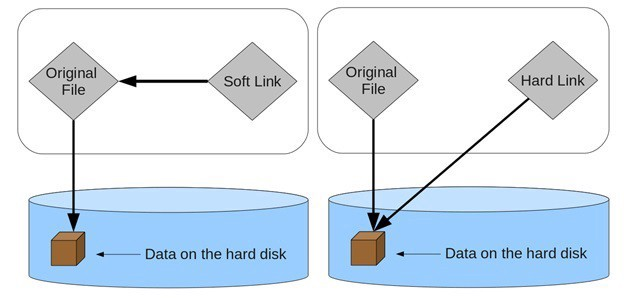
Hard Links in Detail
Section titled “Hard Links in Detail”-
The
lnutility is used to create hard links and (with the-soption) soft links, also known as symbolic links or symlinks. These two kinds of links are very useful in UNIX-based operating systems. -
Suppose that file1 already exists. A hard link, called file2, is created with the command:
$ ln file1 file2Note that two files now appear to exist. However, a closer inspection of the file listing shows that this is not quite true.
$ ls -li file1 file2The
-ioption tolsprints out in the first column the inode number, which is a unique quantity for each file object. This field is the same for both of these files; what is really going on here is that it is only one file, but it has more than one name associated with it, as is indicated by the 2 that appears in the ls output. Thus, there was already another object linked to file1 before the command was executed. -
Hard links are very useful and they save space. For one thing, if you remove either file1 or file2 in the example, the inode object (and the remaining file name) will remain, which might be undesirable, as it may lead to subtle errors later if you recreate a file of that name. If you edit one of the files, exactly what happens depends on your editor; most editors, including vi and gedit, will retain the link by default, but it is possible that modifying one of the names may break the link and result in the creation of two objects.
Soft (Symbolic) Links in Detail
Section titled “Soft (Symbolic) Links in Detail”-
Soft (or Symbolic) links are created with the
-soption, as in:$ ln -s file1 file3$ ls -li file1 file3Notice file3 no longer appears to be a regular file, and it clearly points to file1 and has a different inode number.
-
Symbolic links take no extra space on the file system (unless their names are very long). They are extremely convenient, as they can easily be modified to point to different places. An easy way to create a shortcut from your home directory to long path names is to create a symbolic link.
-
Unlike hard links, soft links can point to objects even on different file systems, partitions, and/or disks and other media, which may or may not be currently available or even exist. In the case where the link does not point to a currently available or existing object, you obtain a dangling link.
Comparing Files and File Types
Section titled “Comparing Files and File Types”Comparing Files with diff
Section titled “Comparing Files with diff”-
diffis used to compare files and directories. This often-used utility program has many useful options (see:man diff) including:Option Usage -cProvides a listing of differences that include three lines of context before and after the lines differing in content -rUsed to recursively compare sub directories, as well as the current directory -iIgnore the case of letters -wIgnore differences in spaces and tabs (white space) -qBe quiet: only report if files are different without listing the differences -
To compare two files, at the command prompt, type
diff [options] <filename1> <filename2>. -
diffis meant to be used for text files; for binary files, one can usecmp
Using diff3 and patch
Section titled “Using diff3 and patch”-
Compare 3 files at once using
diff3, which uses one file as the reference basis for the other two.- For example, suppose you and a co-worker both have made modifications to the same file working at the same time independently.
diff3can show the differences based on the common file you both started with.
- For example, suppose you and a co-worker both have made modifications to the same file working at the same time independently.
-
The syntax for
diff3is as follows:$ diff3 MY-FILE COMMON-FILE YOUR-FILE
-
Many modifications to source code and configuration files are distributed utilizing patches, which are applied with the
patchprogram. -
A patch file contains the deltas (changes) required to update an older version of a file to the new one.
-
The patch files are actually produced by running
diffwith the correct options, as in:$ diff -Nur originalfile newfile > patchfile -
Distributing just the patch is more concise and efficient than distributing the entire file.
- For example, if only one line needs to change in a file that contains 1000 lines, the patch file will be just a few lines long.
-
To apply a patch, you can just do either of the two methods below:
$ patch -p1 < patchfile$ patch originalfile patchfile- The first usage is more common, as it is often used to apply changes to an entire directory tree, rather than just one file, as in the second example.
Using the file Utility
Section titled “Using the file Utility”- In Linux, a file’s extension often does not categorize it the way it might in other operating systems. One cannot assume that a file named file.txt is a text file and not an executable program.
- In Linux, a filename is generally more meaningful to the user of the system than the system itself.
- In fact, most applications directly examine a file’s contents to see what kind of object it is rather than relying on an extension. This is very different from the way Windows handles filenames, where a filename ending with .exe, for example, represents an executable binary file.
- The real nature of a file can be ascertained by using the
fileutility. - For the file names given as arguments, it examines the contents and certain characteristics to determine whether the files are plain text, shared libraries, executable programs, scripts, or something else.