
Network Tools & Services
Networking Configuration and Tools
Section titled “Networking Configuration and Tools”- Network configuration files are essential to ensure that interfaces function correctly. They are located in the
/etcdirectory tree.
Network Interfaces
Section titled “Network Interfaces”- Network interfaces are a connection channel between a device and a network.
- Physically, network interfaces can proceed through a network interface card (NIC), or can be more abstractly implemented as software.
- You can have multiple network interfaces operating at once. Specific interfaces can be brought up (activated) or brought down (de-activated) at any time.
- Information about a particular network interface or all network interfaces can be reported by the
ipandifconfigutilities, which you may have to run as the superuser, or at least, give the full path, i.e./sbin/ifconfig, on some distributions. ipis newer thanifconfigand has far more capabilities, but its output is uglier to the human eye.
The ip Utility
Section titled “The ip Utility”-
To view the IP address:
Terminal window $ /sbin/ip addr show -
To view the routing information:
Terminal window $ /sbin/ip route show -
ipis a very powerful program that can do many things. -
Older (and more specific) utilities such as
ifconfigandrouteare often used to accomplish similar tasks.
pingis used to check whether or not a machine attached to the network can receive and send data; i.e. it confirms that the remote host is online and is responding.- To check the status of the remote host, at the command prompt, type
ping hostname. pingis frequently used for network testing and management; however, its usage can increase network load unacceptably. Abort the execution ofpingby typingCTRL-C, or by using the-coption, which limits the number of packets thatpingwill send before it quits. When execution stops, a summary is displayed.
-
A network requires the connection of many nodes.
-
Data moves from source to destination by passing through a series of routers and potentially across multiple networks.
-
Servers maintain routing tables containing the addresses of each node in the network.
-
The IP routing protocols enable routers to build up a forwarding table that correlates final destinations with the next hop addresses.
-
Use the
routeutility or the newerip routecommand to view or change the IP routing table to add, delete, or modify specific (static) routes to specific hosts or networks.Task Command Show current routing table $ route –nor$ ip routeAdd static route $ route add -net addressor$ ip route addDelete static route $ route del -net addressor$ ip route del
Combines the functionality of ping and traceroute and creates a continuously updated display, like top.
traceroute
Section titled “traceroute”tracerouteis used to inspect the route which the data packet takes to reach the destination host, which makes it quite useful for troubleshooting network delays and errors.- By using
traceroute, you can isolate connectivity issues between hops, which helps resolve them faster. - To print the route taken by the packet to reach the network host, at the command prompt, type
traceroute address.
More Networking Tools
Section titled “More Networking Tools”| Networking Tool | Description |
|---|---|
ethtool | Queries network interfaces and can also set various parameters such as the speed |
netstat | Displays all active connections and routing tables; useful for monitoring performance and troubleshooting |
nmap | Scans open ports on a network; important for security analysis |
tcpdump | Dumps network traffic for analysis |
iptraf | Monitors network traffic in text mode |
mtr | Combines functionality of ping and traceroute and gives a continuously updated display |
dig | Tests DNS workings; a good replacement for host and nslookup |
Network Time Protocol
Section titled “Network Time Protocol”Many protocols require consistent, if not accurate time to function properly. The security of many encryption systems is highly dependent on proper time. Industries such as commodities or stock trading require highly accurate time, as a difference of only seconds can mean hundreds, if not thousands of dollars.
The Network Time Protocol (NTP) is a method to update and synchronize system time. NTP consists of a daemon and a protocol. NTP time sources are divided up into “strata”:
- A strata 0 clock is a special purpose time device (Atomic clock, GPS radio, etc.)
- A strata 1 server is any NTP server connected directly to a strata 0 source (over serial or the like)
- A strata 2 server is any NTP server which references a strata 1 server using NTP
- A strata 3 server is any NTP server which references a strata 2 server using NTP
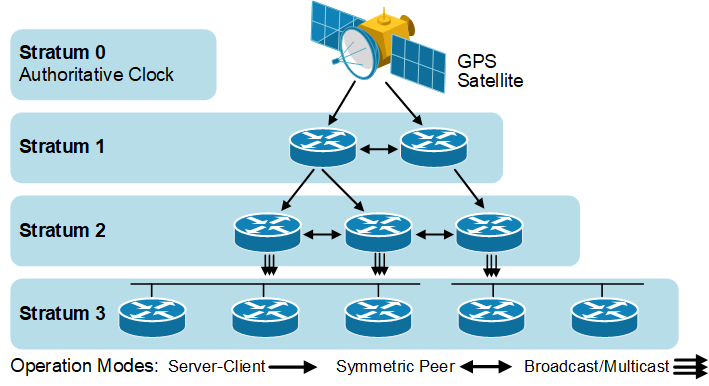
NTP may function as a client, server, or a peer.
- client - acquires time from a server or a peer
- server - provides time to a client
- peers - synchronize time between other peers regardless of the defined servers
NTP Applications
Section titled “NTP Applications”There are several NTP applications; some of the most common are:
- ntp - the default
- chrony - designed to work in a wide range of environments, including intermittent network connections and virtual machines
systemd-timesyncd- an ntp client only included in the systemd package
Implementation of NTP services varies widely between distributions. The most common elements of the configuration are similar for most popular time synchronization applications. Here are the common locations for the ntp applications configuration files:
- ntp -
/etc/ntp.conf - chrony -
/etc/chrony.conf - systemd-timesyncd -
/etc/systemd/timesyncd.conf
The various ntp applications may conflict with each other, so only have one ntp application active at a time.
Configuring the ntpd Client
Section titled “Configuring the ntpd Client”A good NTP server is only as good as its time source. The NTP Pool Project was created to alleviate the load that was crippling the small number of NTP servers.
-
The pool directive is aware of round-robin DNS servers and allows a different IP address on each request.
-
If the connection allows peers, the pool command will establish peers on its own.
-
The classic server directive may be used if desired.
-
To configure your NTP server to use NTP Pool, edit
/etc/ntp.confand add or edit the following settings:Terminal window vi /etc/ntp.confdriftfile /var/lib/ntp/ntp.driftpool 0.pool.ntp.orgpool 1.pool.ntp.orgpool 2.pool.ntp.orgpool 3.pool.ntp.org
The ntpdc -c peers command can show the time differential between the local system and configured time servers.
-
The
timedatectlcommand is in many distributions and may be used to query and control the system time and date. -
timedatectlis part of thesystemdlandscape and supports additional options when used withsystemd-timesyncd.Terminal window timedatectlLocal time: Sun 2023-03-05 16:13:50 UTCUniversal time: Sun 2023-03-05 16:13:50 UTCRTC time: Sun 2023-03-05 16:13:50Time zone: Etc/UTC (UTC, +0000)System clock synchronized: yesNTP service: activeRTC in local TZ: no
Configuring the ntpd Server
Section titled “Configuring the ntpd Server”The configuration elements for the ntp server are contained in the /etc/ntp.conf file. Here are some of the ntp server relevant items:
- Declare the local machine to be a time reference
- The server and fudge directives
- Regulate who can query the time server with
ntpqandntpdccommands (see CVE-2013-5211)- The restrict directives
- Declare which systems are
ntppeers- The peers are listed in the
/etc/ntp.conffile
- The peers are listed in the
- Start NTP daemon
Access Control
Section titled “Access Control”Here is an example of access control entries in /etc/ntp.conf.
/etc/ntp.conf: access control# Default policy prevents queriesrestrict default nopeer nomodify notrap noquery# Allow queries from a particular subnetrestrict 123.123.x.0 mask 255.255.255.0 nopeer nomodify notrap# Allow queries from a particular hostrestrict 131.243.1.42 nopeer nomodify notrap noquery# Unrestrict localhostrestrict 127.0.0.1Peer Configuration
Section titled “Peer Configuration”Here is an example of ntp peer configuration entries.
/etc/ntp.conf: peer configurationpeer 128.100.49.12peer 192.168.0.1Declaring Self a Time Source
Section titled “Declaring Self a Time Source”This is an example of the ntp declaring itself as an NTP server. The second line, the fudge entry, specifies this server is a stratum 10 server.
/etc/ntp.conf: declare self a time sourceserver 127.127.1.0fudge 127.127.1.0 stratum 10Browsers, wget and curl
Section titled “Browsers, wget and curl”wgetis a command line utility that can capably handle the following types of downloads:- Large file downloads
- Recursive downloads, where a web page refers to other web pages and all are downloaded at once
- Password-required downloads
- Multiple file downloads.
- To download a web page, you can simply type
wget URL, and then you can read the downloaded page as a local file using a graphical or non-graphical browser.
- Besides downloading, you may want to obtain information about a URL, such as the source code being used.
curlcan be used from the command line or a script to read such information.curlalso allows you to save the contents of a web page to a file, as doeswget.- You can read a URL using
curl URL.- For example, if you want to read http://www.linuxfoundation.org, type
curl http://www.linuxfoundation.org.
- For example, if you want to read http://www.linuxfoundation.org, type
- To get the contents of a web page and store it to a file, type
curl -o saved.html http://www.mysite.com. The contents of the main index file at the website will be saved in saved.html.
Transferring Files
Section titled “Transferring Files”FTP (File Transfer Protocol)
Section titled “FTP (File Transfer Protocol)”- When you are connected to a network, you may need to transfer files from one machine to another. File Transfer Protocol (FTP) is a well-known and popular method for transferring files between computers using the Internet. This method is built on a client-server model.
- FTP is one of the oldest methods of network data transfer, dating back to 1971. As such, it is considered inadequate for modern needs as well as being intrinsically insecure. However, it is still in use and when security is not a concern (such as with anonymous FTP) it can make sense.
- FTP can be used within a browser or with stand-alone client programs.
FTP Clients
Section titled “FTP Clients”- FTP clients enable you to transfer files with remote computers using the FTP protocol. These clients can be either graphical or command line tools. Filezilla, for example, allows use of the FTP protocol to transfer files between computers.
- All web browsers support FTP, all you have to do is give a URL like
ftp://wordplay.com. Some command line FTP clients are:ftpsftpncftpyafc(Yet Another FTP Client)
FTP has fallen into disfavor on modern systems, as it is intrinsically insecure, since passwords are user credentials can be transmitted without encryption and thus can be intercepted. Thus, it was removed from RHEL 8 and recent versions of other distributions.
-
To securely access a remote system, you may need to log in or run commands using the same or different username.
-
You may also need to transfer files using
scp, all while ensuring secure and interception-free communication. -
SSH (Secure SHell) exists for this purpose. It uses encryption based on strong algorithms.
-
Assuming the proper SSH packages are installed on a system, no further setup is needed to begin using SSH. To sign onto a remote system, use the following command:
Terminal window ssh farflung.comstudent@farflung.com's password: (type here)assuming there is a student account on farflung.com. To log in as a different user, you can use:
Terminal window ssh root@farflung.comssh -l root farflung.com -
To copy files from one system to another, you can do the following:
Terminal window scp file.txt farflung.com:/tmpscp file.tex student@farflung.com/home/studentscp -r some_dir farflung.com:/tmp/some_dir -
To run a command on multiple systems simultaneously, you can use the following command:
Terminal window for machines in node1 node2 node3do(ssh $machines some_command &)done -
You can use the
pssh(Parallel SSH) utility to execute a command on multiple systems in one fell stroke as in:Terminal window pssh -viH machine1 machine2 machine3 do_something
SSH Configuration Files
Section titled “SSH Configuration Files”One can configure SSH further to expedite its use, in particular to permit logging in without a password. User-specific configuration files are created under every user’s home directory in the hidden .ssh directory:
-
id_rsa: the user’s private key -
id_rsa.pub: the user’s public key -
authorized_keys: public keys that are permitted to log in -
known_hosts: hosts from which logins have been allowed in the past -
config: file for specifying various options -
First a user has to generate their private and public encryption keys with
ssh-keygen:Terminal window ssh-keygenGenerating public/private rsa key pair. ...cat authorized_keysssh-rsa AAAAB3Nza........student@debianssh-rsa AAAAB3Nza........student@fedora -
The private key must never ever be shared with anyone. The public key, however, should be given to any machine with which you want to permit password-less access. Note that authorized_keys contains public keys that are allowed to login as you on this machine.
-
known_hostsis gradually built up as ssh accesses occur. If the system detects changes in the users who are trying to log in through ssh, it will warn you of them and afford the opportunity to deny access.Terminal window cat known_hostsx7 ecdsa-sha2-nistp256 AAAAE2VjZHNhLXN...... M=192.168.1.200 ecdsa-sha2-nistp256 AAAA...... bcs=
SSH Configuration File Precedence
Section titled “SSH Configuration File Precedence”-
The order the configuration files are processed is as follows:
- Command line options
~/.ssh/config/etc/ssh/ssh_config
-
The precedence of the files and the contents is first match used.
/home/student/.ssh/configTerminal window Host appleHostName 192.168.0.196User studentPort 4242IdentityFile /home/student/.ssh/customHost awsHostname ec2-34-238-135-25.compute-1.amazonaws.comUser ubuntuIdentityFile /home/student/.ssh/cloud1.pemForwardX11 noPasswordAuthentication no Host *In the above
~/.ssh/configspecific configuration information is listed for the hosts apple and aws. If neither of these match, then the generic parameters would apply. This configuration has no generic parameters. The command usage would be:Terminal window ssh appleorssh aws
SSH on a Cloud System
Section titled “SSH on a Cloud System”- SSH on a cloud system works the same, with some automation applied.
- The ssh keys are generated for the default user during cloud system creation
- The public key is copied into the default user’s authorized_keys file
- An option to copy the public and private to your local system is presented
- Password-based authentication is generally not supported for users on cloud systems
It is not uncommon to misplace public keys on remote systems. Recreating a public can be done with ssh-keygen.
Command:
$~/.ssh$ ls -l-rw------- 1 student student 411 Jul 11 07:01 id_ed25519-rw-r--r-- 1 student student 96 Jul 11 07:01 id_ed25519.pub
#Rename the public key:mv id_ed25519.pub id_ed25519.pub.lost$~/.ssh$ ls -l-rw------- 1 student student 411 Jul 11 07:01 id_ed25519-rw-r--r-- 1 student student 96 Jul 11 07:01 id_ed25519.pub.lost
ssh-keygen -y -f ~/.ssh/id_ed25519 > ~/.ssh/id_ed25519.pub
$~/.ssh$ ls -l-rw------- 1 student student 411 Jul 11 07:01 id_ed25519-rw-rw-r-- 1 student student 96 Jul 11 07:04 id_ed25519.pub-rw-r--r-- 1 student student 96 Jul 11 07:01 id_ed25519.pub.lostssh-keygen: This is the command itself, which is used to generate SSH keys.-y: This option is used to read a private SSH key file and output the corresponding public key. In this case, it’s used to read the private key file~/.ssh/id_ed25519.-f ~/.ssh/id_ed25519: This specifies the path to the private key file (id_ed25519) that you want to generate the corresponding public key for.> ~/.ssh/id_ed25519.pub: This redirects the output (the generated public key) to a file namedid_ed25519.pubin the~/.sshdirectory.