
Users & Groups
Identifying the Current User
Section titled “Identifying the Current User”- To identify the current user, type
whoami. - To list the currently logged-on users, type
who.
Giving who the -a option will give more detailed information.
User Startup Files
Section titled “User Startup Files”In Linux, the command shell program (bash or zsh) uses one or more startup files to configure the user environment. Files in the /etc directory define global settings for all users, while initialization files in the user’s home directory can include and/or override the global settings.
The startup files can do anything the user would like to do in every command shell, such as:
- Customizing the prompt
- Defining command line shortcuts and aliases
- Setting the default text editor
- Setting the path for where to find executable programs
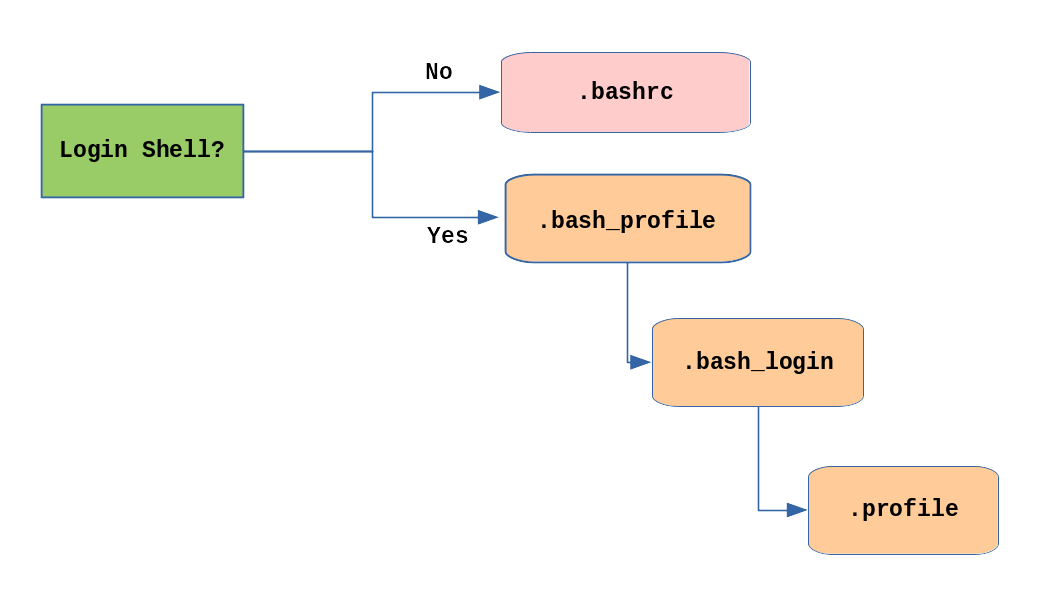
Order of the Startup Files
Section titled “Order of the Startup Files”The standard prescription is that when you first login to Linux, /etc/profile is read and evaluated, after which the following files are searched (if they exist) in the listed order:
~/.bash_profile~/.bash_login~/.profile
where ~/ denotes the user’s home directory.
The Linux login shell evaluates whatever startup file that it comes across first and ignores the rest. This means that if it finds ~/.bash_profile, it ignores ~/.bash_login and ~/.profile. Different distributions may use different startup files.
However, every time you create a new shell, or terminal window, etc., you do not perform a full system login; only a file named ~/.bashrc file is read and evaluated. Although this file is not read and evaluated along with the login shell, most distributions and/or users include the ~/.bashrc file from within one of the three user-owned startup files.
Most commonly, users only fiddle with ~/.bashrc, as it is invoked every time a new command line shell initiates, or another program is launched from a terminal window, while the other files are read and executed only when the user first logs onto the system.
Creating Aliases
Section titled “Creating Aliases”Customized commands or modifying the behavior of already existing ones can be done by creating aliases. These aliases are placed in ~/.bashrc file so they are available to any command shells that are created. unalias removes an alias.
Typing alias with no arguments will list currently defined aliases.
Please note there should not be any spaces on either side of the equal sign and the alias definition needs to be placed within either single or double quotes if it contains any spaces.
Account Types in Linux
Section titled “Account Types in Linux”Every User in Linux has an associated account.
- User Account - Maintain user login, password, unique ID and group ID. (Account for Individual people who need access to system)
- Super User Account (root) - UID (0), have unrestricted access and control of system.
- System Accounts - Created during OS installation (sshd, mail, etc.). UID < 100 or b/w 500 to 1000. Do not have dedicated
/home. - Service Accounts - Similar to system accounts and created when services (nginx, mercury, etc.) are installed in system.
Purpose of User Accounts
Section titled “Purpose of User Accounts”- Linux systems provide a multi-user environment which permits people and processes to have separate simultaneous working environments.
- One special user account is for the root user, who is able to do anything on the system. To avoid making costly mistakes, and for security reasons, the root account should only be used when absolutely necessary.
- Normal user accounts are for people who will work on the system. Some user accounts (like the daemon account) exist for the purpose of allowing processes to run as a user other than root.
Basics of Users and Groups
Section titled “Basics of Users and Groups”-
All Linux users are assigned a unique user ID (uid), which is just an integer; normal users start with a uid of 1000 or greater.
-
Linux uses groups for organizing users. Groups are collections of accounts with certain shared permissions.
-
Control of group membership is administered through the
/etc/groupfile, which shows a list of groups and their members. -
By default, every user belongs to a default or primary group.
-
When a user logs in, the group membership is set for their primary group and all the members enjoy the same level of access and privilege.
-
Permissions on various files and directories can be modified at the group level.
-
Users also have one or more group IDs (gid), which indicate the primary, principal, or default group of the user. The default group ID is the same as the user ID. These numbers are associated with names through the files
/etc/passwdand/etc/group. -
Groups are used to establish a set of users who have common interests for the purposes of access rights, privileges, and security considerations. Access rights to files (and devices) are granted on the basis of the user and the group they belong to.
-
Attributes of a User Account:
/etc/passwdfile contains one record (one line) for each user, each of which is a colon ( : ) separated list of fields:username password UID GID comment on GECOS home shell owl x 1000 1000 Owl /home/owl /bin/bash
Adding and Removing Users
Section titled “Adding and Removing Users”-
Distributions have straightforward graphical interfaces for creating and removing users and groups and manipulating group membership. However, it is often useful to do it from the command line or from within shell scripts. Only the root user can add and remove users and groups.
-
Adding a new user is done with
useraddand removing an existing user is done withuserdel. -
In the simplest form, an account for the new user
bjmoosewould be done with:$ sudo useradd bjmoosewhich, by default, sets the home directory to
/home/bjmoose, populates it with some basic files (copied from/etc/skel) and adds a line to/etc/passwdsuch as:bjmoose:x:1002:1002::/home/bjmoose:/bin/bashand sets the default shell to
/bin/bash. -
The next available
UIDgreater thanUID_MIN(specified in/etc/login.defs) by default is assigned as bjmoose’s UID -
A group called
bjmoosewith aGID=UIDis also created and assigned as bjmoose’s primary group. -
An entry of
!!is placed in the password field of the/etc/shadowfile for bjmoose’s entry, thus requiring the administrator to assign a password for the account to be usable. -
Custom
useraddcommand:sudo useradd -s /bin/csh -m -k /etc/skel -c "Bullwinkle J Moose" bmoose-s /bin/csh: It specifies the login shell for the new user. In this case, the login shell is set to/bin/csh, which is the C Shell.-m: It ensures that the user’s home directory is created.-k /etc/skel: It sets the skeleton directory from which the contents are copied to the new user’s home directory. The skeleton directory typically contains default configuration files and directories.-c "Bullwinkle J Moose": It specifies the comment or description for the user. In this case, the comment is set to “Bullwinkle J Moose”.bmoose: It is the username for the new user. Replace it with the desired username.
-
Removing a user account is as easy as typing
userdel bjmoose. -
However, this will leave the
/home/bjmoosedirectory intact. This might be useful if it is a temporary inactivation. -
To remove the home directory while removing the account one needs to use the
-roption touserdel. -
Typing
idwith no argument gives information about the current user, as in:$ id uid=1002(bjmoose) gid=1002(bjmoose) groups=106(fuse),1002(bjmoose)If given the name of another user as an argument,
idwill report information about that other user.
Password Management
Section titled “Password Management”-
Passwords can be changed with
passwd. -
Users can change their own password. Root can change any user password.
-
By default, the password choice is examined by
pam_cracklib.so, which furthers making good password choices. A normal user changing their password would type the following command:passwdOutput:
Changing password for bjmoose (current) UNIX password: <bjmoose’s password> New UNIX password: <bjmoose’s-new-password> Retype new UNIX password: <bjmoose’s-new-password> passwd: all authentication tokens updated successfully
Command:
Terminal window $ sudo passwd rjsquirrel`Output:New UNIX password: \<rjsquirrel's-new-password\>Retype new UNIX password: \<rjsquirrel's-password\>passwd: all authentication tokens updated successfully
Adding and Removing Groups
Section titled “Adding and Removing Groups”-
Adding a new group is done with
groupadd:$ sudo /usr/sbin/groupadd anewgroup -
The group can be removed with
groupdel:$ sudo /usr/sbin/groupdel anewgroup -
Adding a user to an already existing group is done with
usermod. For example, you would first look at what groups the user already belongs to:$ groups rjsquirrel rjsquirrel : rjsquirreland then add the new group:
$ sudo /usr/sbin/usermod -a -G anewgroup rjsquirrel$ groups rjsquirrel rjsquirrel: rjsquirrel anewgroup -
These utilities update
/etc/groupas necessary. -
Make sure to use the
-aoption, for append, so as to avoid removing already existing groups.groupmodcan be used to change group properties, such as the Group ID (gid) with the-goption or its name with then-noption. -
Removing a user from the group is somewhat trickier. The
-Goption to usermod must give a complete list of groups. Thus, if you do:$ sudo /usr/sbin/usermod -G rjsquirrel rjsquirrel$ groups rjsquirrel rjsquirrel : rjsquirrelonly the
rjsquirrelgroup will be left.
Why Use /etc/shadow?
Section titled “Why Use /etc/shadow?”- The default permissions of
/etc/passwdare644(-rw-r--r--); anyone can read the file. - This is unfortunately necessary because system programs and user applications need to read the information contained in the file. These system programs do not run as the user root and, in any event, only root may change the file.
- Of particular concern are the hashed passwords themselves. If they appear in
/etc/passwd, anyone may make a copy of the hashed passwords and then make use of utilities such as Crack and John the Ripper to guess the original clear text passwords given the hashed password. This is a security risk! /etc/shadowhas permission settings of400 (-r--------), which means that only root can access this file. This makes it more difficult for someone to collect the hashed passwords.
Unless there is a compelling good reason not to, you should use the /etc/shadow file.
/etc/shadow Format
Section titled “/etc/shadow Format”/etc/shadow contains one record (one line) for each user, as in:
daemon:*:16141:0:99999:7:::
.....beav:$6$iCZyCnBJH9rmq7P.$RYNm10Jg3wrhAtUnahBZ/mTMg.RzQE6iBXyqaXHvxxbK TYqj.d9wpoQFuRp7fPEE3hMK3W2gcIYhiXa9MIA9w1:16316:0:99999:7:::
Each record contains fields separated by colons ( : ):
username: unique user namepassword: the hashed (sha512) value of the passwordlastchange: days since Jan 1, 1970 that password was last changedmindays: minimum days before password can be changedmaxdays: maximum days after which password must be changedwarn: days before password expires that the user is warnedgrace: days after password expires that account is disabledexpire: date that account is/will be disabledreserved: reserved field
The username in each record must match exactly that found in /etc/passwd, and also must appear in the identical order. All dates are stored as the number of days since Jan. 1, 1970 (the epoch date).
The password hash is the string $6$ followed by an eight character salt value, which is then followed by a $ and an 88 character (sha512) password hash.
Password Aging (chage)
Section titled “Password Aging (chage)”-
It is generally considered important to change passwords periodically. This limits the amount of time a cracked password can be useful to an intruder and also can be used to lock unused accounts.
-
The downside is users can find this policy annoying and wind up writing down their ever-changing passwords and thus making them easier to steal.
-
The utility that manages this is chage:
chage [-m mindays] [-M maxdays] [-d lastday] [-I inactive] [-E expiredate] [-W warndays] [-l list information] user
Using chage
Section titled “Using chage”- Only the root user can use
chage. The one exception to this is that any user can run with the -l option to determine when their password or account is due to expire.
To force a user to change their password at their next login, you can run the following command:
sudo chage -d 0 USERNAME
Examples of chage:
#used to view the password and account expiration information for a usersudo chage -l beaver
sudo chage -m 14 -M 30 wally
sudo chage -E 2012-4-1 eddie
sudo chage -d 0 june
The root Account
Section titled “The root Account”The root account is very powerful and has full access to the system. Other operating systems often call this the administrator account; in Linux, it is often called the superuser account.
su and sudo
Section titled “su and sudo”-
When assigning elevated privileges, command
su(switch or substitute user) can be used to launch a new shell running as another user (you must type the password of the user you are becoming). -
Most often, this other user is root, and the new shell allows the use of elevated privileges until it is exited. It is almost always a bad (dangerous for both security and stability) practice to use
suto become root. Resulting errors can include deletion of vital files from the system and security breaches. -
Granting privileges using
sudois less dangerous and is preferred. -
By default,
sudomust be enabled on a per-user basis. However, some distributions (such as Ubuntu) enable it by default for at least one main user, or give this as an installation option. -
By default, root logins through the network are generally prohibited for security reasons.
-
One can permit Secure Shell logins using ssh, which is configured with
/etc/ssh/sshd_config, and PAM (Pluggable Authentication Modules), through thepam_securetty.somodule and the associated/etc/securettyfile. Root login is permitted only from the devices listed in/etc/securetty. -
It is generally recommended that all root access be through
suorsudo(causing an audit trail of all root access throughsudo). Note some distributions (such as Ubuntu), by default actually prohibit logging in directly to the root account. -
PAM can also be used to restrict which users are allowed to
suto root. It might also be worth it to configureauditdto log all commands executed as root.
Elevating to root Account
Section titled “Elevating to root Account”- To temporarily become the superuser for a series of commands, type
suand then be prompted for the root password. - To execute just one command with root privilege type
sudo <command>. When the command is complete, you will return to being a normal unprivileged user. sudoconfiguration files are stored in the/etc/sudoersfile and in the/etc/sudoers.d/directory. By default, thesudoers.ddirectory is empty.
Locked Accounts
Section titled “Locked Accounts”-
Linux ships with some locked accounts which means they can run programs, but can never login to the system and have no valid password associated with them. For example
/etc/passwdhas entries like:bin:x:1:1:bin:/bin:/sbin/nologin daemon:x:2:2:daemon:/sbin:/sbin/nologin -
The
nologinshell returns the following if a locked user tries to login to the system:This account is currently not available.
or whatever message may be stored in
/etc/nologin.txt. -
Such locked accounts are created for special purposes, either by system services or applications; if you scan
/etc/passwdfor users with the nologin shell you can see who they are on your system. -
It is also possible to lock the account of a particular user as in the following command:
$ sudo usermod -L bjmoosewhich means the account stays on the system but logging in is impossible.
-
Unlocking can be done with the
-Uoption. A customary practice is to lock a user’s account whenever they leave the organization or is on an extended leave of absence. -
Another way to lock an account is to use
chageto change the expiration date of an account, as in the following command:$ sudo chage -E 2001-09-11 rjsquirrelThe actual date is irrelevant as long as it is in the past.
Locked accounts have no valid password:
-
Usually represented by “
!!” in/etc/shadow
Group Management
Section titled “Group Management”-
In Linux systems, groups are collections of users with a common purpose. They share files, directories, and privileges, distinguishing them from others on the system. Groups are beneficial for collaborative projects, and users can belong to multiple groups.
-
The
/etc/groupfile defines groups, similar to how the/etc/passwdfile defines users. Each line in the file follows this format:groupname:password:GID:user1,user2,...
Here’s what each component represents:
groupname: Name of the group.password: Placeholder for the group password. Setting group passwords is only possible if /etc/gshadow exists.GID: Group identifier. Values 0-99 are for system groups, while values 100 and above (up to GID_MIN) are considered special. Values beyond GID_MIN are for User Private Groups (UPG).user1,user2,...: Comma-separated list of users who are members of the group. If a user’s primary group is the current group, they don’t need to be listed explicitly.
Group Membership
Section titled “Group Membership”- In Linux, a user has one primary group listed in both
/etc/passwdand/etc/group. A user may belong to between 0 and 15 secondary groups. - The primary group’s
GIDis used when the user creates files or directories. Secondary group membership provides additional permissions.
To identify group membership, you can use either of the following commands:
groups [user1 user2 ...]: Shows the groups for specified users. If no user is specified, it displays the groups for the current user.id -Gn [user1 user2 ...]: Shows the group names for specified users. If no user is specified, it displays the group names for the current user.
Note that the default groups can vary depending on the Linux distribution and installation specifics.
Group Management Commands
Section titled “Group Management Commands”-
Group accounts may be managed and maintained with:
groupadd: Add a new groupgroupmod: Modify a group’s attributesgroupdel: Remove a groupusermod: Manage a user’s group memberships
-
These group manipulation utilities modify the
/etc/groupfile and, if it exists, the/etc/gshadowfile, and may only be executed by root. Example commands:Terminal window $ sudo groupadd -r -g 215 staff$ sudo groupmod -g 101 blah$ sudo groupdel newgroup$ sudo usermod -G student,group1,group2 student
User Private Groups
Section titled “User Private Groups”Linux uses User Private Groups (UPG).
- The idea behind UPGs is that each user will have his or her own group. However, UPGs are not guaranteed to be private; additional members may be added to someone’s private group in
/etc/group. - By default, users whose accounts are created with
useraddhave the primary group id equal to their user idGID = UIDand their group name is also identical to the username. - As specified in
/etc/profile, theumaskis set to 002 for all users created with UPG. Under this scheme, user files are thus created with permissions664 (rw-rw-r--)and directories with775 (rwxrwxr-x).
Environment Variables
Section titled “Environment Variables”- Environment variables are values that can be utilized by the command shell, such as bash, or other utilities and applications.
- A large number of environment variables can be listed with commands such as
env,set,export, orprintenv. Note thatsetmay print out more lines than the other two methods. - Some environment variables are given preset values by the system (which can usually be overridden), while others are set directly by the user, either at the command line or within startup and other scripts.
- An environment variable is simply a character string that contains information used by one or more applications. There are several ways to view the values of currently set environment variables.
Setting Environment Variables
Section titled “Setting Environment Variables”-
By default, variables created within a script are only available to the current shell; child processes (sub-shells) will not have access to values that have been set or modified. Allowing child processes to see the values requires use of the export command.
-
All variables are prefixed with
$when referenced. Except when they are being defined:Task Command Show the value of a specific variable echo $SHELLDefining a Variable $ MYCOLOR=blueNote there can be no spaces around the equal (=) sign!Export a new variable value export VARIABLE=value(orVARIABLE=value; export VARIABLE)Add a variable permanently Edit ~/.bashrcand add the lineexport VARIABLE=value. Typesource ~/.bashrcor just. ~/.bashrc (dot ~/.bashrc); or just start a new shell by typingbash -
You can also set environment variables to be fed as a one shot to a command as in:
$ SDIRS=s_0* KROOT=/lib/modules/$(uname -r)/build make modules_installwhich feeds the values of the
SDIRSandKROOTenvironment variables to the commandmake modules_install.
Exporting Environment Variables
Section titled “Exporting Environment Variables”-
By default, variables created within a script are only available to the current shell. Child processes (sub-shells) will not have access to the contents of these variables.
-
In order for variables to be visible to child processes, they need to be exported using the export command.
Exporting a variable can be done in one step:
$ export VAR=valueor in two steps:
$ VAR=value ; export VARTerminal window $ export VERSION=$(uname-r)$ exportOutput:declare -x BITS="64"declare -x CCACHE_COMPRESS="1"declare -x CCACHE_DIR="/mp/.ccache"...declare -x VERSION="4.0.3"
The HOME Variable
Section titled “The HOME Variable”-
HOME is an environment variable that represents the home (or login) directory of the user.
-
cdwithout arguments will change the current working directory to the value of HOME. -
Note the tilde character (~) is often used as an abbreviation for $HOME. Thus,
cd $HOMEandcd ~are completely equivalent statements.Command Explanation $ echo $HOME/home/me$ cd /binShow the value of the HOME environment variable, then change directory (cd) to /bin. $ pwd/binWhere are we? Use print (or present) working directory (pwd) to find out. As expected, /bin. $ cdChange directory without an argument… $ pwd/home/me…takes us back to HOME, as you can now see.
The PATH Variable
Section titled “The PATH Variable”-
PATH is an ordered list of directories (the path) which is scanned when a command is given to find the appropriate program or script to run. Each directory in the path is separated by colons (:). A null (empty) directory name (or
./) indicates the current directory at any given time.:path1:path2(there is a null directory before the first colon)path1::path2(there is a null directory between path1 and path2)
-
To prefix a private
bindirectory to your path:$ export PATH=$HOME/bin:$PATH$ echo $PATH/home/student/bin:/usr/local/bin:/usr/bin:/bin/usr
The SHELL Variable
Section titled “The SHELL Variable”-
The environment variable SHELL points to the user’s default command shell (the program that is handling whatever you type in a command window, usually bash) and contains the full path name to the shell:
$ echo $SHELL/bin/bash
The PS1 Variable and the Command Line Prompt
Section titled “The PS1 Variable and the Command Line Prompt”-
Prompt Statement (PS) is used to customize prompt string in terminal windows to display the information user want.
-
PS1 is the primary prompt variable which controls what your command line prompt looks like. The following special characters can be included in PS1:
\u- User name\h- Host name\w- Current working directory\!- History number of this command\d- Date
Recalling Previous Commands (history)
Section titled “Recalling Previous Commands (history)”- Bash keeps track of previously entered commands and statements in a history buffer.
- It can recall previously used commands simply by using the
UpandDowncursor keys. - To view the list of previously executed commands, type
historyat the command line. - The list of commands is displayed with the most recent command appearing last in the list.
- This information is stored in
~/.bash_history. - If multiple terminals are open, the commands typed in each session are not saved until the session terminates.
Using History Environment Variables
Section titled “Using History Environment Variables”Several associated environment variables can be used to get information about the history file.
HISTFILE: The location of the history file.HISTFILESIZE: The maximum number of lines in the history file (default 500).HISTSIZE: The maximum number of commands in the history file.HISTCONTROL: How commands are stored.HISTIGNORE: Which command lines can be unsaved.
Finding and Using Previous Commands
Section titled “Finding and Using Previous Commands”| Key | Usage |
|---|---|
Up/Down arrow keys | Browse through the list of commands previously executed |
!! (Pronounced as bang-bang) | Execute the previous command |
CTRL-R | Search previously used commands |
press CTRL-R to do a reverse intelligent search. As you start typing, the search goes back in reverse order to the first command that matches the letters you have typed.
By typing more successive letters, you make the match more and more specific.
Executing Previous Commands
Section titled “Executing Previous Commands”| Syntax | Task |
|---|---|
! | Start a history substitution |
!$ | Refer to the last argument in a line |
!n | Refer to the nth command line |
!string | Refer to the most recent command starting with string |
All history substitutions start with !. When typing the command: ls -l /bin /etc /var, !$ will refer to /var, the last argument to the command.
Keyboard Shortcuts
Section titled “Keyboard Shortcuts”| Keyboard Shortcut | Task |
|---|---|
CTRL-L | Clears the screen |
CTRL-D | Exits the current shell |
CTRL-Z | Puts the current process into suspended background |
CTRL-C | Kills the current process |
CTRL-H | Works the same as backspace |
CTRL-A | Goes to the beginning of the line |
CTRL-W | Deletes the word before the cursor |
CTRL-U | Deletes from beginning of line to cursor position |
CTRL-E | Goes to the end of the line |
Tab | Auto-completes files, directories, and binaries |