
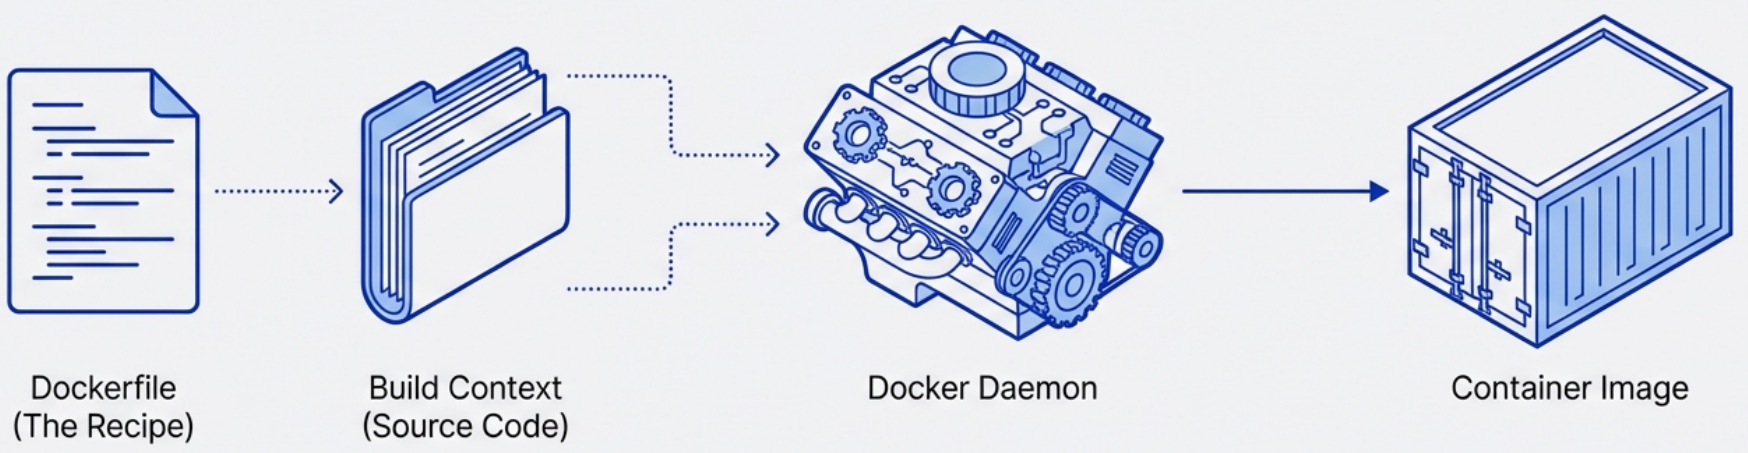
Dockerfile
A Dockerfile is a plain text file containing ordered instructions that Docker executes top-to-bottom to build an image. Each instruction that modifies the filesystem creates a new layer - and layer order matters more than most people realize.
Steps for creating Dockerfile:
- Start with an Operating System
- Install the language runtime
- Install any application dependencies
- Set up the execution environment
- Run the application
Core Instructions
Section titled “Core Instructions”These are the ones you’ll use in almost every Dockerfile:

| Instruction | When to use it |
|---|---|
FROM | Always first. Sets the base image. |
WORKDIR | Sets working directory. Creates it if it doesn’t exist. Prefer over RUN mkdir && cd. |
COPY | Copy local files into the image. Prefer over ADD for local files. |
ADD | Like COPY but also handles remote URLs and auto-extracts tarballs. Use only when you need those features. |
RUN | Execute commands at build time. Each RUN is a layer - chain related commands with &&. |
ENV | Set environment variables that persist into the running container. |
ARG | Build-time variables only. Not available at runtime. Safe for build config, not secrets. |
EXPOSE | Documents which port the app listens on. Does not actually publish the port. |
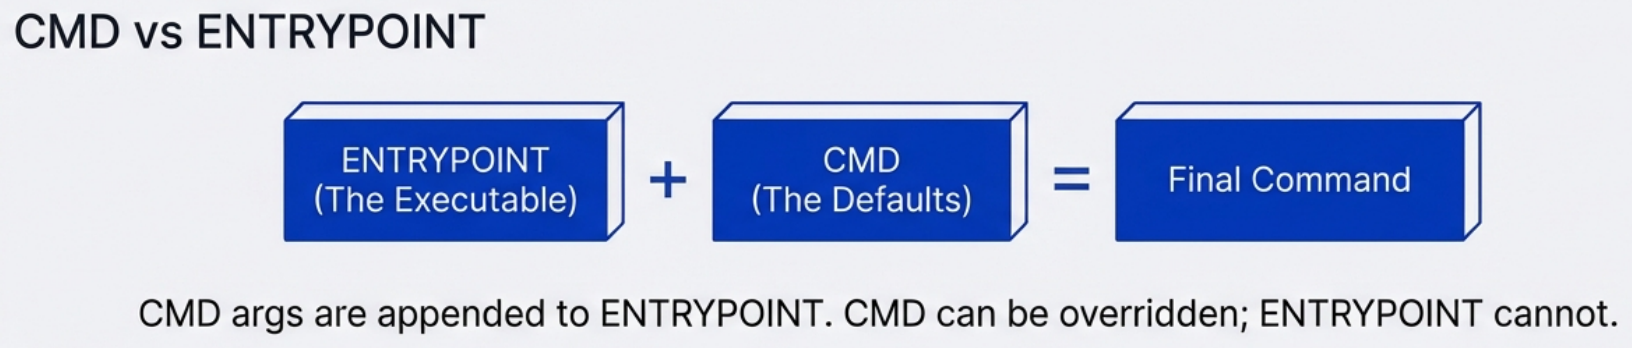
CMD | Default command when the container starts. Overridable at docker run. |
ENTRYPOINT | Sets the container’s executable. CMD becomes its default arguments. |
USER | Switch to a non-root user. Should be near the end, after installs. |
HEALTHCHECK | Define a command Docker uses to check if the container is healthy. |
LABEL | Attach metadata (maintainer, version, etc.) using OCI-standard keys. |
VOLUME | Declare mount points. Signals intent to operators - doesn’t configure mounts. |
ADD vs COPY
Section titled “ADD vs COPY”Both instructions copy files from the build context into the image, but they behave very differently:
| COPY | ADD | |
|---|---|---|
| Local files | ✅ Yes | ✅ Yes |
| Auto-extract tars | ❌ No | ✅ Yes - gzip, bzip2, xz archives are unpacked automatically |
| Remote URLs | ❌ No | ✅ Yes - downloads the file into the image |
| Predictability | ✅ Does exactly what it says | ⚠️ Surprising behavior - extraction and download are implicit |
| Cache invalidation | On file content change | On file content change |
| Prefer? | ✅ Almost always | Only when you specifically need tar auto-extraction |
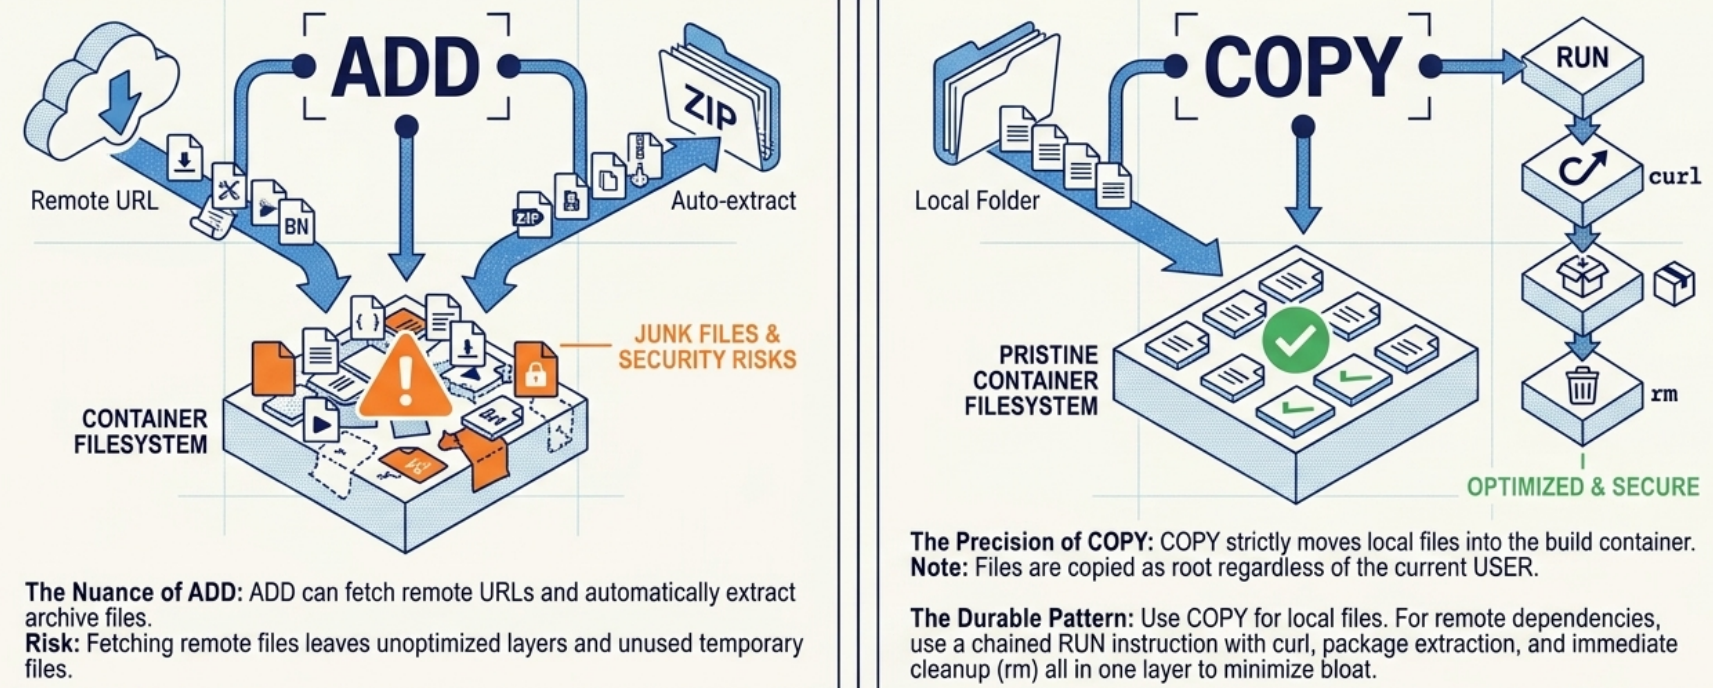
# ✅ Use COPY for local files - explicit and predictableCOPY ./config/nginx.conf /etc/nginx/nginx.confCOPY . /app
# ✅ Use ADD only when you need local tar auto-extractionADD app.tar.gz /app      # extracts into /app automatically
# ❌ Don't use ADD for remote URLs - use RUN curl insteadADD https://example.com/file.tar.gz /tmp/
# ✅ Use RUN curl/wget for remote files - download and clean up in one layerRUN curl -fsSL https://example.com/file.tar.gz -o /tmp/file.tar.gz && \ tar -xzf /tmp/file.tar.gz -C /opt/ && \ rm /tmp/file.tar.gzFor both commands, Docker performs a checksum on the copied files to manage the build cache. If the files have changed since the last build, the cache is invalidated and a new layer is built.
ARG vs ENV
Section titled “ARG vs ENV”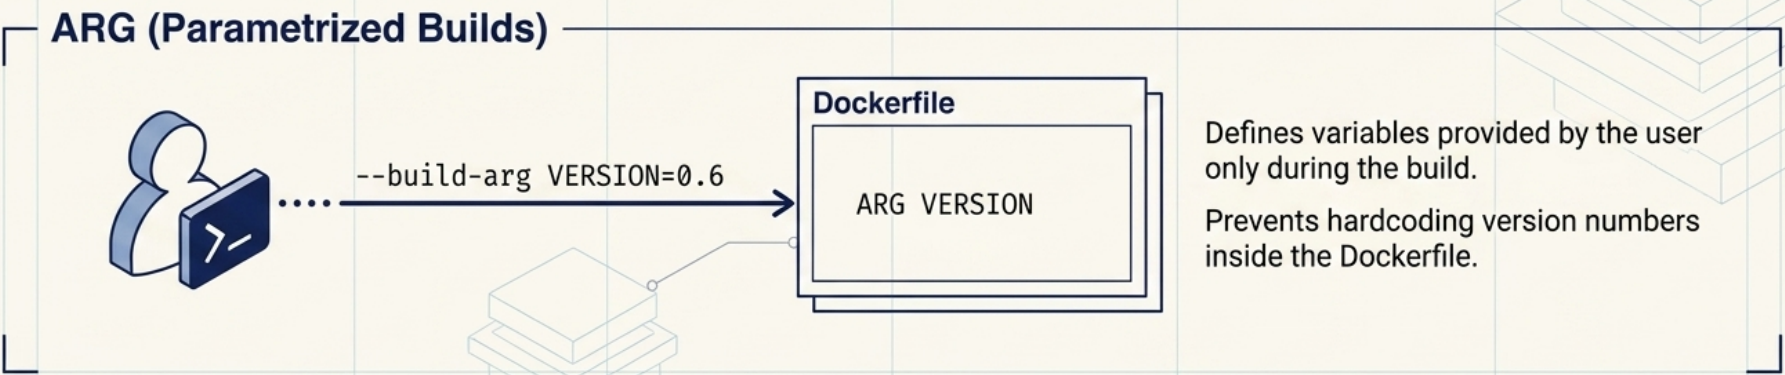
# ARG: build-time only, not in the final image environmentARG NODE_VERSION=20FROM node:${NODE_VERSION}-alpine
# ENV: available at build AND runtimeENV NODE_ENV=productionENV PORT=3000CMD vs ENTRYPOINT
Section titled “CMD vs ENTRYPOINT”This trips up almost everyone at least once.
| CMD | ENTRYPOINT | |
|---|---|---|
| Role | Default arguments / command | The executable itself |
| Overridable? | Yes - any args after docker run image replace it | Only with --entrypoint flag |
| When combined | CMD provides default args to ENTRYPOINT | ENTRYPOINT receives CMD as args |
# Standalone CMD - the whole command is replaceableCMD ["python3", "app.py"]
# docker run myimage python3 other.py  → runs other.py instead
# ENTRYPOINT + CMD - idiomatic pattern for "this image IS a tool"ENTRYPOINT ["nginx"]CMD ["-g", "daemon off;"]
# docker run myimage -c /etc/nginx/custom.conf → passes -c as arg to nginx# docker run --entrypoint sh myimage → replaces nginx entirelyUse ENTRYPOINT when your image wraps a specific executable (a CLI tool, a server). Use CMD alone when you want full flexibility. Always use the exec form (["executable", "arg"]) over shell form (executable arg) - exec form doesn’t spawn a shell process and handles signals correctly.
ONBUILD: Triggers for Downstream Images
Section titled “ONBUILD: Triggers for Downstream Images”The ONBUILD instruction lets base image authors define instructions that execute only when their image is used as a FROM in another build - not when the base image itself is built. The triggers are stored in ContainerConfig.OnBuild metadata and fire immediately after the downstream FROM step.
# Company shared base image: company/node-baseFROM node:20-alpineWORKDIR /appONBUILD COPY package*.json ./ONBUILD RUN npm ci --only=productionONBUILD COPY . .# Downstream Dockerfile - ONBUILD triggers run automaticallyFROM company/node-base # triggers fire here: COPY package.json, RUN npm ci, COPY . .EXPOSE 3000CMD ["node", "server.js"]A common use case is a shared organisational base image that automatically copies source code and installs dependencies when a developer builds their application layer.
Instruction Order Matters (Layer Cache)
Section titled “Instruction Order Matters (Layer Cache)”Docker caches each layer. If a layer hasn’t changed since the last build, Docker reuses it - skipping that step entirely. The moment a layer changes, everything below it rebuilds.
Build cache also means failure recovery is fast: if a build fails partway through, fix the error and re-run - Docker skips every already-successful layer and resumes exactly where the failure occurred.
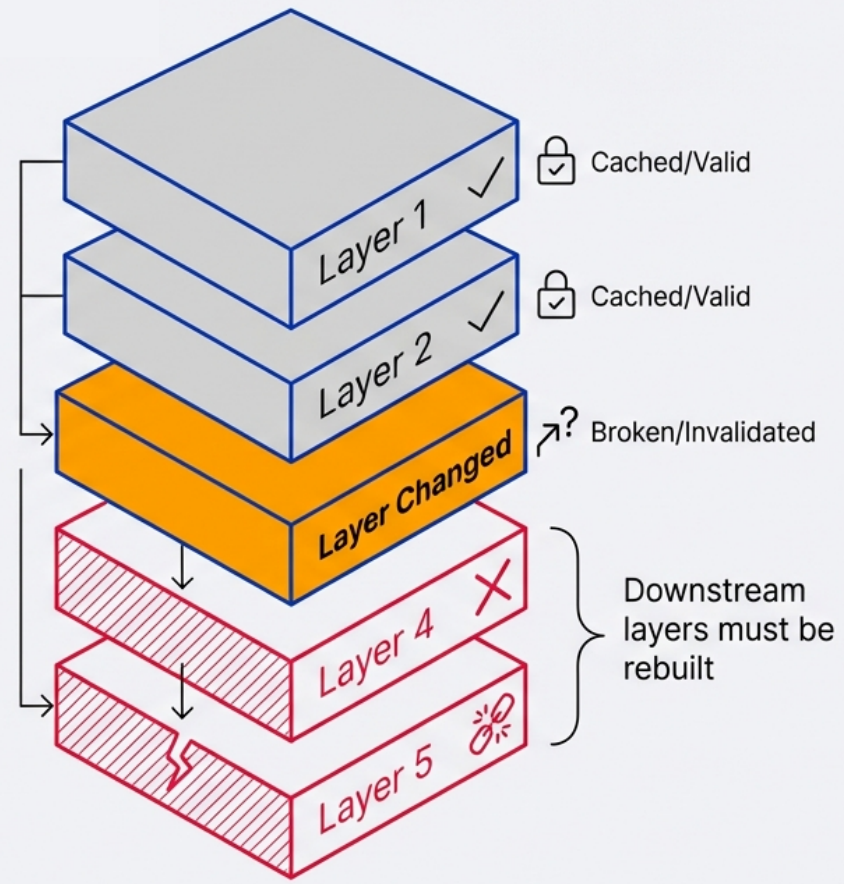
The rule: put things that change least at the top, things that change most at the bottom.
# ❌ Bad order - COPY happens before dependency install# Any file change invalidates the pip install layerFROM python:3.12-slimCOPY . /appWORKDIR /appRUN pip install -r requirements.txt# ✅ Good order - dependencies install from cache unless requirements.txt changesFROM python:3.12-slimWORKDIR /appCOPY requirements.txt . # Copy only the dep manifest firstRUN pip install -r requirements.txt # This layer is cached until requirements.txt changesCOPY . . # Source code changes don't bust the dep cacheThis single change can cut rebuild times from minutes to seconds on most projects.
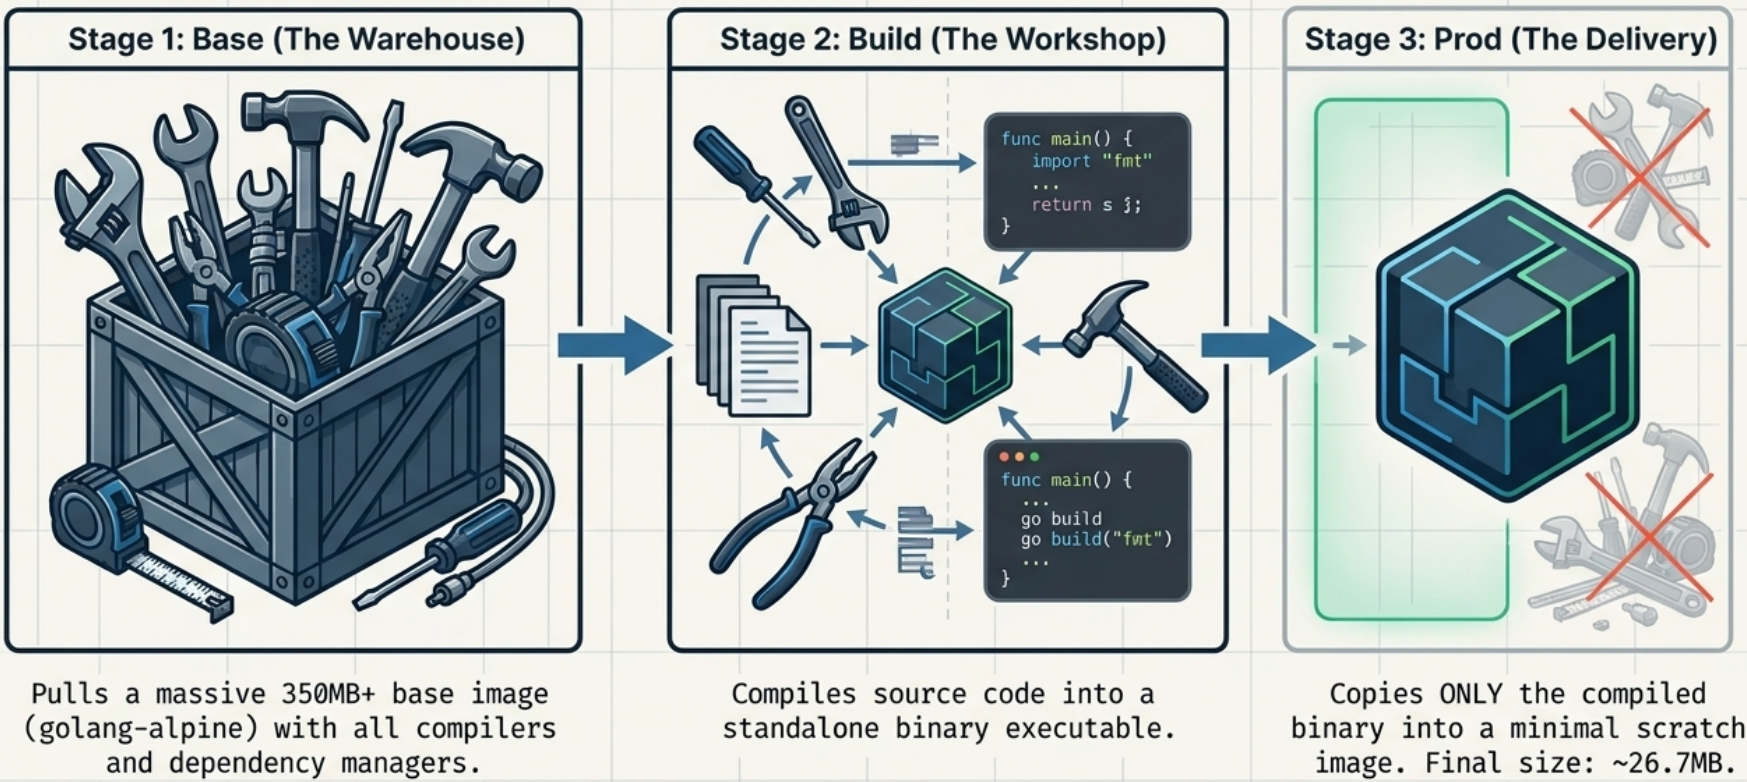
Multi-Stage Builds
Section titled “Multi-Stage Builds”Multi-stage builds are the most impactful optimization for compiled languages or apps with heavy build tooling.
-
The idea: use a fat image to build, copy only the binary/artifact into a minimal final image.
-
Single Dockerfile with multiple
FROMinstructions - eachFROMinstruction represents a new build stage. -
You can name stages using
AS stageNameand reference them in laterCOPY --from=stageNamesteps. -
Each stage outputs an intermediate image that later stages can use, but Docker deletes them when the final stage completes.
# Stage 1: BuildFROM golang:1.22-alpine AS builderWORKDIR /appCOPY go.mod go.sum ./RUN go mod download                  # Cache dependencies separatelyCOPY . .RUN CGO_ENABLED=0 go build -o /server ./cmd/server
# Stage 2: Run - minimal image, no Go toolchainFROM scratchCOPY --from=builder /server /serverEXPOSE 8080ENTRYPOINT ["/server"]
The final image here contains only the compiled binary - no Go compiler, no source code, no package manager. Result: a 5–15MB image instead of 300MB+.
For interpreted languages, multi-stage still helps by separating build dependencies from runtime:
# Stage 1: Install deps (includes build tools for native modules)FROM node:20-alpine AS depsWORKDIR /appCOPY package*.json ./RUN npm ci --only=production
# Stage 2: Runtime imageFROM node:20-alpine AS runtimeWORKDIR /appCOPY --from=deps /app/node_modules ./node_modulesCOPY . .USER node                            # Drop privileges before the app startsEXPOSE 3000CMD ["node", "server.js"]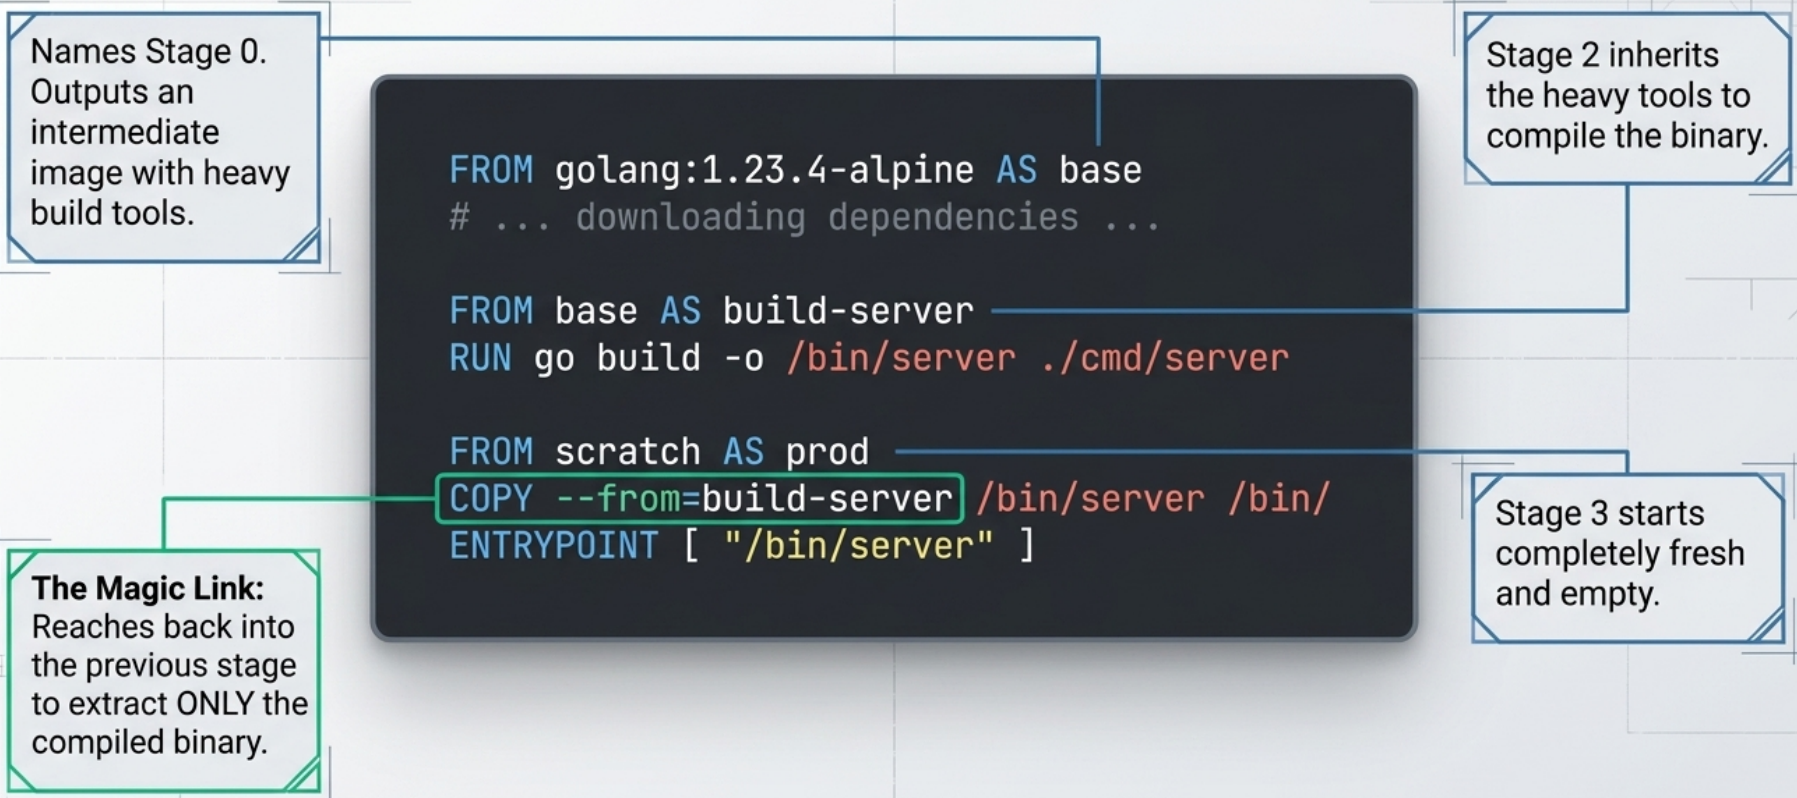
Build Targets: Multiple Images from One Dockerfile
Section titled “Build Targets: Multiple Images from One Dockerfile”If your Dockerfile defines separate named final stages, you can target a specific one at build time:
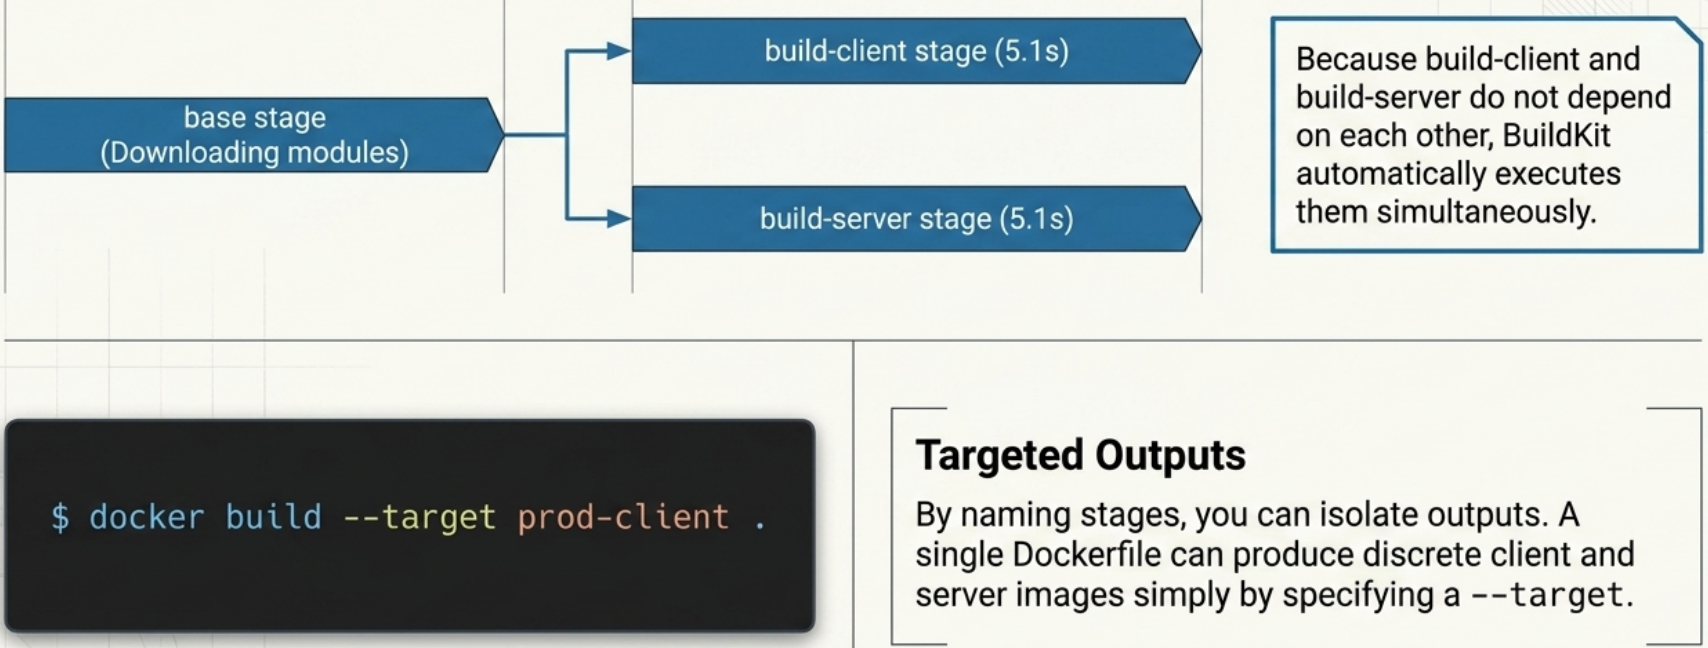
# Production stageFROM node:20-alpine AS prodCOPY --from=deps /app/node_modules ./node_modulesCOPY . .CMD ["node", "server.js"]
# Development stage - includes dev tools and hot-reloadFROM node:20-alpine AS devRUN npm install --include=devCOPY . .CMD ["npm", "run", "dev"]# Build only the production stagedocker build --target prod -t my-app:prod .
# Build only the development stagedocker build --target dev -t my-app:dev .Parallel Stage Execution
Section titled “Parallel Stage Execution”BuildKit automatically runs independent stages in parallel. If two stages both start from the same base, they can execute concurrently once the base stage finishes - no configuration required. Stages with a COPY --from=<stage> dependency will wait for that stage to complete first.
Pinning Base Images
Section titled “Pinning Base Images”# ❌ Unpinned - base image can change without warningFROM node:latest
# ✅ Tag-pinned - predictable, but tags can be re-pushedFROM node:20.12-alpine
# ✅✅ Digest-pinned - immutable, guaranteed the same image every timeFROM node:20.12-alpine@sha256:abc123...Pin to at least a minor version tag in CI. For production base images, digest pinning removes any ambiguity.
Reducing Image Size
Section titled “Reducing Image Size”-
Choose a smaller base image.
alpinevariants are typically 5–10x smaller thandebian-based ones.distrolessorscratchimages are smaller still and have no shell - minimal attack surface. -
Combine
RUNcommands that modify the same set of files, so intermediate files don’t persist in layers:# ❌ Each RUN is a separate layer - cache files persist between layersRUN apt-get updateRUN apt-get install -y curlRUN rm -rf /var/lib/apt/lists/*# ✅ Single layer - cache cleaned in the same stepRUN apt-get update && \apt-get install -y --no-install-recommends curl && \rm -rf /var/lib/apt/lists/* -
Use
.dockerignoreto excludenode_modules,.git, build artifacts, and local env files from the build context. A large build context slows every build even if the files aren’tCOPY’d.
Handling Build-Time Secrets
Section titled “Handling Build-Time Secrets”Don’t COPY credential files or use ARG for secrets - both leak into image history. Use RUN --mount=type=secret:
# syntax=docker/dockerfile:1FROM python:3.12-slim
# Mount a secret at build time - it never lands in any image layerRUN --mount=type=secret,id=pip_token \ pip install --extra-index-url \ "https://$(cat /run/secrets/pip_token)@pypi.company.com/simple/" \ private-package# Pass the secret at build time - not stored in imagedocker build --secret id=pip_token,src=./pip_token.txt -t myapp .Running as a Non-Root User
Section titled “Running as a Non-Root User”By default, Docker runs container processes as root (uid 0). If an attacker escapes the container, they’re root on the host - or close to it. This is the single most impactful security change you can make to a Dockerfile.
A Docker user can always override image defaults at runtime (e.g. docker run --user root), so there is no way for an image to enforce that containers run as non-root. The best an image author can do is establish a non-root user as the default - which still matters significantly, as it protects against misconfigured deployments and reduces the blast radius of most container escapes.
FROM python:3.12-slimWORKDIR /appCOPY requirements.txt .RUN pip install --no-cache-dir -r requirements.txt
# Create a dedicated user and group with no login shellRUN groupadd -r appuser && useradd -r -g appuser appuser
COPY --chown=appuser:appuser . .     # Set ownership at copy time
USER appuser # Switch before CMD/ENTRYPOINTCMD ["python3", "app.py"]HEALTHCHECK
Section titled “HEALTHCHECK”The HEALTHCHECK instruction defines a command Docker runs periodically to determine whether the application inside the container is functioning - distinct from whether the process is simply running.
# Check the /health endpoint every 30s; mark unhealthy after 3 consecutive failuresHEALTHCHECK --interval=30s --timeout=5s --start-period=10s --retries=3 \ CMD curl -f http://localhost:3000/health || exit 1| Option | Default | Meaning |
|---|---|---|
--interval | 30s | How often to run the check |
--timeout | 30s | How long the check command has to respond |
--start-period | 0s | Grace period at startup where failures are ignored |
--retries | 3 | Consecutive failures before marking unhealthy |
Exit codes Docker expects:
0- healthy1- unhealthy (append|| exit 1to commands that return non-standard codes)2- reserved, do not use
Healthchecks can also be defined at runtime with --health-cmd (overrides any Dockerfile HEALTHCHECK):
docker run --health-cmd='curl -f http://localhost/health || exit 1' \ --health-interval=30s \ my-imageStartup Scripts and Precondition Validation
Section titled “Startup Scripts and Precondition Validation”When designing an image, ask yourself whether the software running in your container requires any of the following:
- Startup assistance - runtime configuration, certificate injection, secrets rendering, or templating before the app launches
- Supervision or monitoring - ensuring child processes are restarted if they crash, or zombie processes are reaped
- Coordination with other processes - waiting for a database, sidecar, or shared volume to be ready before the main process starts
If the answer to any of these is yes, you need to include a startup script or initialization program with the image and install it as the ENTRYPOINT. Because a container has no control over the environment it is deployed into, the startup script is your only opportunity to validate that all required conditions are met before handing off to the main application.
#!/bin/shset -e
# Fail fast if required environment variables are missing: "${DB_HOST:?DB_HOST is required}": "${API_KEY:?API_KEY is required}"
# Wait for a dependency to become reachableuntil nc -z "$DB_HOST" 5432; do  echo "Waiting for database at $DB_HOST:5432..."  sleep 2done
# Drop root privileges, then exec into the main process as PID 1exec gosu appuser "$@"- Fail fast - exit immediately on any missing requirement. A startup failure is clearer than an app crash mid-run.
exec "$@"- the final line mustexecthe main process so it becomes PID 1 and receives Docker signals correctly. Withoutexec, the shell stays as PID 1 and your app is unreachable.gosu- a minimal privilege-dropping tool designed for containers. Unlikesuorsudo, it does not spawn a shell wrapper, so the target process inherits PID 1 cleanly with correct signal forwarding.
COPY entrypoint.sh /usr/local/bin/entrypoint.shRUN chmod +x /usr/local/bin/entrypoint.shENTRYPOINT ["entrypoint.sh"] # exec form requiredCMD ["node", "server.js"] # passed as "$@" to the scriptBuilding an Image
Section titled “Building an Image”# Standard build - Dockerfile must be named "Dockerfile" in the current directorydocker build -t my-app:1.0 .
# -f / --file: use a non-standard Dockerfile name or pathdocker build -f Dockerfile.prod -t my-app:prod .
# -q / --quiet: suppress all output, only print the final image IDdocker build -q -t my-app:1.0 .
# --no-cache: bypass layer cache, force a complete rebuilddocker build --no-cache -t my-app:1.0 .
# --build-arg: pass a value into an ARG instruction at build timedocker build --build-arg NODE_VERSION=20 -t my-app:1.0 .Complete Example
Section titled “Complete Example”A production-grade Python API Dockerfile combining everything above:
# syntax=docker/dockerfile:1FROM python:3.12-slim AS base
# Build-time config - declared before LABEL so $APP_VERSION can be interpolatedARG APP_VERSION=dev
# Image metadata (OCI standard labels)LABEL org.opencontainers.image.authors="team@company.com" \      org.opencontainers.image.source="https://github.com/company/myapi" \      org.opencontainers.image.description="Production Python API" \      org.opencontainers.image.version="$APP_VERSION"
# Runtime environmentENV PYTHONDONTWRITEBYTECODE=1 \    PYTHONUNBUFFERED=1 \    PORT=8000
WORKDIR /app
# Create non-root user early so COPY --chown can reference it# Explicit UID/GID (1001) for Kubernetes admission controller compatibilityRUN groupadd -r -g 1001 api && \    useradd -r -u 1001 -g api --no-create-home api
# --- Dependency layer (cached until requirements.txt changes) ---COPY --chown=api:api requirements.txt .RUN --mount=type=cache,target=/root/.cache/pip \    pip install -r requirements.txt
# --- App layer ---COPY --chown=api:api . .
USER api
EXPOSE 8000
HEALTHCHECK --interval=30s --timeout=5s --start-period=10s --retries=3 \    CMD python3 -c "import urllib.request; urllib.request.urlopen('http://localhost:8000/health')"
# ENTRYPOINT = the executable; CMD = default args (overridable at docker run)ENTRYPOINT ["python3", "-m", "uvicorn"]CMD ["app.main:app", "--host", "0.0.0.0", "--port", "8000"]
Multi-Stage Build: Go REST API
Section titled “Multi-Stage Build: Go REST API”A compiled language shows the full power of multi-stage builds. The builder stage needs the entire Go toolchain; the runtime image needs only the binary:
# syntax=docker/dockerfile:1
# ─── Stage 1: Build ──────────────────────────────────────────────────────────FROM golang:1.22-alpine AS builder
ARG APP_VERSION=devWORKDIR /build
# Download modules first - cached until go.mod/go.sum changeCOPY go.mod go.sum ./RUN --mount=type=cache,target=/root/go/pkg/mod \    go mod download
COPY . .
# Compile a static binary; embed version string via ldflags# -s -w strips debug info for a smaller binaryRUN --mount=type=cache,target=/root/.cache/go-build \    CGO_ENABLED=0 GOOS=linux go build \      -ldflags="-s -w -X main.version=${APP_VERSION}" \      -o /server ./cmd/server
# ─── Stage 2: Runtime ────────────────────────────────────────────────────────# distroless/static: includes CA certs and tzdata but has no shell,# no package manager, and no debug tooling - minimal attack surfaceFROM gcr.io/distroless/static-debian12:nonroot
# ARG values do not cross stage boundaries - re-declare to use in this stageARG APP_VERSION=dev
LABEL org.opencontainers.image.authors="team@company.com" \      org.opencontainers.image.source="https://github.com/company/myapp" \      org.opencontainers.image.description="Production Go API" \      org.opencontainers.image.version="$APP_VERSION"
# Copy only the compiled binary - no source, no toolchain, no package managerCOPY --from=builder /server /server
# distroless:nonroot already runs as UID 65532 - no USER instruction needed
EXPOSE 8080
# No shell in distroless - HEALTHCHECK CMD cannot execute here.# Use Kubernetes readiness/liveness probes, or implement a /healthz HTTP# handler in the binary and probe via the orchestrator instead.
ENTRYPOINT ["/server"]CMD ["--host", "0.0.0.0", "--port", "8080"]