
Docker Image
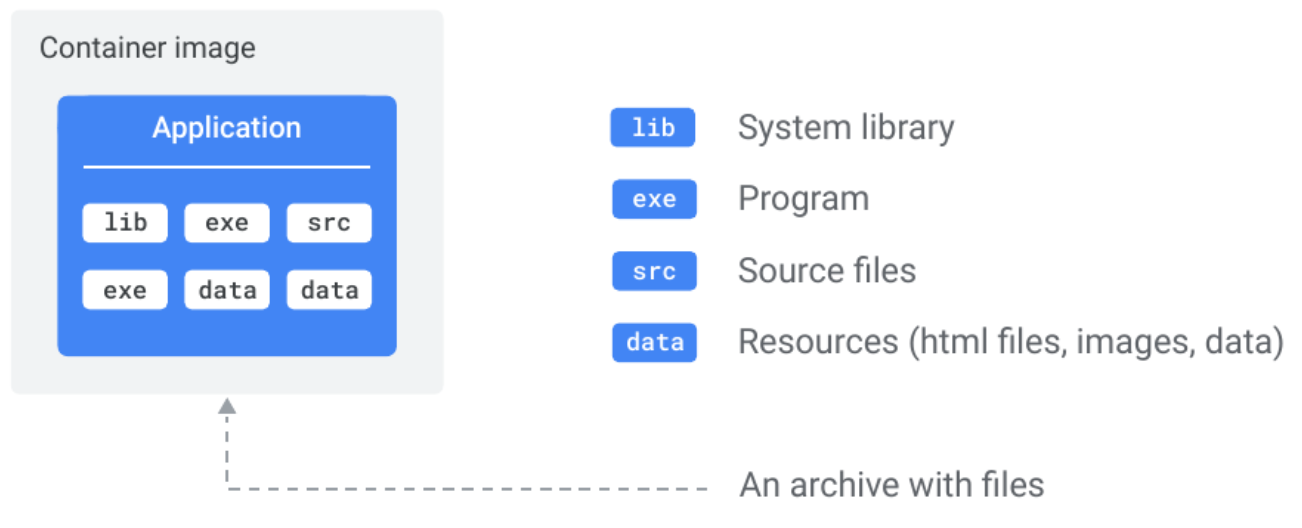
- A Docker image is a read-only package, containing everything needed to run an application - code, runtime, libraries, environment variables, and configuration.
- Built from a Dockerfile using
docker buildor by manually modifying an existing image inside a container usingdocker commit. Hosted on a registry and pulled to any machine with a Docker runtime. - An image is just a collection of image layers.
- Docker creates images by stacking independent layers and representing them as a single unified object. One layer might contain OS components, another application dependencies, and another the application code itself - Docker stacks these and makes them appear as one unified filesystem to anything running inside the container.
- Images are immutable and build-time constructs - you never modify a running image; updates mean building a new one. Containers are the runtime counterpart: a container is essentially an image brought to life with a writable layer on top. You can also think of it the other way around - a stopped container is a potential image.
docker commitlets you snapshot a stopped container’s state into a new image, though for reproducibility you should prefer a Dockerfile in production. - Images are kept small by design - they share the host OS kernel (no kernel included) and exclude non-essential tools like package managers and shells. Images stripped of these extras are called slim images.
- Once a container is running, the image and container are bound - you cannot delete the image until you stop and delete the container. If multiple containers use the same image, the image can only be deleted after all of them are removed.
Layered Architecture
Section titled “Layered Architecture”-
Every instruction in a Dockerfile that modifies the filesystem creates a new layer. A layer is a set of files and file metadata packaged and distributed as an atomic unit.
-
Docker Engine’s cache stores these layers and reuses them across builds, speeding up the process and reducing storage usage.
-
Internally, Docker treats each layer as an image - layers are often called intermediate images. You can even promote a layer to a full image by tagging it with
docker tag <layer-id> <name>. -
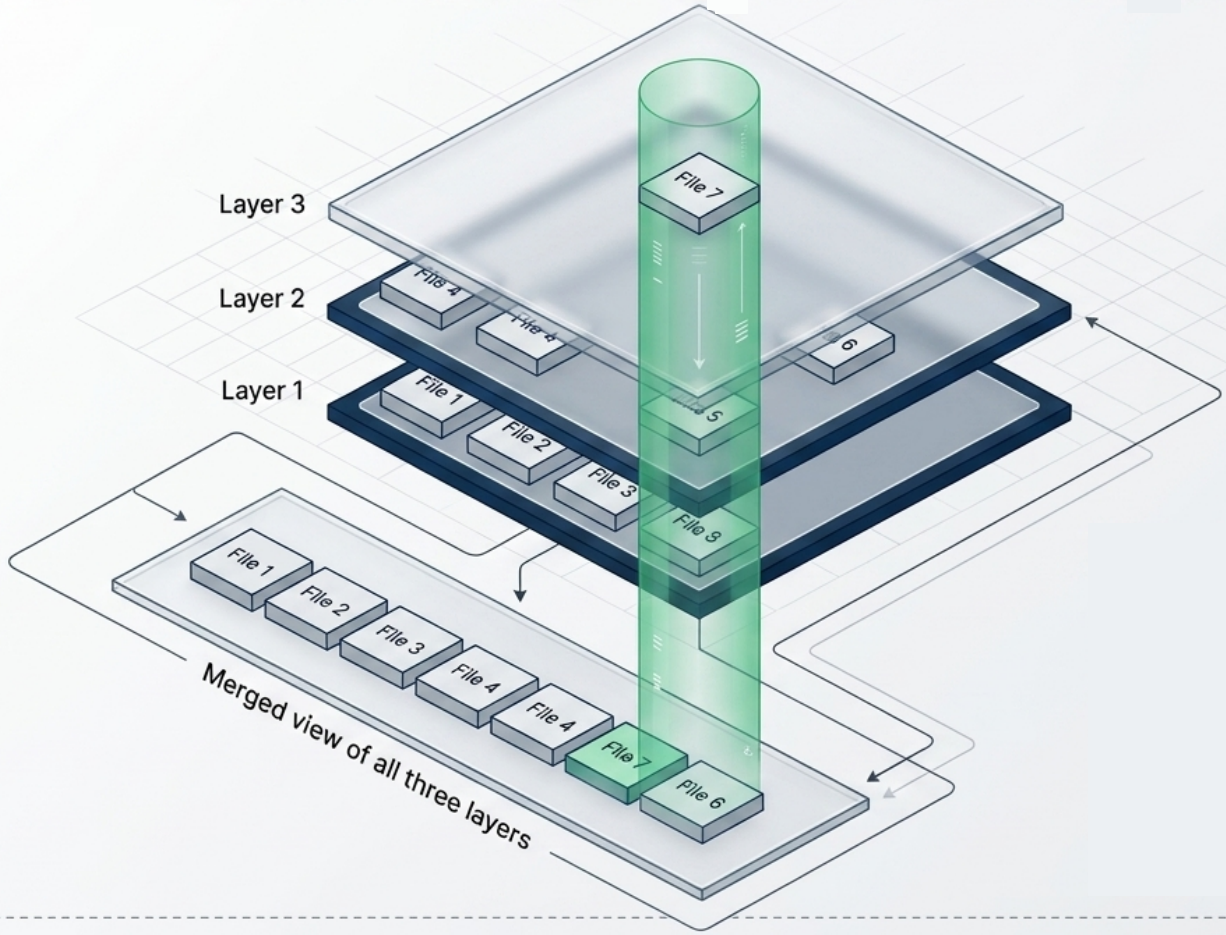
Images maintain parent/child relationships - each image builds on its parent and adds layers on top. The files available to a container are the union of all layers across the entire image lineage. Images can have parent/child relationships with any other image, including images in different repositories with different owners.
-
Layers are stacked using a Union Filesystem - Docker uses the
overlay2storage driver to present all independent read-only layers as a single unified filesystem. Each layer contains only the delta from the previous. -
Layer shadowing: When layers are stacked, a file in a higher layer with the same name as a file in a lower layer will shadow (obscure) the lower one. The container sees only the top-most version.
-
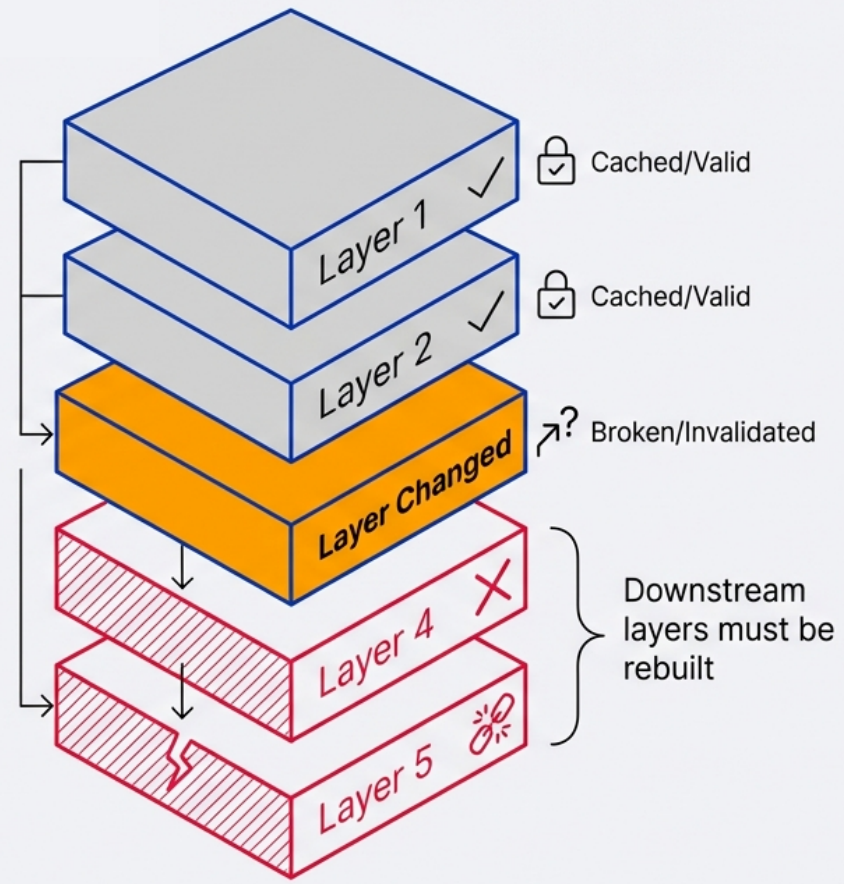
Layers are cached and reused - if a layer hasn’t changed, Docker skips rebuilding it and reuses the cached version. This makes rebuilds fast.
-
Layers are stored as independent objects, and the image is just metadata identifying the required layers and explaining how to stack them.
FROM ubuntu:22.04 → Layer 1: Base OS filesystemRUN apt-get install nginx → Layer 2: nginx binaries addedCOPY ./site /var/www/html → Layer 3: your site content added
-
Shared layers: Multiple images that share a base layer (e.g., all your apps based on
node:22-alpine) only store that base layer once on disk. No duplication.
Image vs Container
Section titled “Image vs Container”| Docker Image (Blueprint) | Docker Container (Implementation) | |
|---|---|---|
| What it is | Blueprint (read-only layers) | Running instance of an image |
| State | Static, immutable | Has a writable layer on top |
| Lifecycle | Built once, used many times | Created from an image, stopped, removed |
| Storage | Passive - no CPU/RAM required | Active - consumes RAM while running |
| Data | Baked in at build time | Runtime writes go to container layer (ephemeral) |
| Sharing | Pushed/pulled via registry | Not shareable - run a new container instead |
- When a container starts, Docker adds a thin read-write layer on top of the image’s read-only layers.
- Any data written to this layer is lost when the container is removed unless mounted to a volume.
Manual Image Construction
Section titled “Manual Image Construction”An alternative to writing a Dockerfile is building an image manually - by modifying a live container and committing its filesystem state as a new image. This works because a container’s filesystem is a UFS mount: every change made inside the container is written as a new layer owned by that container.
Workflow:
-
Start an interactive container from a base image
Terminal window docker container run -it --name image-dev ubuntu:latest /bin/bash -
Modify the container’s filesystem - install software, add files, change config. All writes go to the container’s writable layer.
Terminal window # Inside the containerapt-get update && apt-get install -y git -
Commit the container as a new image - best practice is to include an author (
-a) and a commit message (-m):Terminal window docker container commit -a "@author" -m "Added git" image-dev ubuntu-git
Inspecting what changed - docker diff
If you need to review which files were modified before committing, use docker container diff. It lists every altered path with a status letter:
| Status | Meaning |
|---|---|
A | File or directory was added |
C | File or directory was changed |
D | File or directory was deleted |
docker container diff image-devExecution context metadata
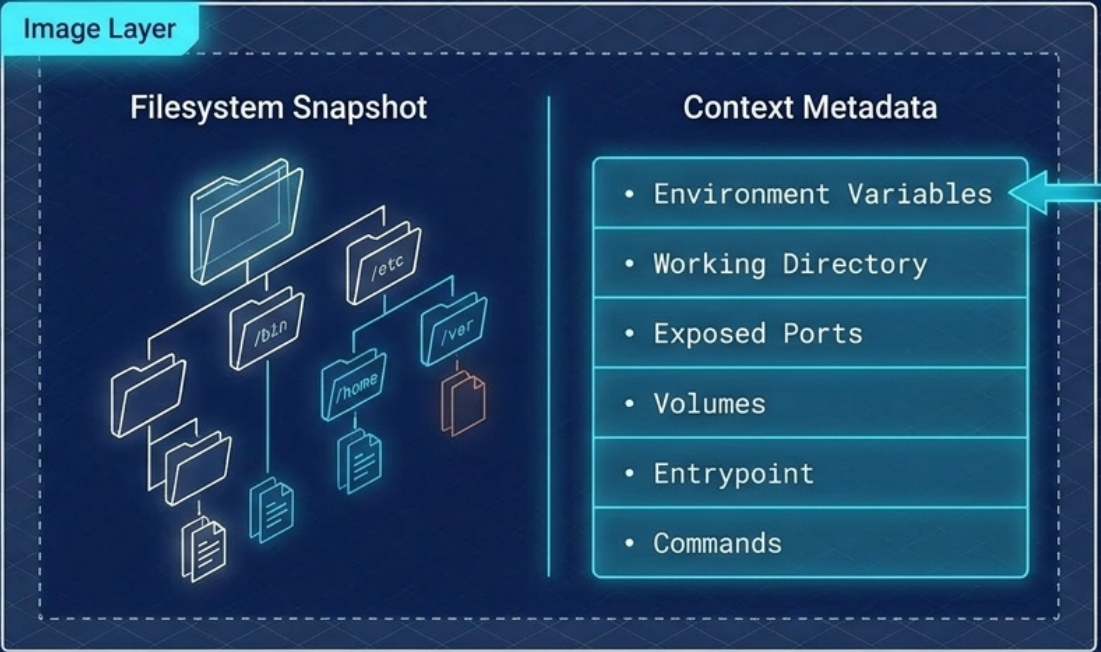
docker commit saves more than just the filesystem snapshot - it also captures the container’s execution context, which the resulting image inherits:
-
Environment variables
-
Working directory
-
Exposed ports and volume definitions
-
Entrypoint and default command
This means you can set a specific entrypoint before committing so the packaged tool runs automatically:
# Exit and re-run with a custom entrypoint, then commitdocker container run -it --name git-image --entrypoint git ubuntu-gitdocker container commit -a "@author" -m "Set git entrypoint" git-image ubuntu-git:v2Pulling Images
Section titled “Pulling Images”-
Pulling is the process of downloading an image from a registry to the local image cache (stored at
/var/lib/docker/<storage-driver>/on Linux). -
When you run
docker pullwith no registry or tag specified, Docker assumes Docker Hub as the registry andlatestas the tag. -
Docker is efficient during pulls - it checks which layers already exist in the local cache and skips downloading those. Only missing layers are transferred.
Terminal window # Pull from Docker Hub (implicit registry + latest tag)docker pull nginx# Pull a specific tagdocker pull nginx:1.25.3# Pull from a private registrydocker pull myregistry.azurecr.io/team/my-app:v2.1# Pull by digest (immutable - exact image guaranteed)docker pull nginx@sha256:abc123...
Key Image Commands
Section titled “Key Image Commands”# Build an image from a Dockerfile in the current directorydocker build -t my-app:1.0 .
# List images on the local machinedocker images
# List images with their digestsdocker images --digests
# Pull an image from a registrydocker pull nginx:alpine
# Inspect image layers and metadatadocker inspect nginx:alpinedocker history nginx:alpine # Show all layers (including metadata-only layers)
# Tag an existing image for a different registrydocker tag my-app:1.0 myregistry.io/team/my-app:1.0
# Push to a registry (must be logged in)docker push myregistry.io/team/my-app:1.0
# Remove an imagedocker rmi my-app:1.0
# Force-remove (untags if container is stopped - leaves a dangling image)docker rmi -f my-app:1.0
# Remove dangling (untagged) images only - images used by stopped containers are keptdocker image prune
# Remove ALL unused images (not referenced by any container, running or stopped)docker image prune -a
# Delete ALL local images (force)docker rmi $(docker images -q) -fImage Naming and Tags
Section titled “Image Naming and Tags”- An image is named when its author tags and publishes it. Until an image is tagged, the only way to refer to it is by its unique image ID generated at build time.
- Docker displays a 12-digit truncated ID in command output (e.g.,
docker images,docker ps) for readability. Internally and via the API, Docker uses the full 64-character hex ID. - A single image can be assigned multiple tags - for example, the same image might be tagged as both
nginx:1.25.3andnginx:stable. - The
latesttag is the default, but it is not guaranteed to be the most up-to-date image in the repository. It is simply the tag that was most recently pushed aslatest.
Images are identified as: [registry/][namespace/]name[:tag]
| Example | Meaning |
|---|---|
nginx | docker.io/library/nginx:latest (implicit) |
nginx:alpine | Official nginx, alpine variant |
myregistry.io/myteam/app:v2.1 | Private registry, specific version |
myapp@sha256:abc123... | Pinned to exact digest - most reproducible |
Official vs Unofficial Images
Section titled “Official vs Unofficial Images”- Official images live at the top-level namespace on Docker Hub (e.g.,
nginx,redis,python). They are curated and vetted by Docker and the software vendors, feature a green “Docker Official Image” badge, and are generally secure and well-documented. - Unofficial images live in user or organization namespaces (e.g.,
nigelpoulton/gsd). Treat any unofficial image as potentially unsafe by default - always inspect the Dockerfile and source before using it in production. - Always pin versions in production -
nginx:1.25.3notnginx:latest. Tags are mutable;latestcan change without warning. - Use digest pinning for critical dependencies - digest (
sha256:...) is immutable and guarantees the exact image.
Digest Pinning
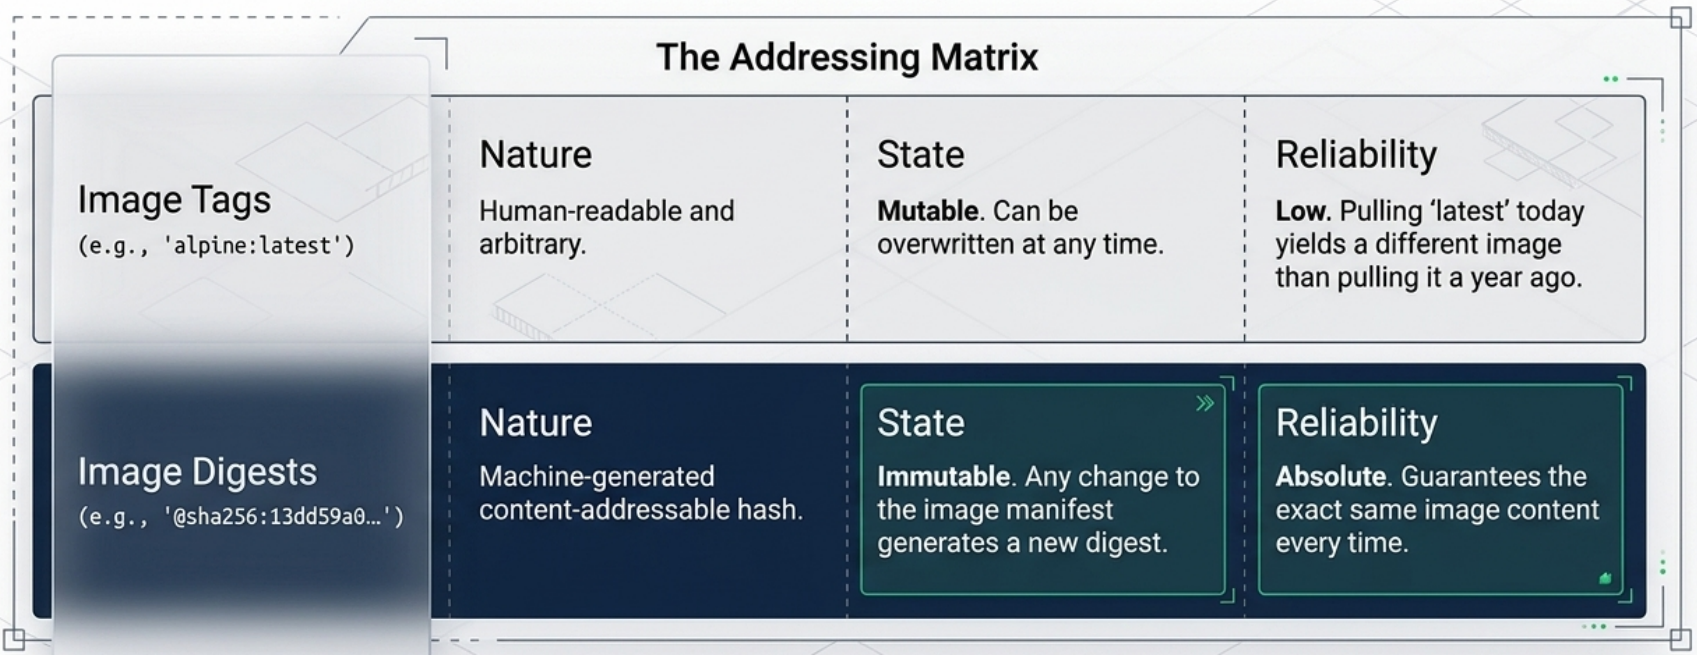
Section titled “Digest Pinning”Tags are mutable - anyone with push access can overwrite a tag with a different image, including replacing a safe version with a vulnerable one. Digests solve this.
-
Docker assigns every image a cryptographic digest (content hash) based on its contents. Digests are immutable and guarantee you get the exact image, regardless of what happens to the tag.
-
The image digest specifically hashes the image’s manifest file, not the layers directly.
-
Docker compares hashes before and after every push and pull to detect tampering in transit. However, because Docker compresses layers during push/pull to save bandwidth and registry storage, the uncompressed hash won’t match the hash of the compressed data on the wire. To solve this, each layer gets two hashes:
- Content hash - hash of the uncompressed layer. Used locally to verify layer integrity.
- Distribution hash - hash of the compressed layer as transmitted over the network. Included with every push/pull and used to verify no tampering occurred during transfer.
-
This is why hashes shown in different CLI commands and registry outputs don’t always match - sometimes you are looking at a content hash, other times a distribution hash.
Terminal window # View digests for local imagesdocker images --digests# Inspect a remote image's digest without pulling itdocker buildx imagetools inspect nginx:1.25.3# Pull by digest - guaranteed to be the exact same image every timedocker pull nginx@sha256:a3e4b5c6d7...
Multi-Architecture Images
Section titled “Multi-Architecture Images”Docker can hide images for multiple CPU architectures behind a single tag. When you docker pull nginx, Docker automatically queries the registry and pulls the version built for your host architecture (e.g., linux/amd64, linux/arm64).

This is implemented with two layers of metadata:
| Object | Role |
|---|---|
| Manifest list (aka Image Index) | Lists all architectures supported by a tag. Points to individual manifests for each. |
| Manifest | Defines the layers and configuration for one specific architecture. |
# Inspect a manifest list to see all supported architecturesdocker buildx imagetools inspect nginx:latest
# Build a multi-architecture imagedocker buildx build --platform linux/amd64,linux/arm64 -t myapp:latest --push .
Building multi-architecture images requires one of two approaches:
| Method | Speed | Notes |
|---|---|---|
| Emulation (QEMU) | Slow | Builds non-native arches by emulating the CPU. No shared cache. |
| Docker Build Cloud | Fast | Native hardware for each arch. Shared cache. Requires paid subscription. |
Vulnerability Scanning with Docker Scout
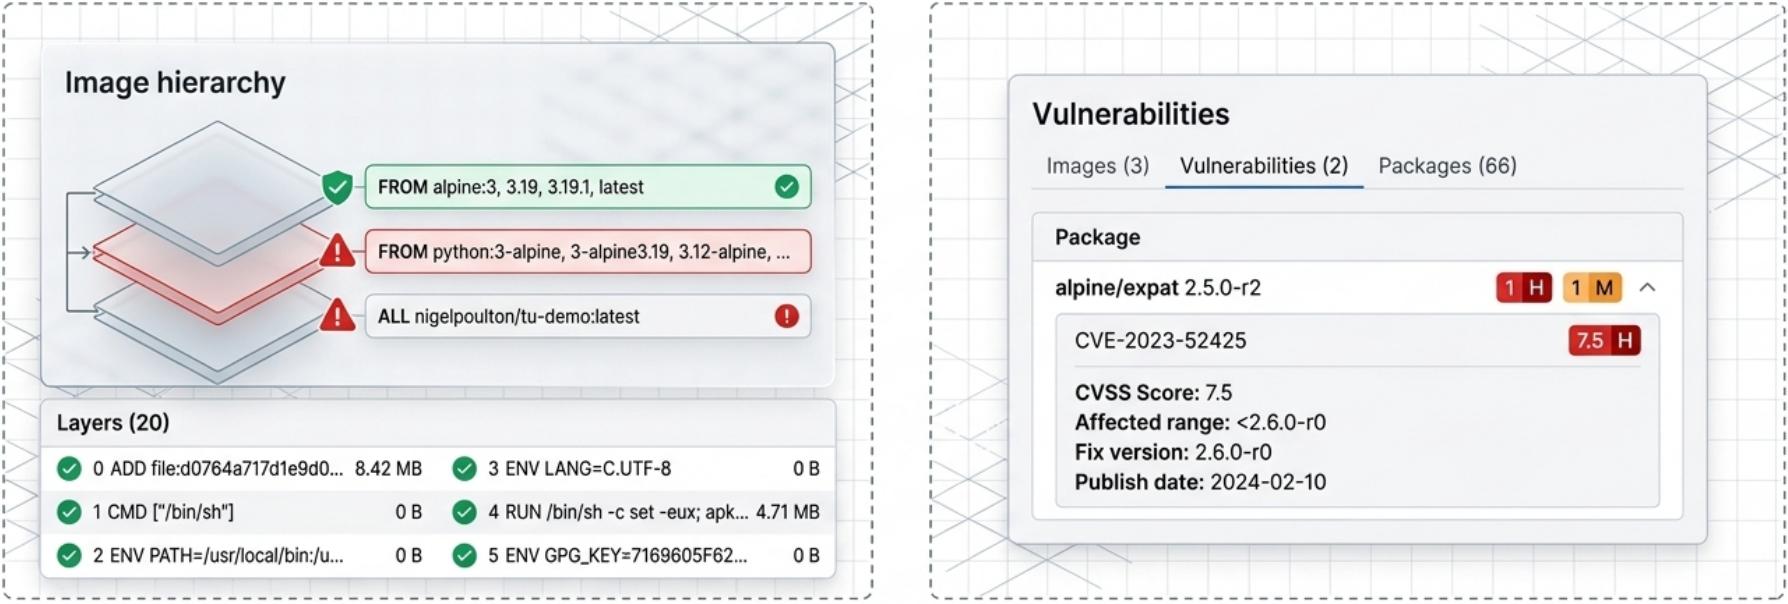
Section titled “Vulnerability Scanning with Docker Scout”Docker Scout is a built-in CLI plugin and service that analyzes images for CVEs (Common Vulnerabilities and Exposures). It maps an image’s Software Bill of Materials (SBOM) against known vulnerability databases.
# Quick overview of vulnerability counts by severitydocker scout quickview nginx:latest
# Granular CVE report with affected packages and fixed versionsdocker scout cves nginx:latest
# Scan a locally built image before pushingdocker scout cves my-app:1.0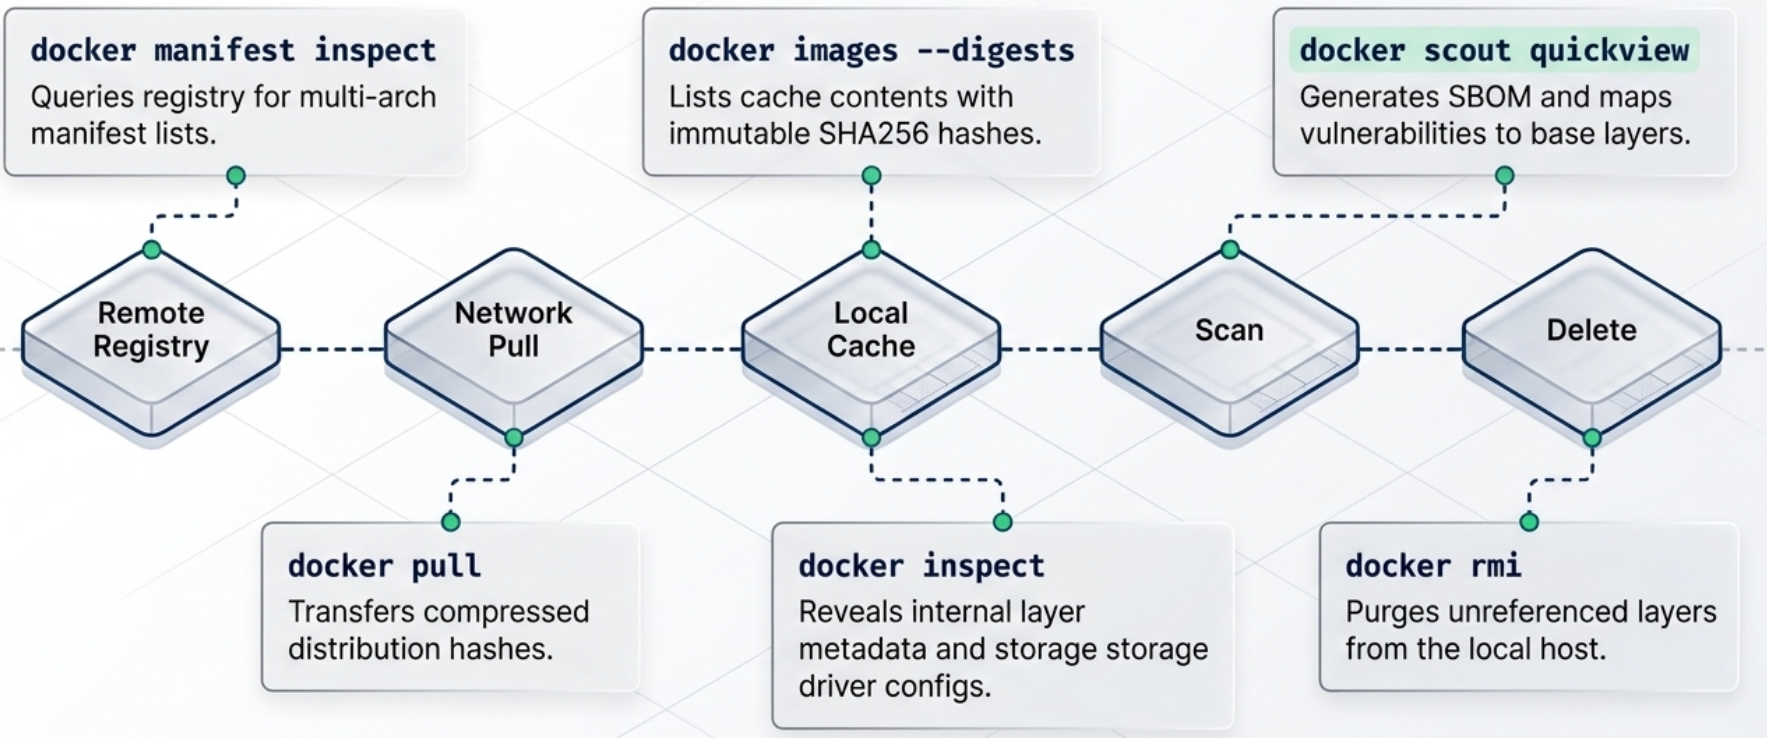
The Docker Build System: Buildx and BuildKit
Section titled “The Docker Build System: Buildx and BuildKit”When you run docker build, two components are involved behind the scenes:
| Component | Role |
|---|---|
| Buildx (client) | CLI plugin that interprets your command, packages the Dockerfile + build context + flags, and sends them to the backend. Default since Docker v23.0 / Docker Desktop v4.19. |
| BuildKit (server) | The backend that executes build instructions and produces the final image. Each BuildKit instance is called a builder. Supports advanced features like multi-stage builds, parallel stage execution, and inline cache. |
Build Drivers
Section titled “Build Drivers”Buildx supports different drivers that control where the build actually runs:
| Driver | Where it runs | Architectures | Notes |
|---|---|---|---|
docker-container (local) | BuildKit container on your machine | AMD, ARM, RISC-V, s390x (via QEMU) | No subscription required, emulation can be slow |
cloud (Docker Build Cloud) | Remote native hardware | AMD, ARM | Shared team cache, faster builds - requires paid subscription |
# List available buildersdocker buildx ls
# Create a local builder using the docker-container driverdocker buildx create --use --name my-builder
# Build for multiple architectures and push directly to registrydocker buildx build --platform linux/amd64,linux/arm64 -t yourusername/my-app:1.0 --push .
# Force a build without using the cachedocker build --no-cache -t my-app:1.0 .
Docker Build Cloud
Section titled “Docker Build Cloud”Docker Build Cloud is a remote build service where builds execute on Docker-managed native hardware in the cloud — rather than on your local machine or a local BuildKit container.
Why it matters for multi-architecture images:
| Method | Speed | How |
|---|---|---|
Local (docker-container driver) | Slow for non-native arches | Emulates foreign CPUs via QEMU — an ARM build on an x86 machine runs at a fraction of native speed |
Docker Build Cloud (cloud driver) | Fast for all arches | Runs each architecture on dedicated native hardware — no emulation overhead |
Additional benefits beyond speed:
- Shared team cache: All team members building the same image share a single remote layer cache. A cache miss for one developer is a cache hit for everyone else after the first build.
- No local resource consumption: Heavy builds (large monorepos, multi-stage) don’t saturate local CPU/RAM.
- Consistent environment: Removes “works on my machine” build variance — everyone uses the same remote BuildKit version and OS.
# Sign into Docker to authenticate with Build Clouddocker login
# Connect your local Buildx CLI to a cloud builder# (replace 'my-org' with your Docker Hub org or username)docker buildx create \  --driver cloud \  --name cloud-builder \  my-org/default
# Set the cloud builder as the active builderdocker buildx use cloud-builder
# Build and push — executes on remote native hardwaredocker buildx build \  --platform linux/amd64,linux/arm64 \  -t myregistry.io/my-app:1.0 \  --push .
# Switch back to local builder when neededdocker buildx use my-builder