
The Mechanics of Containerization
What Is a Container Image?
Section titled “What Is a Container Image?”A container image is an immutable, self-contained package that bundles everything your application needs to run. Think of it as a snapshot - a blueprint that describes the state of a filesystem and the configuration needed to launch a process from it.
What Goes Inside a Container Image?
Section titled “What Goes Inside a Container Image?”A container image can include any combination of the following:
| Content Type | Description |
|---|---|
| System packages | OS-level utilities and libraries (e.g., glibc, openssl) |
| A runtime | The execution environment for your app (e.g., JVM, Node.js, Python interpreter) |
| Library dependencies | Application-level libraries your code imports |
| Source code | Your application’s source files (in interpreted languages) |
| Binaries | Pre-compiled executables |
| Static assets | HTML, CSS, images, config templates |
| Configuration | Container configuration (entrypoint, env vars, user, working dir) |
Containers vs. Container Images
Section titled “Containers vs. Container Images”| Concept | Definition |
|---|---|
| Container Image | A static, read-only blueprint stored on disk. It doesn’t “run” - it just exists. |
| Container | A live, running instance created from a container image. It only exists while there are active processes. |
- When you run a container image, the container runtime executes the program specified in the image’s entrypoint (e.g., starting the JVM for a Java app).
- A container only exists at runtime. If the process exits or is killed, the container stops and ceases to exist.
What Happens When a Container Starts?
Section titled “What Happens When a Container Starts?”Two important things happen automatically when a container is launched:
1. Private File System Seeding
Section titled “1. Private File System Seeding”The contents of the container image are used to seed a private, isolated file system for the container. Every process inside the container sees this file system - and only this file system - as if it were the entire machine.
2. Virtual Network Interface
Section titled “2. Virtual Network Interface”The container gets its own virtual network interface with a local IP address. Your application can bind to this interface and start listening on a port, enabling it to receive incoming network traffic.
Container Configuration
Section titled “Container Configuration”The configuration section of a container image tells the runtime how to turn the image into a running container. Key settings include:
Entrypoint
Section titled “Entrypoint”The entrypoint is the command executed when the container starts. For example:
- A Java app →
java -jar app.jar - A Python app →
python main.py - A compiled binary →
/usr/local/bin/myapp
Environment Variables
Section titled “Environment Variables”Used to pass runtime configuration into your application without baking it into the image. Common uses: database URLs, API keys, feature flags, log levels.
DATABASE_URL=postgres://user:pass@host/dbLOG_LEVEL=infoSpecifies which OS user the container process runs as.
Working Directory
Section titled “Working Directory”Sets the default directory from which the entrypoint command is executed (equivalent to cd /app before running your process).
Runtime Overrides
Section titled “Runtime Overrides”When starting a container, you can override the image’s default values for:
- The entrypoint command
- Arguments passed to the entrypoint
- Environment variables
This makes images reusable across different environments (dev, staging, production) without rebuilding.
The Linux Kernel Features That Make Containers Possible
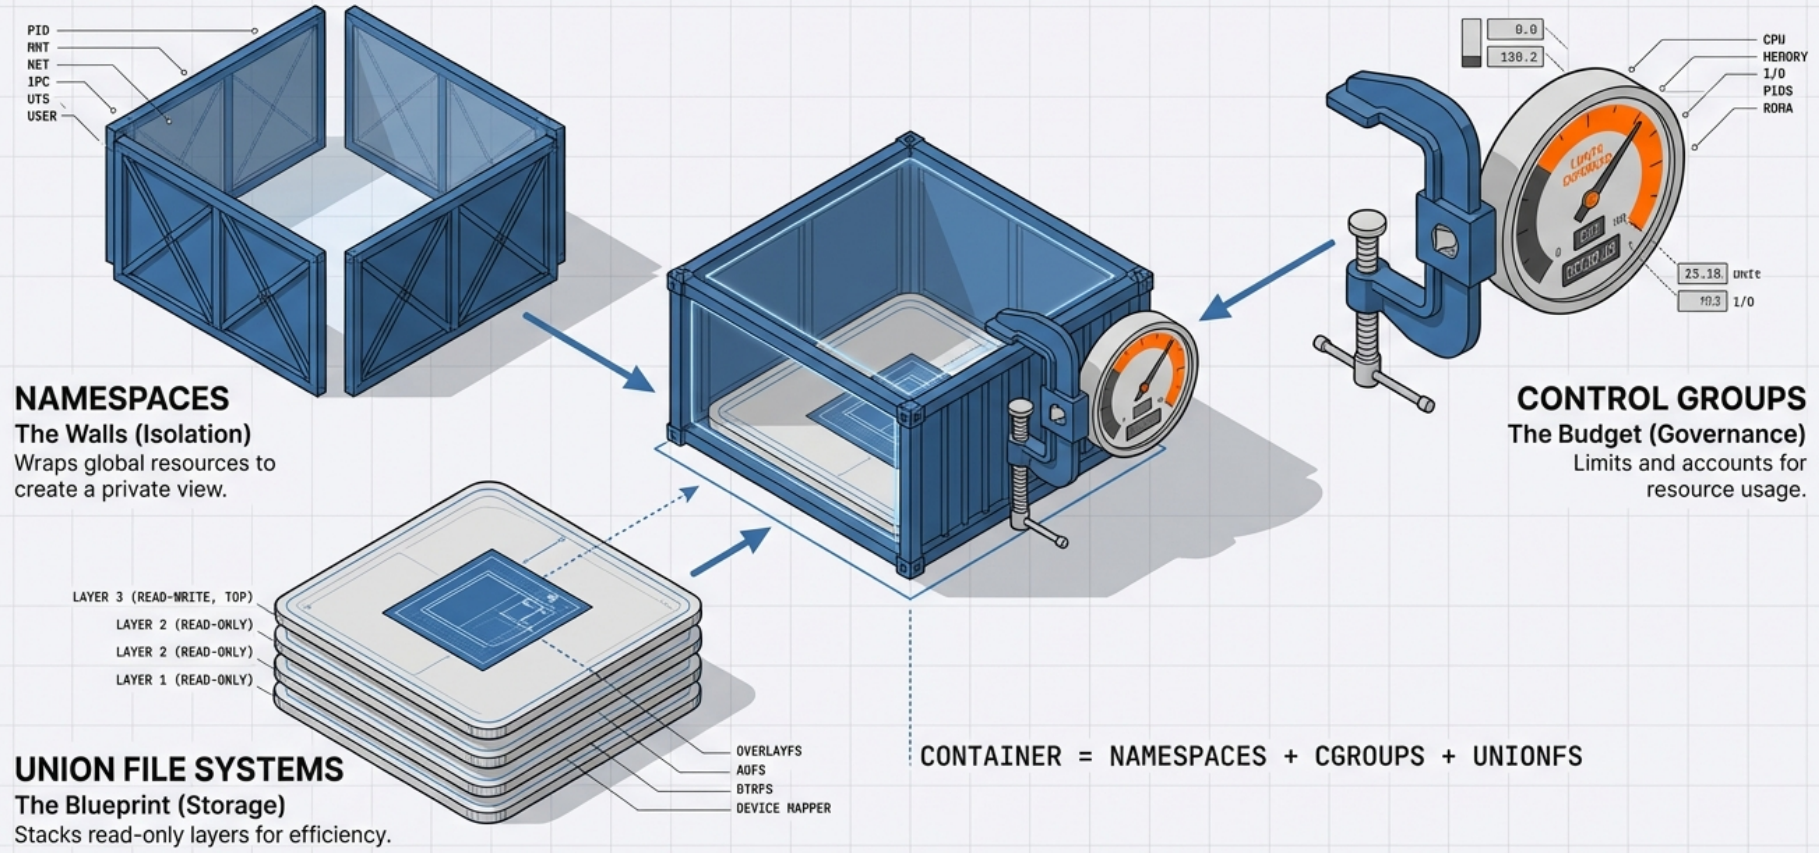
Section titled “The Linux Kernel Features That Make Containers Possible”Containers are not virtual machines. They don’t emulate hardware or run a full guest OS. Instead, they rely on three foundational Linux kernel features to provide isolation, resource control, and efficient storage.
1. Namespaces - Isolation
Section titled “1. Namespaces - Isolation”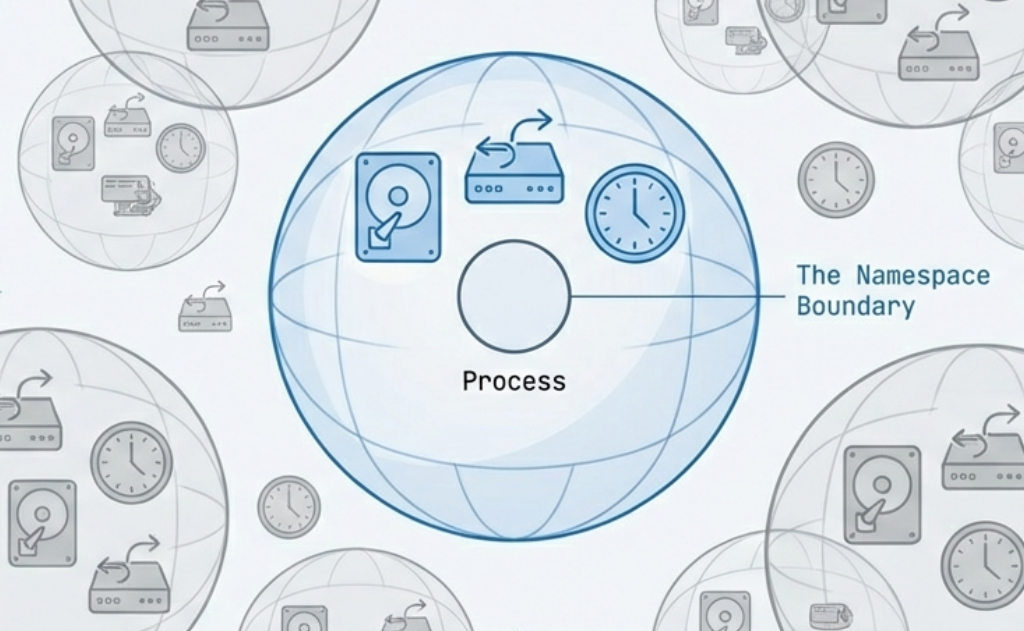
A namespace wraps a global system resource so that processes within the namespace have their own isolated view of it. From inside a namespace, a process believes it has the entire resource to itself.
PID Namespace (Process Isolation)
Section titled “PID Namespace (Process Isolation)”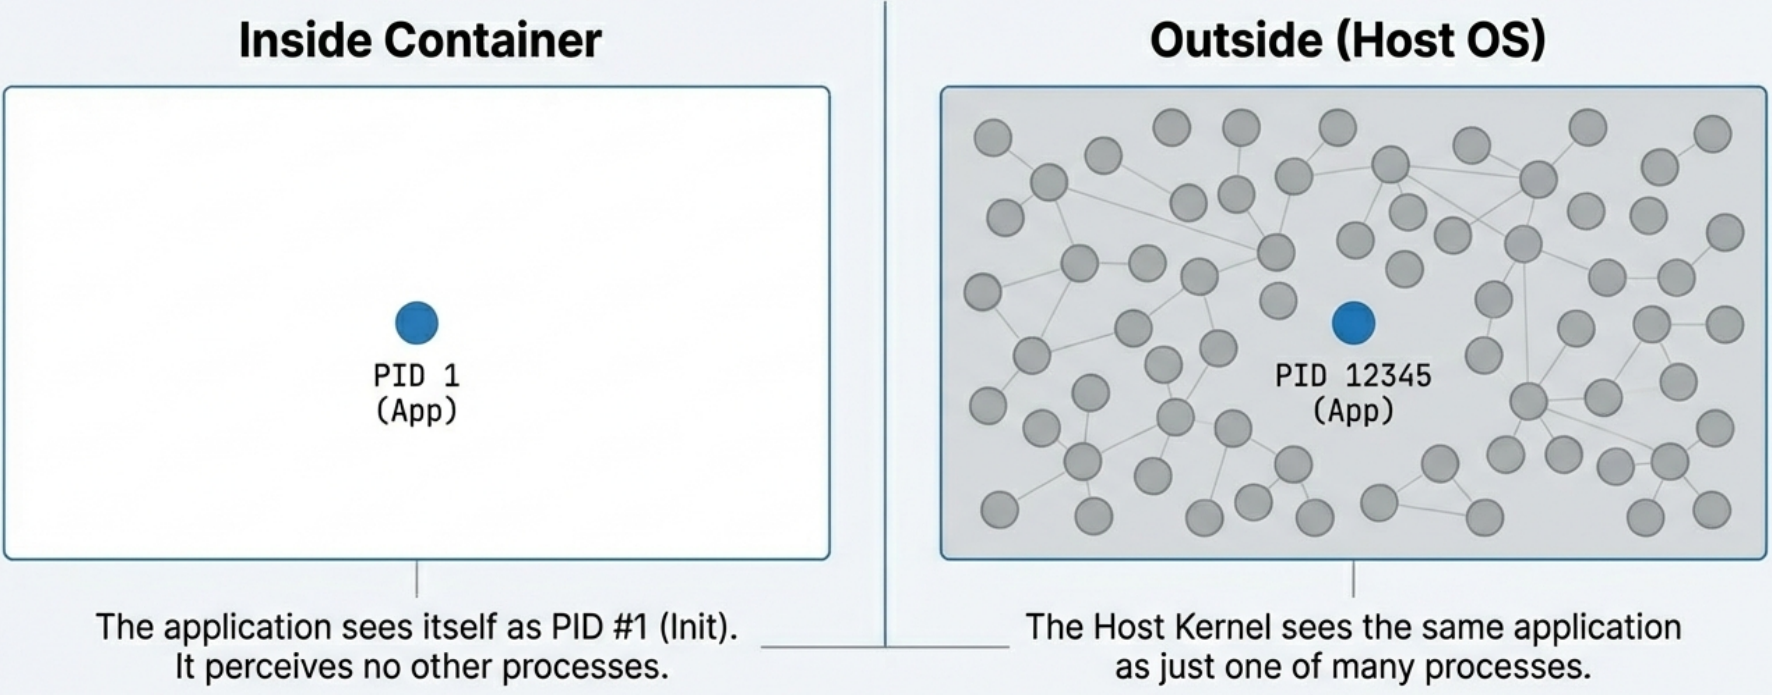
- Inside the container, your application’s main process is assigned PID 1,
even if on the host machine it’s actually running as PID 12345. - The process
cannot see, signal, or interact with processes running outside its PID
namespace. - This is why running
ps auxinside a container only shows the container’s own processes.
Network Namespace (Network Isolation)
Section titled “Network Namespace (Network Isolation)”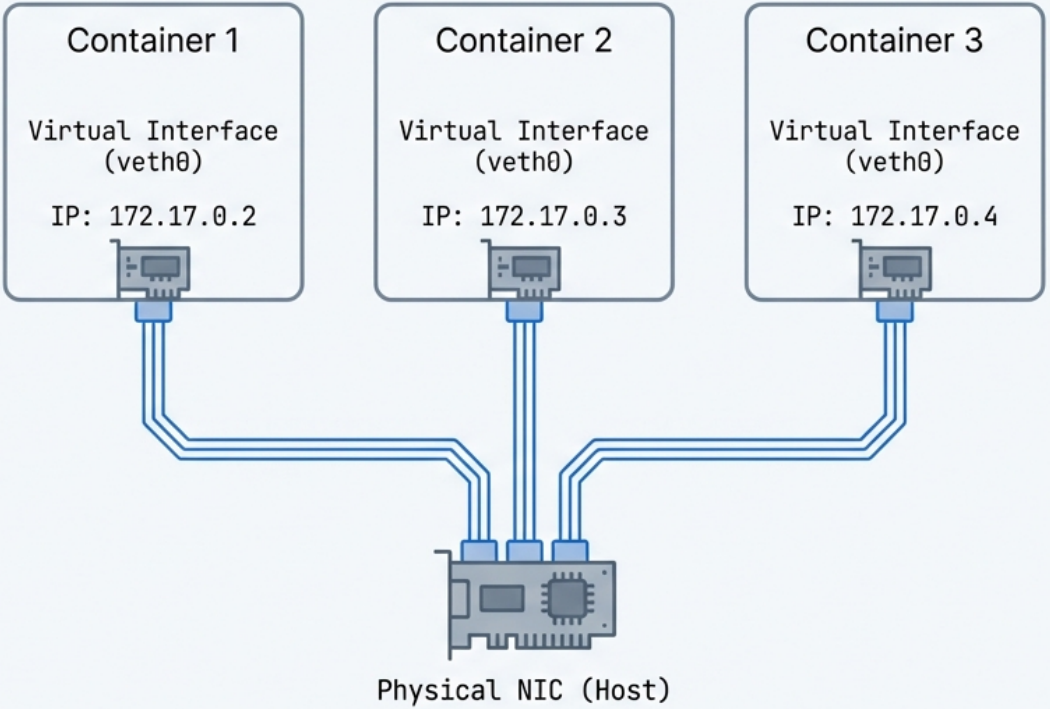
- Each container gets its own completely isolated network stack: its own IP
address, routing table, firewall rules (iptables), and ports. - Two containers
can each bind to port 8080 simultaneously without conflict, because they live in
different network namespaces. - The container runtime (e.g., Docker) creates
virtual ethernet pairs (
veth) to connect the container’s network namespace to the host.
Mount Namespace (File System Isolation)
Section titled “Mount Namespace (File System Isolation)”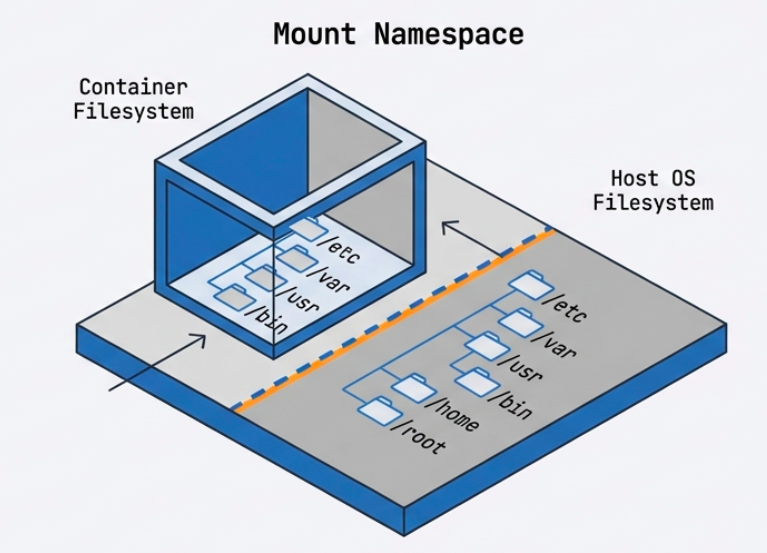
- Gives the container its own isolated view of the file system hierarchy. -
The container can have
/etc,/var,/home, etc. that are completely separate from the host’s file system. - Changes to the file system inside the container (in the writable layer) are invisible to the host and other containers.
Three tools work together to deliver complete filesystem isolation:
| Tool | Role |
|---|---|
| Union Filesystem (UFS) | Combines the image’s read-only layers into a single unified view for the container |
| MNT Namespace | Gives the container its own mount point, so it cannot see or traverse the host’s filesystem tree |
chroot | A kernel syscall that sets the image filesystem root as the container’s root (/), preventing the container from accessing anything above it on the host |
UTS Namespace (Hostname Isolation)
Section titled “UTS Namespace (Hostname Isolation)”- Allows the container to have its own hostname and domain name, independent of the host.
- This is why a container can report its hostname as
web-server-1while the host machine is namedprod-node-42.
IPC Namespace (Inter-Process Communication Isolation)
Section titled “IPC Namespace (Inter-Process Communication Isolation)”- Isolates IPC resources such as System V message queues and POSIX shared memory.
- Prevents processes in one container from interfering with IPC resources used by another.
User Namespace (User Identity Isolation)
Section titled “User Namespace (User Identity Isolation)”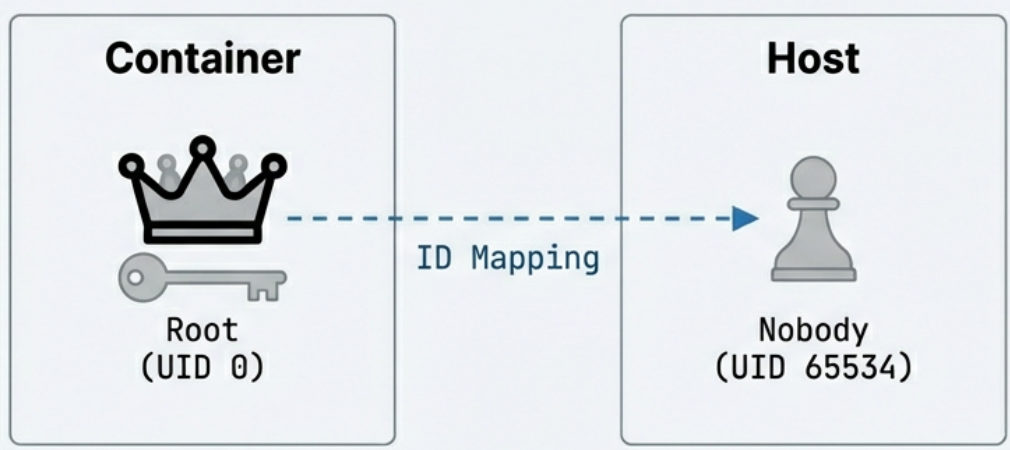
- Maps user IDs inside the container to different user IDs on the host. - A process running as UID 0 (root) inside the container can be mapped to an unprivileged user (e.g., UID 65534) on the host. - This is a critical security feature: even if a malicious process “escapes” the container, it runs as a non-privileged host user.
2. Control Groups (cgroups) - Resource Management
Section titled “2. Control Groups (cgroups) - Resource Management”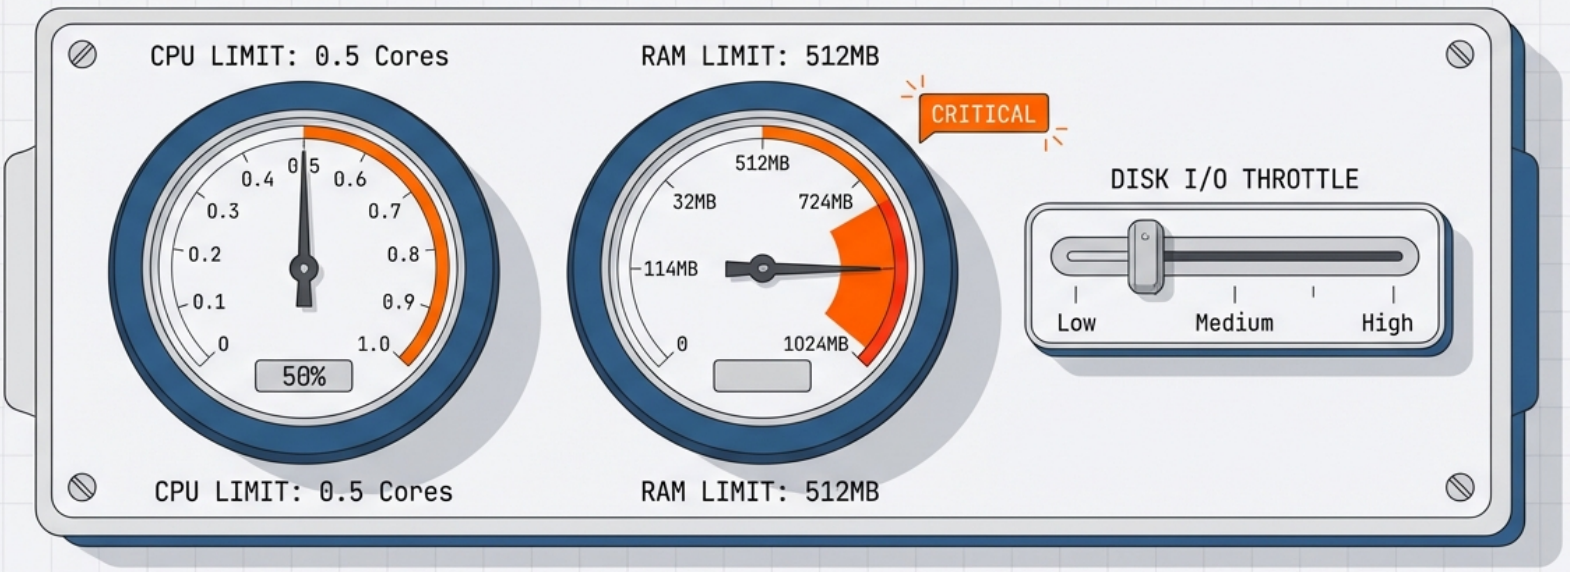
While namespaces provide isolation, cgroups provide resource governance. They allow the kernel to limit, account for, and isolate the resource usage of a group of processes.
CPU Limits
Section titled “CPU Limits”- You can cap how much CPU time a container’s processes receive.
- Example: Limit a container to 0.5 CPU cores, even on a 32-core machine.
- Implemented via CPU shares, CPU quotas, and CPU periods.
Memory Limits
Section titled “Memory Limits”- Set a maximum amount of RAM a container can use.
- Example:
--memory=512mrestricts the container to 512 MB of RAM. - If the container exceeds its memory limit, the kernel’s OOM (Out-Of-Memory) killer will terminate a process in the container.
Block I/O Limits
Section titled “Block I/O Limits”- Throttle the rate at which a container can read from or write to disk.
- Prevents one container from saturating disk bandwidth.
The “Noisy Neighbor” Problem
Section titled “The “Noisy Neighbor” Problem”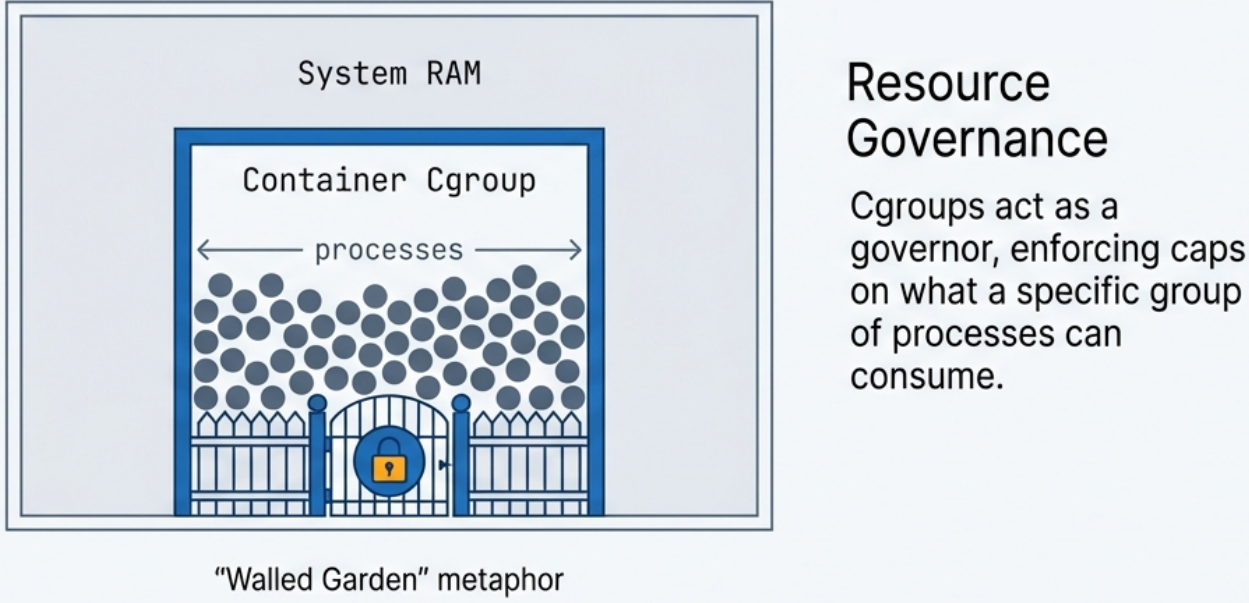
Without cgroups, a single poorly-written or malicious container could consume 100% of CPU or RAM, starving every other application on the same host. cgroups enforce guaranteed resource isolation, making multi-tenant container hosting reliable.
cgroups v1 vs. v2
Section titled “cgroups v1 vs. v2”
- cgroups v1: Each resource controller (cpu, memory, blkio) is managed separately. - cgroups v2: A unified hierarchy where all controllers are managed together. More modern and consistent. Required by some newer container runtimes.
3. Union File Systems & Copy-on-Write (CoW) - Storage
Section titled “3. Union File Systems & Copy-on-Write (CoW) - Storage”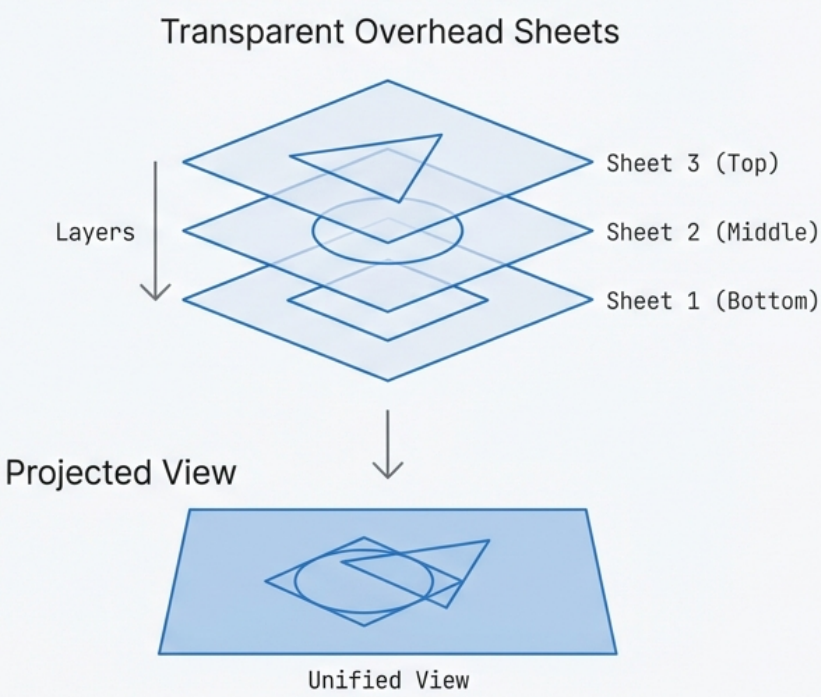
A Union File System combines multiple directories (called layers) into a single unified view. This layered architecture is what makes images lightweight, fast to pull, and highly efficient in storage and memory usage. It maintains two distinct perspectives:
- Upper view: The merged view of all layers combined
- Lower view: The view of the base layer only
Image Layers (Lower Layers - Read-Only)
Section titled “Image Layers (Lower Layers - Read-Only)”A container image is composed of multiple stacked, read-only layers. Each layer represents a set of file system changes (additions, modifications, deletions) from one build step.
Example layer stack for a Java web app:
[ Layer 4 ] → App JAR file added (top, most specific)[ Layer 3 ] → JDK installed[ Layer 2 ] → apt-get update + curl[ Layer 1 ] → Base Ubuntu 22.04 image (bottom, most general)Each layer is content-addressed - identified by a cryptographic hash of its contents. This means:
- If two images share the same base layer (e.g., Ubuntu 22.04), that layer is stored once on disk and shared in memory, even if 50 containers are running from different images.
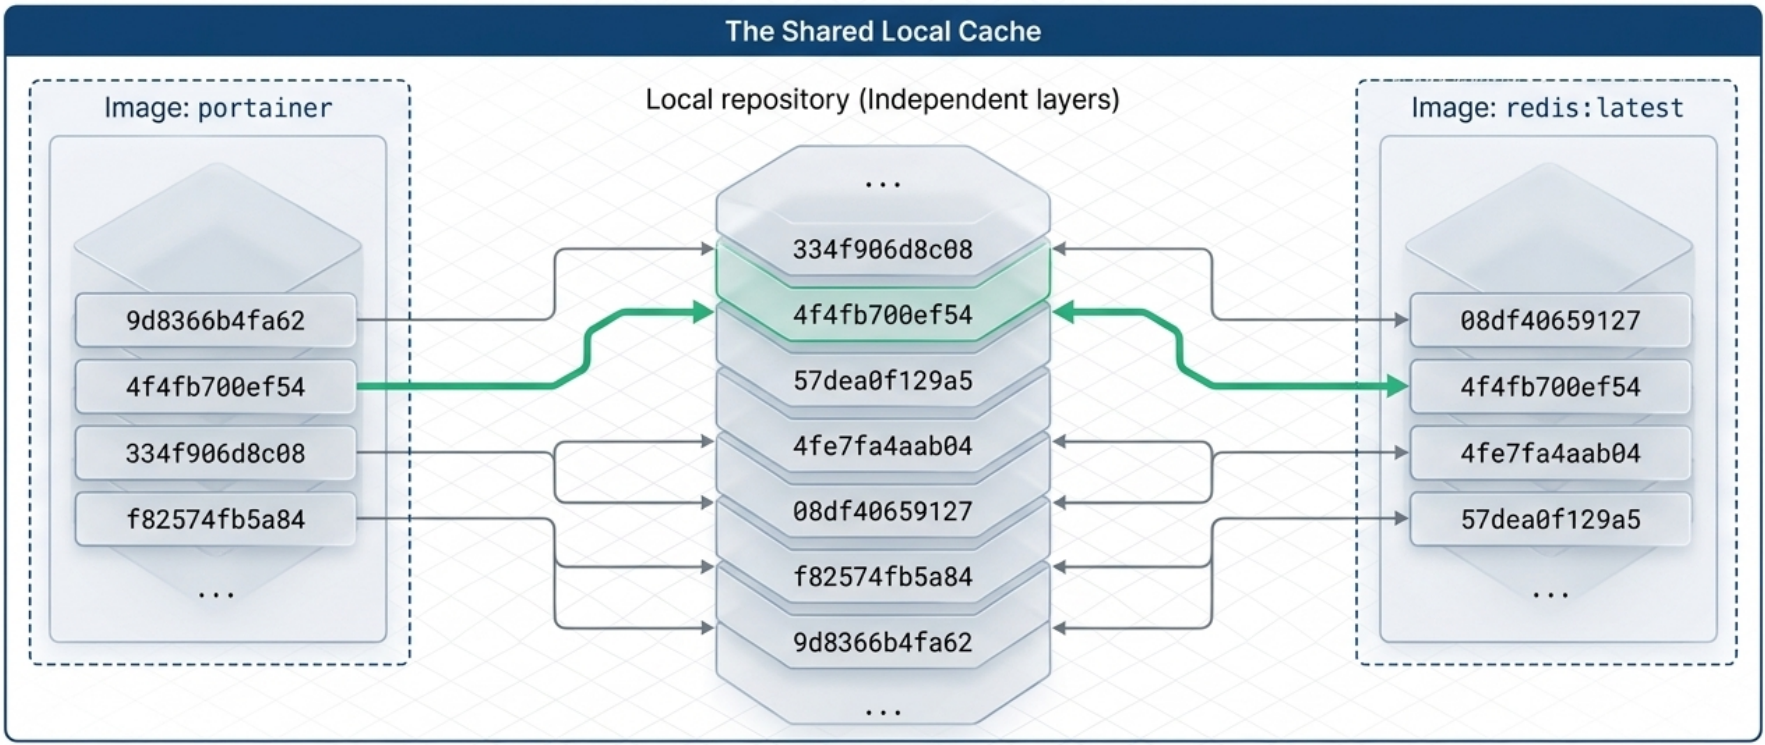
- Pulling a new image version is fast: only the changed layers need to be downloaded.
Each layer’s metadata includes its own identifier (cryptographic hash), the identifier of its parent layer, and the execution context of the container that created it. These relationships form a graph that Docker and the UFS use to assemble and verify images at build, pull, and run time.
Container Layer (Upper Layer - Read-Write)
Section titled “Container Layer (Upper Layer - Read-Write)”When a container is started, a thin, ephemeral read-write layer is added on top of the read-only image layers. This is the only place where the running container can write new data.
[ Container Layer ] → Read-Write (ephemeral, destroyed when container stops)─────────────────────────────────────────────────────────────────────────────[ Layer 4 ] → Read-Only ─┐[ Layer 3 ] → Read-Only │ These are the image layers - shared and immutable[ Layer 2 ] → Read-Only │[ Layer 1 ] → Read-Only ─┘Copy-on-Write (CoW) Mechanism
Section titled “Copy-on-Write (CoW) Mechanism”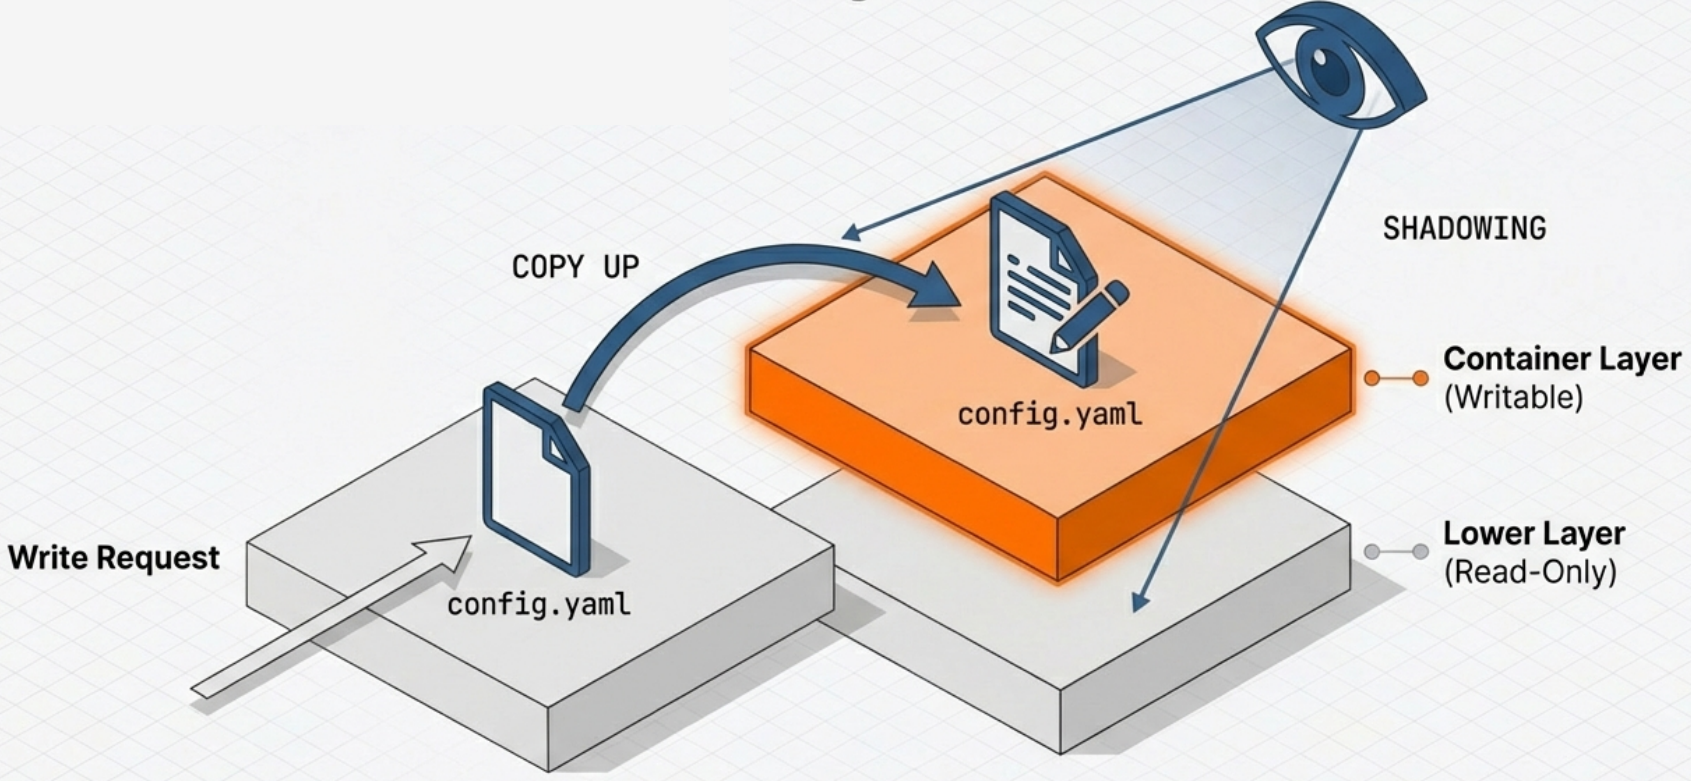
The key question is: what happens if a running container needs to modify a file that exists in a read-only layer?
The answer is Copy-on-Write:
- When a container process writes to a file that exists only in a read-only lower layer, the file system detects this.
- A copy of the file is made up into the writable container layer.
- The modification is applied to the copy in the upper layer.
- Subsequent reads of that file will see the modified version from the upper layer (it shadows the original below).
- When the container is deleted, the entire upper read-write layer is discarded - the original image layers remain perfectly intact.
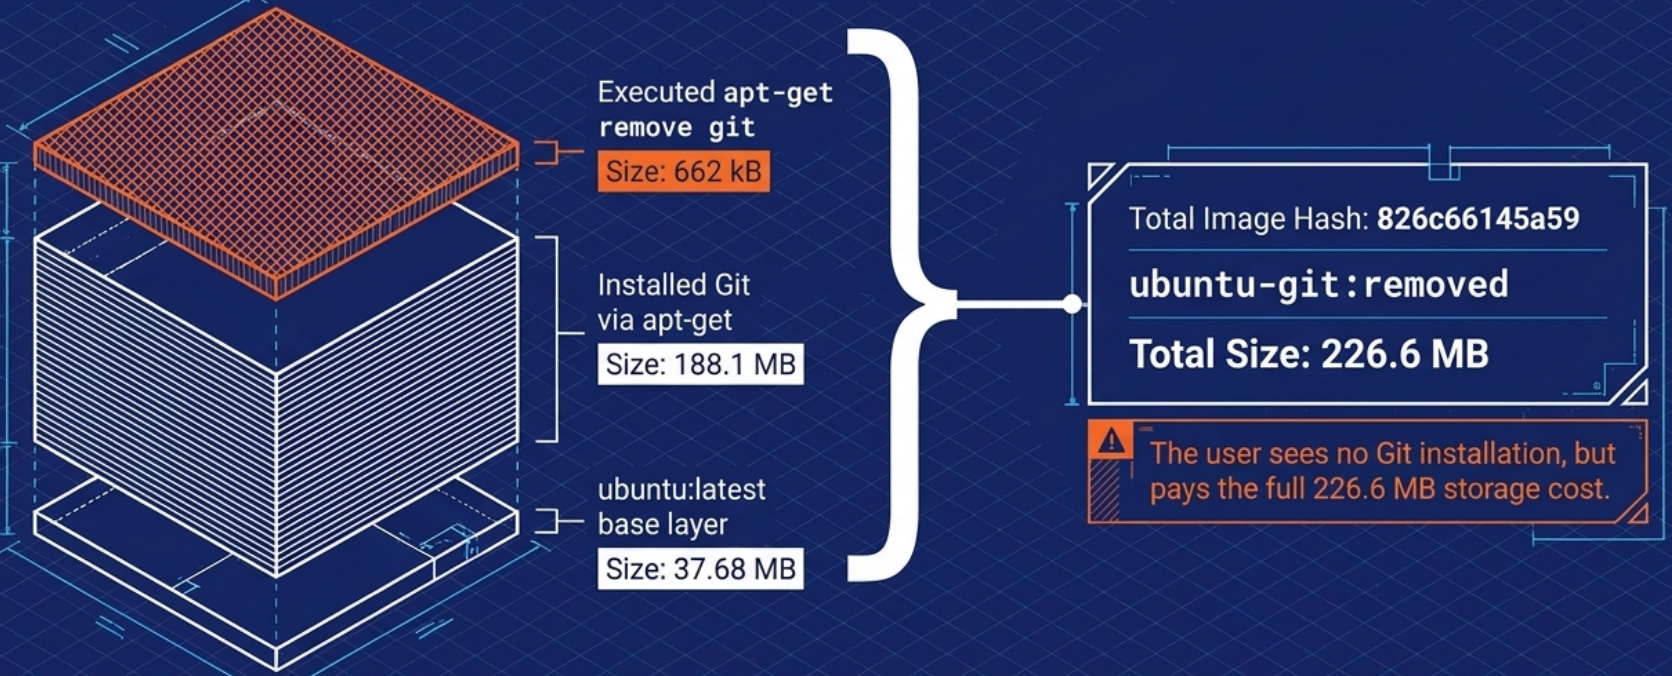
Deletions work differently. When a container process deletes a file that exists in a read-only layer, Docker writes a whiteout record to the writable container layer. The UFS interprets this whiteout and hides any version of that file in the layers below. The original file in the read-only layer is never touched - the whiteout simply masks it from view. The same mechanism applies to the parent folder when an entire directory is removed.
This is why stopping and removing a container does not destroy the image, and why you can spin up 100 containers from the same image without 100 copies of the image on disk.
Union File System Implementations
Section titled “Union File System Implementations”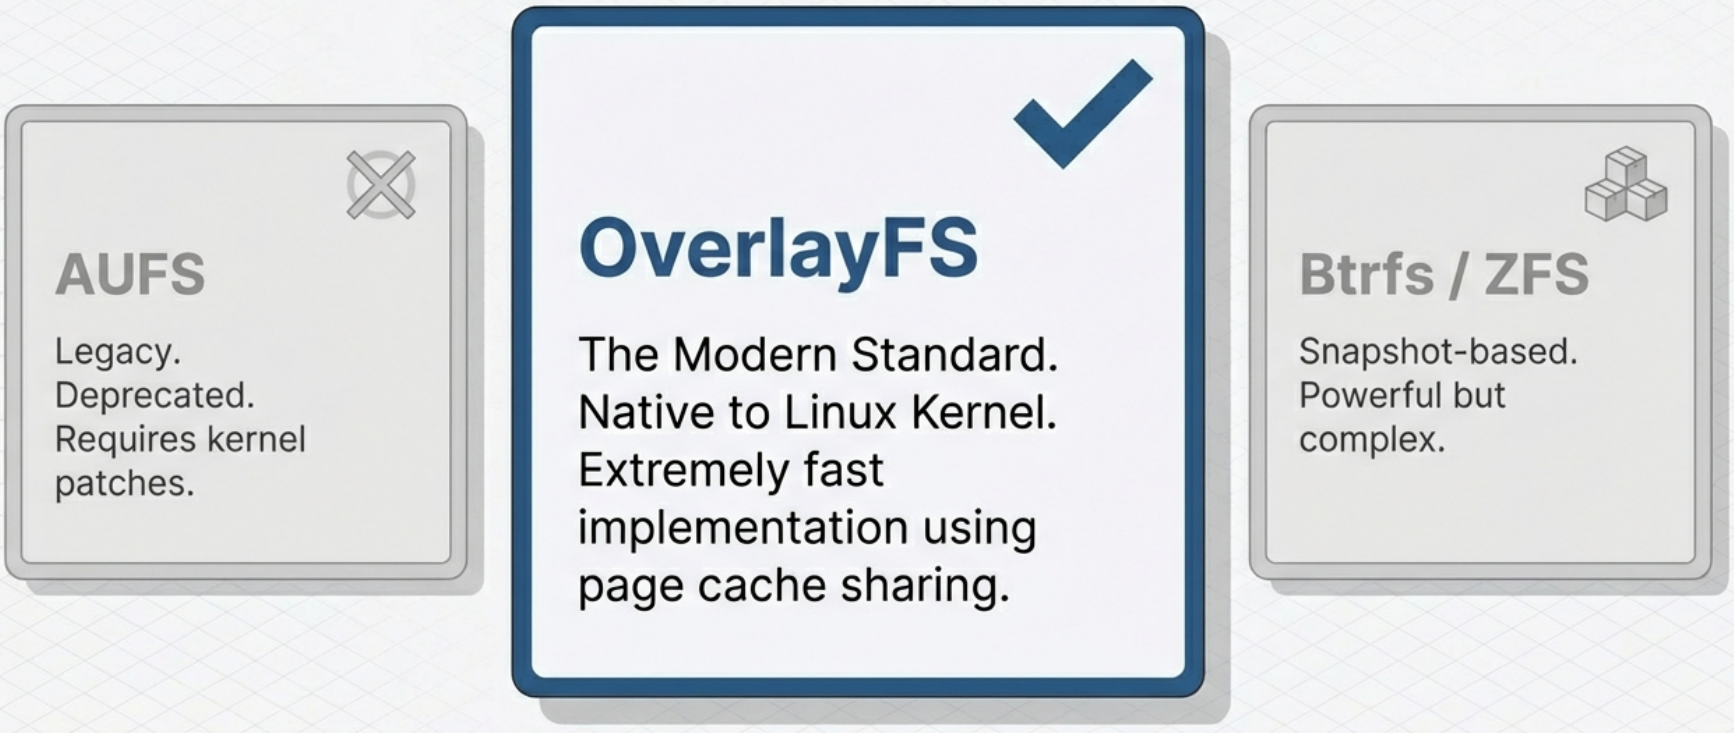
The “stacking” of layers into a single unified view is handled by a Union File System. Common implementations include:
| Implementation | Notes |
|---|---|
| OverlayFS | The default for Docker on modern Linux. Uses kernel-native overlay mounts. Very fast. |
| AUFS | (Historical - removed) Once the Docker default on Ubuntu. Required an out-of-tree kernel patch and was never merged into mainline Linux. Removed from Docker Engine 23.0 (February 2023) - no longer installable. Documented for context only. |
| Btrfs | A copy-on-write file system at the block level. Offers snapshots. |
| ZFS | Provides strong integrity guarantees and efficient snapshots. Less common for containers. |
| Device Mapper | (Historical - legacy only) Block-level thin provisioning. Was used in RHEL/CentOS 7 environments before OverlayFS became universal. Relevant only when maintaining very old systems; no new deployments should use this driver. |
Limitations of Union Filesystems
Section titled “Limitations of Union Filesystems”Union filesystems are powerful but carry some trade-offs worth knowing:
SELinux Extended Attributes
Because union filesystems translate between different filesystem conventions when merging layers, some implementations do not support certain metadata features - most notably SELinux extended attributes (xattrs). A layer built with SELinux labels may lose those labels or have them reinterpreted when merged. This can cause unexpected permission or policy enforcement issues in hardened environments.
Memory-Mapped Files (mmap)
Union filesystems use a copy-on-write pattern: when a process modifies a file in a read-only layer, the file is first copied up into the writable layer before the write is applied. This conflicts with mmap - the system call that maps a file directly into a process’s memory address space.
mmap requires the file to have a stable location on disk throughout the lifetime of the mapping. The CoW copy-up operation breaks that assumption: the file moves from the read-only layer to the writable layer mid-access, causing either:
- Silent data corruption for applications that assume address stability
SIGBUSerrors when the mapping becomes invalid- Severe performance degradation as the kernel repeatedly invalidates and rebuilds page-table entries
Applications most commonly affected:
- Relational databases (PostgreSQL, MySQL) - heavy use of mmap for WAL and data files
- JVM-based applications - the JVM maps class files and memory-mapped I/O directly
- Memory-mapped logging (e.g., LMDB, RocksDB)
- Elasticsearch - maps index files for performance
[!note] OverlayFS (the modern default) handles mmap significantly better than AUFS or Device Mapper did, but the fundamental CoW-vs-mmap tension still exists for write-heavy paths. The workaround remains authoritative.
The Workaround: Volumes
Mount a volume at any path where the application performs mmap-heavy writes. Volumes bypass the union filesystem entirely and write directly to the host filesystem, eliminating both the CoW overhead and the mmap stability issue.
# Mount a volume at the path an mmap-heavy app writes to,# bypassing the union filesystem for that directory:docker run -v my-data:/var/lib/postgresql/data postgresFilesystem Attribute Changes (Ownership and Permissions)
Changes to filesystem attributes - such as file ownership (chown) and permissions (chmod) - are recorded by the UFS in exactly the same way as changes to file content. The practical implication: if you run chown or chmod on a large number of files in a single layer, every one of those files gets copied into the new layer even though their content is unchanged. This can silently inflate layer sizes significantly. Keep attribute changes targeted and combine them with the instruction that first creates the files to avoid creating a bloated extra layer.
Hidden Bloat and the Flatten Anti-Pattern
Because whiteouts hide but never delete, and because every RUN instruction adds a layer, images can accumulate invisible bloat over time. The temptation is to “flatten” the image by collapsing all layers into one:
# ❌ Anti-pattern: flattening destroys critical image metadatadocker image save my-app | docker image import - my-app:flatThis is the wrong solution - it costs you:
- Metadata - entrypoint, env vars, labels, exposed ports, and the full execution context are lost
- Change history -
docker historybecomes a single opaque entry, making debugging impossible - Layer sharing - consumers who already have your base layers cached must re-download the entire image from scratch
The correct approach is to branch instead of flatten - go back to an earlier point in the image’s layer history and create a new image from there, keeping only the layers you need. Better still, automate construction with a Dockerfile and combine operations into single RUN steps to prevent bloat from accumulating in the first place. Every Dockerfile build is a reproducible, auditable branch - without the manual error-prone steps of the flatten workaround.
Exporting and Importing Filesystems (Legitimate Uses)
While flattening a production image is an anti-pattern, there are legitimate reasons to work with container filesystems outside the union filesystem context entirely - and Docker provides two commands for this:
| Command | What it does |
|---|---|
docker container export | Streams the full flattened filesystem of a container to a tarball (stdout or file). Represents what the container actually sees - the merged union of all layers. |
docker image import | Streams a tarball into Docker as a new single-layer image. Supports compressed and uncompressed formats. An optional Dockerfile instruction can be applied during import. |
# Export a running or stopped container's filesystem to a tar archivedocker container export my-container -o my-container-fs.tar
# For just a few files, docker cp is more directdocker cp my-container:/etc/nginx/nginx.conf ./nginx.conf
# Import a filesystem tarball as a new minimal base image# (optional: apply a Dockerfile instruction inline with --change)docker image import my-container-fs.tar my-base-image:latestdocker image import --change 'CMD ["/bin/sh"]' my-fs.tar my-base:minimal
When to use these:
-
You need to inspect or use the container’s merged filesystem outside Docker (e.g., forensic analysis, extracting artifacts)
-
You are bootstrapping a minimal base image from a filesystem you built externally (e.g., a custom root fs created with
debootstraporbuildroot) -
You need more than a few files -
docker cpworks for individual files, butexportis more direct for bulk extraction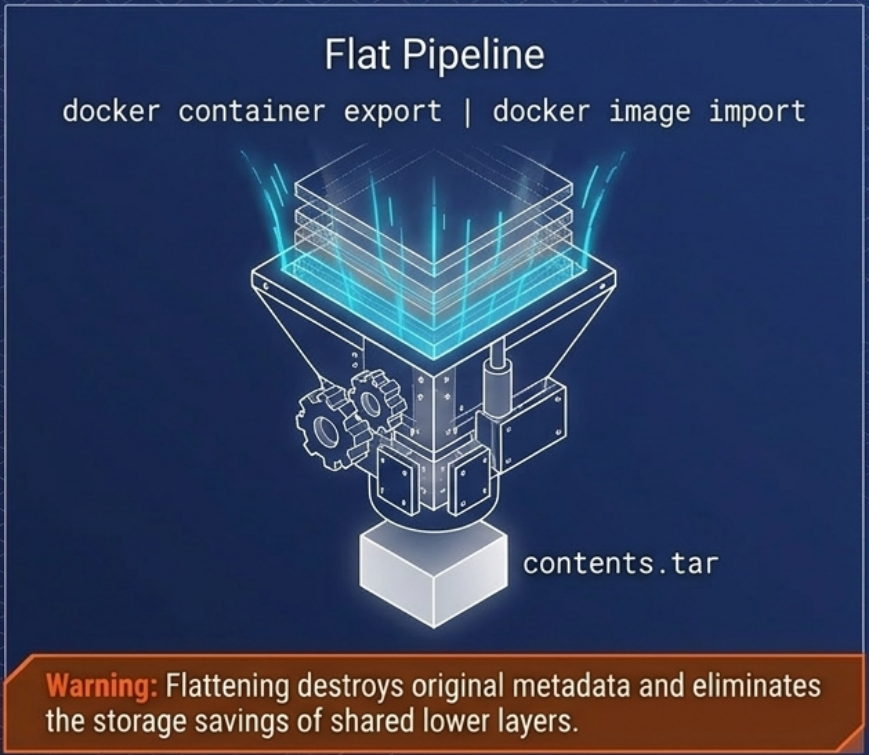
Putting It All Together: The Full Container Lifecycle
Section titled “Putting It All Together: The Full Container Lifecycle”1. Build → Dockerfile instructions create stacked read-only image layers each layer hashed and stored
2. Push/Pull → Only missing layers are transferred over the network shared layers are reused from local cache
3. Start → Runtime creates: • New set of Namespaces (pid, net, mnt, uts, ipc, user) • New cgroup for the container's processes • A writable CoW layer on top of the image layers • A virtual network interface with an IP address
4. Running → Process runs in isolation sees its own PID 1, its own /etc, its own IP cgroups enforce CPU/memory limits writes go to the ephemeral upper layer
5. Stop/Delete → Running processes are terminated The ephemeral read-write layer is discarded Image layers remain untouched Namespaces and cgroups are torn down